DPX 4.11 Guide
Catalogic SoftwareKnowledge BaseMySupport
  • Welcome to DPX!
  • Introduction
    • About DPX
  • Installation and Configuration
    • How to Start – Basic Configuration
      • Protocols Used for Backup and Restore Data Transfer
    • DPX Master Server
      • Deploying DPX with VMware vSphere
        • Auxiliary Tasks for VMware Deployment
      • Deploying DPX with Microsoft Hyper-V
        • Auxiliary Tasks for Hyper-V Deployment
      • DPX Master Server Interface
      • Connecting to DPX Master Server via SSH
      • Configuration
    • DPX Client
      • DPX Client for Microsoft Windows
        • Requirements
        • Installation
        • How to Uninstall
      • DPX Client for Linux
        • Requirements
        • Installation
        • How to Uninstall
      • Automated Deployment of DPX Client
      • Further Actions with DPX Client
    • DPX Proxy Server
      • Deploying DPX Proxy Server for VMware
      • DPX Proxy Server Web Interface
    • DPX Hyper-V Agent
    • Nodes
      • Adding a Client Node to the Master Server during Client Deployment
      • Adding a Client Node from the Master Server Level
      • Adding a vStor Storage Node
      • Adding a Configured Hyper-V Host as a DPX Node
      • Adding Other Node Types to the Master Server
      • Adding a Node Group
    • Devices
      • Adding a Device Cluster
      • Adding a Device
      • Adding a Tape Library
      • Adding a Tape Library Device
    • Media
      • Adding a Media Pool
      • Adding Media Volumes
    • Tape Libraries
      • Tape Library Deployment
      • Tape Library Setup
      • Manual Tape Library Installation
      • Tape Library Verification
      • Manual Tape Library Configuration
      • Setting up LTO Tape Drives for Hardware Encryption
        • Assigning and Unassigning Media to/from Tape Library Slots
    • User Configuration
      • Configure Administrators Window
    • Other Components of the DPX Suite
  • Storage
    • Backup Destinations
    • Tape Storage
    • vStor
    • Disk Directory
    • NetApp
      • NetApp SnapVault Management
        • Terminology for NetApp SnapVault Management
        • NetApp SnapVault Management Setup and Configuration
    • Cloud Storage
      • Registering AWS S3 Cloud Storage
      • Registering a Generic Cloud Storage
  • Backup
    • Introduction and Backup Types
    • File Backup
      • Creating a File Backup Job
        • Job Source Options for File Backup
        • Job Destination Options for File Backup
        • Other Job Options for File Backup
      • Editing a File Backup Job
      • Scheduling a File Backup Job
    • Block Backup
      • Prerequisites
      • Creating a Block Backup Job
        • Job Options for Block Backup
      • Editing a Block Backup Job
      • Scheduling a Block Backup Job
      • Forcing a Base Backup
      • Backing up System State
      • Backing up System Table
      • NetApp SnapVault Management Backup
    • Application Backup
      • Microsoft SQL Server Backup
        • Creating a Microsoft SQL Server Backup Job
        • AlwaysOn Database Backup
      • Microsoft Exchange Server Backup
        • Creating a Microsoft Exchange Server Backup Job
      • Microsoft SharePoint Server Backup
        • SharePoint Installation and Configuration Requirements
        • Creating a Microsoft SharePoint Server Backup Job
      • SAP HANA Backup
      • Oracle Database Backup
        • Creating an Oracle Database Backup Job
      • OpenText GroupWise Backup
        • Creating a GroupWise Backup Job
    • Bare Metal Recovery (BMR) Backup
      • Creating a BMR Backup Job
    • Catalog Backup
      • General Considerations
      • Creating a Catalog Backup Job
        • Job Options for Catalog Backup
      • Editing a Catalog Backup Job
      • Scheduling a Catalog Backup Job
    • NDMP Backup (desktop interface only)
      • Prerequisites
      • Creating an NDMP Backup Job
        • Job Source Options for NDMP Backup
        • Job Destination Options for NDMP Backup
        • Other Job Options for NDMP Backup
      • Editing an NDMP Backup Job
      • Scheduling an NDMP Backup Job
    • Image Backup (desktop interface only)
      • Creating an Image Backup Job
      • Editing an Image Backup Job
      • Scheduling an Image Backup Job
    • Agentless Backup for VMware and Hyper-V
      • Agentless Backup for VMware
        • Agentless Backup for VMware Complements Block Data Protection
        • Agentless VMware Backup Architecture and Data Flow
        • Environmental Requirements for Agentless VMware Backup
        • Best Practices for Agentless VMware Backup
        • Creating an Agentless VMware Backup Job
          • Job Source Options for Agentless VMware Backup
          • Other Job Options for Agentless VMware Backup
        • Editing an Agentless VMware Backup Job
        • Scheduling a VMware Backup Job
        • Application-Consistent Protection
        • Architecture and Data Flow
      • Agentless Backup for Microsoft Hyper-V
        • Creating a Hyper-V Backup Job
        • Editing a Hyper-V Backup Job
        • Scheduling a Hyper-V Backup Job
    • Differential and Incremental Backups
    • Archive
      • Creating an Archive Job for Block Backup
      • Creating an Agentless VMware Archive Job
  • Restore
    • Introduction and Restore Modes
    • Restore Modes in the Web Interface
      • Full VM Restore for VMware
      • Full VM Restore for Hyper-V
      • Instant VM Restore
      • Multi-VM Restore 🆕
        • Job Options for Multi-VM Restore
        • Advanced Filters
      • Agentless File Restore
      • File Restore from Block Backup
        • Advanced Job Options
      • Instant Access
      • Virtualization
      • Application Restore
        • Microsoft SQL Server Restore
        • Microsoft Exchange Server Restore
        • Microsoft Sharepoint Server Restore
        • Oracle Database Restore
        • OpenText GroupWise Restore
      • File Restore from File Backup
        • Job Options for File Restore from File Backup
    • Restore Modes in the Desktop Interface
      • File Restore
        • Creating a File Restore Job
      • Image Restore
        • Creating an Image Restore Job
      • NDMP Restore
        • Creating an NDMP Restore Job
      • Block Restore
        • Creating a Block Restore Job
          • Block Restore Job Options
        • Specifying Mount Points
        • Restoring Block Data with Instant Access
        • Restoring BMR Data with Virtualization
        • NetApp SnapVault Management Restore
      • Agentless VMware Restore
        • Creating an Agentless VMware Restore Job
          • Agentless VMware Restore Job Operations
        • Rapid Return to Production (RRP)
      • Tape Restore
        • Creating a Tape Restore Job
      • Application Restore
      • Scheduling a Restore Job in the Desktop Interface
        • Previewing Scheduled Jobs in the Desktop Interface
      • Restore Job Source Options
    • Catalog Restore
      • Creating a Catalog Restore Job
    • Bare Metal Recovery (BMR) Restore
    • Recovering Archived Backups
      • Recovering a VMware Archive
  • Web Interface
    • Log-in Page
    • Dashboard
    • Job Monitor
    • Job Manager
    • Schedule Overview
    • Reports
      • Reports Templates
    • Nodes
    • Devices & Pools
    • Events
    • Configuring Enterprise Information
    • Configuring Custom SSL Certificates
  • Desktop Interface
    • Connect to DPX Window
    • Main Window
    • Common Menu Bar Options
    • Function Tabs Desktop Interface
      • Backup Tab
      • Restore Tab
      • Monitor Jobs Tab
      • Control Devices Tab
      • Reports Tab
      • Catalog Tab
      • Copy Tab
      • Manage Tapes Tab
      • Configure Tab
      • [Legacy] Analytics Tab
    • Common Function Window Tasks
    • Configuring Parameters
    • Configuring the Enterprises
      • Editing an Enterprise Configuration
      • Configuring Devices
  • BARE METAL RECOVERY
    • Bare Metal Recovery Overview
    • Bare Metal Recovery for Windows
    • Bare Metal Recovery for Linux
    • Recovery from a Replicated or Alternate Data Resource
  • MAINTENANCE
    • Condense
      • Starting a Condense Job
      • Scheduling a Condense Job (desktop interface only)
    • Job-Related Information
      • Job Return Codes
      • Job Status and Available Actions
    • Collecting Logs
    • Getting Node Information
    • File Exclusion Rules
    • Managing Licenses
    • Pre-Scripts and Post-Scripts
    • Updating DPX
      • Command Line Update
      • Online Autoupdate Method
      • Offline Autoupdate Method
  • Miscellaneous
    • Configuring Keyrings
      • Adding a Keyring
      • Adding a Key
    • SNMP Interface
    • Troubleshooting
      • Troubleshooting Unsuccessful Multi-VM Restore Cleanup
      • Troubleshooting Installation of the Catalogic DPX Client on UNIX and UNIX-like Systems
      • Managing the CMAgent Service
    • Technical Support
    • Terminology
    • Acronyms
    • Default Ports
Powered by GitBook
On this page
  1. Installation and Configuration
  2. Media

Adding a Media Pool

PreviousMediaNextAdding Media Volumes

Last updated 9 months ago

Before adding a media pool, review the following prerequisites:

  • It is desirable for media pools to correspond to logical groups, such as business components (SALES_POOL, MARKET_POOL, etc.) or physical locations (EAST_POOL, WEST_POOL, etc.).

  • It is advantageous to locate a pool of media volumes near the backup devices where the volumes are mounted. This avoids the delay that can result when an operator must search elsewhere for the media volume requested by Catalogic DPX.

  • If the media pool is used for multiple device clusters, the device clusters and the media pool must be near each other. As you cannot predict the media volumes in the pool for which Catalogic DPX prompts, all free volumes in a pool must be easily available to all device clusters that might need it.

To add a media pool in DPX, do the following:

  1. Go to Devices & Pools in the sidebar. Switch to the Media Pools tab, then select the Add Media Pool button in the upper right corner. If you have added a device cluster through the web interface and kept the Automatically create corresponding media pool toggle on, some media pools (with the mp- prefix may already be on the list. They will be of Disk Directory type. Otherwise, the list is empty. See .

The Add Media Pool dialog will open.
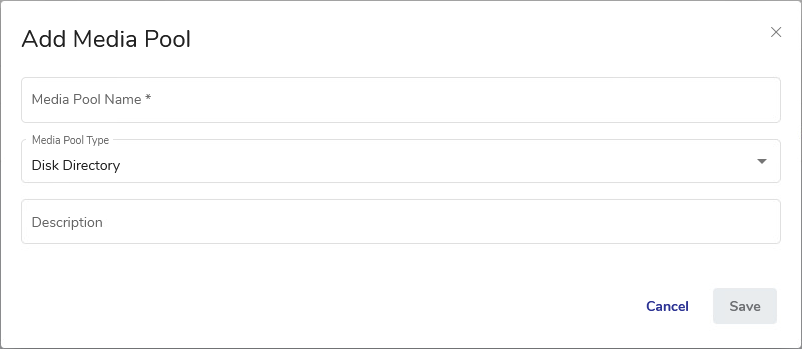
  1. Specify the Media Pool Name. The name may only include alphanumeric characters (a-z, A-Z, 0-9), underscores (_) and hyphens (-). No other special characters are allowed. The name cannot be longer than 48 characters. The field is case-insensitive.

  2. Select Media Pool Type. Currently, only two types are available in the web interface:

    • Disk Directory

    • Cloud

    For other types, head to the desktop interface.

    If you select Cloud, an additional AWS S3 Storage Class drop-down will appear. There are three classes to choose from:

    • STANDARD

    • GLACIER

    • DEEP_ARCHIVE

  3. Optionally, you can add a brief description (max. 48 characters).

  4. Click Save. The Media Pool is now added.
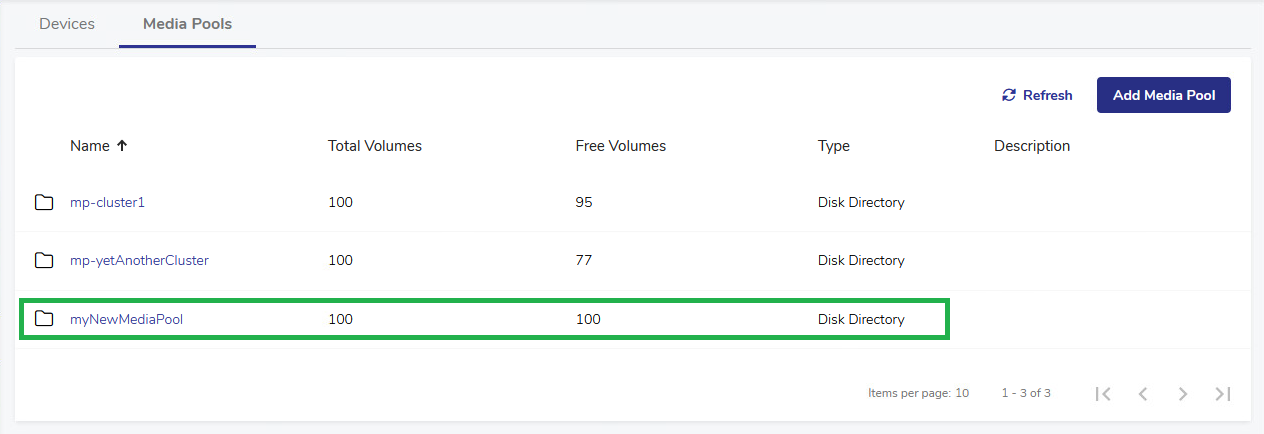
Note. For Disk Directory, media pools are automatically created with 100 volumes.

  1. Select the Configure tab, then click Media.

  2. In the main pane, select New_Enterprise and click Add Media Pool in the Media Pool Tasks section of the task panel to open the ADD MEDIA POOL dialog pane.
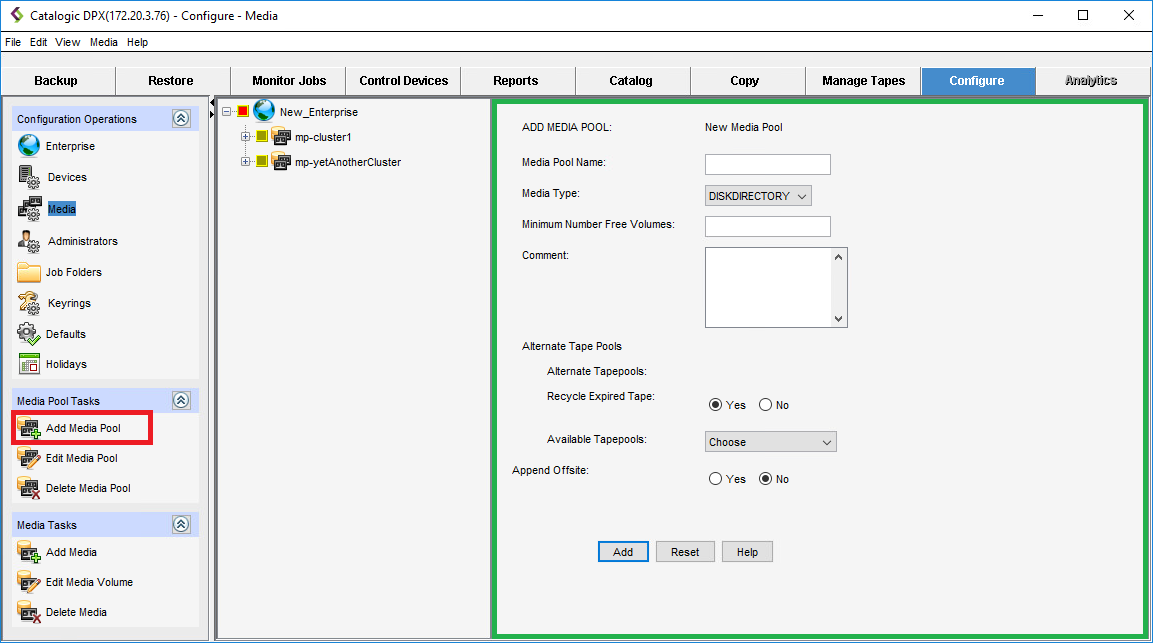
  1. In the Add Media Pool dialog, enter the following fields:

Media Pool Name

Specify the name of the new pool. The name may only include alphanumeric characters (a-z, A-Z, 0-9), underscores (_) and hyphens (-). No other special characters are allowed. The name cannot be longer than 48 characters.

If your scratch pool name contains more than one number, only one of the numbers can be used to associate the scratch pool to a scratch pool on the tape library server. You can specify which end of the scratch pool name should be parsed for the associating number using either the -A right or -A left option. -A right (the default) will use the first number from the right of the scratch pool name, and -A left will use the first digit from the left. For example, use the option -A left to associate scratch pool BEXI_2_aug29 with scratch pool2 on your tape library server, and use -A right to associate scratch pool BEXS_US7year_1 with scratch pool1 on your tape library server. On Windows, add either -A right or -A left to the SSJUKER registry entry. On UNIX, add either -A right or -A left to the SSJUKER file in the bin subdirectory of the directory in which Catalogic DPX is installed.

Attention! Do not update registries or environmental variables unless you fully understand what changes you are making. Bad registries or environmental variables can adversely affect applications or operating systems. You can Contact Catalogic Software Data Protection Technical Support for assistance.

Media Type

Select one of the following media types to register:

  • DISKDIRECTORY

    Use this media type to back up to DiskDirectory.

  • LTO

  • CLOUD

    Use this media type to register the Amazon S3 storage or a supported storage compatible with the Amazon S3 interface. You can use either the Amazon S3 Standard, Glacier, or Deep Glacier.

  • DLT

  • GENERIC

  • 3480

  • 9840

All media volumes in a pool must be the same media type.

Minimum Number Free Volumes

Enter the minimum number of free media volumes allowed in the pool. When the number of free volumes falls below this number, Catalogic DPX issues a warning message. A practical threshold value is 2 times the number of drives. This quantity ensures you receive warnings early enough to acquire new media volumes.

Comment (optional)

Enter an optional comment up to 48 characters.

Alternate Tape Pools

You can specify the alternate tape pools for the tape libraries. This option is not available for the cloud media.

  • Recycle Expired Tape

    When Catalogic DPX uses a tape from an alternate pool, it becomes part of the primary pool. Catalogic DPX allows you to recycle those volumes back to the alternate pool upon expiration.

    Select Yes to recycle expired volumes for the alternate pool. Or, select No so that the volumes in the alternate pools remain in the primary pool upon expiration.

  • Available Tape Pools

    Select an alternate pool in the Enterprise.

  • Append Offsite

    Select Yes so that DPX appends tape libraries with the Offsite status to the alternate pool. In this case, you must enable the Append Offsite option in the backup’s Job Destinations. Or, select No so that DPX does not append the tape library with the Offsite status to the alternate pool.

  • Click Add to add the new media pool in the Enterprise.

These are just types of AWS S3 subscription plans. You can learn more from the .

Note. Media pools used with libraries controlled by the interface of the manufacturer require special naming conventions. For more information, see below.

See also. For more information about registering cloud storage with Catalogic DPX, see in the DPX 4.9.x User’s Guide.

provider’s website
Chapter 8: Cloud Storage
Special Media Pool Naming Conventions
Adding a Device Cluster