DPX 4.11 Guide
Catalogic SoftwareKnowledge BaseMySupport
  • Welcome to DPX!
  • Introduction
    • About DPX
  • Installation and Configuration
    • How to Start – Basic Configuration
      • Protocols Used for Backup and Restore Data Transfer
    • DPX Master Server
      • Deploying DPX with VMware vSphere
        • Auxiliary Tasks for VMware Deployment
      • Deploying DPX with Microsoft Hyper-V
        • Auxiliary Tasks for Hyper-V Deployment
      • DPX Master Server Interface
      • Connecting to DPX Master Server via SSH
      • Configuration
    • DPX Client
      • DPX Client for Microsoft Windows
        • Requirements
        • Installation
        • How to Uninstall
      • DPX Client for Linux
        • Requirements
        • Installation
        • How to Uninstall
      • Automated Deployment of DPX Client
      • Further Actions with DPX Client
    • DPX Proxy Server
      • Deploying DPX Proxy Server for VMware
      • DPX Proxy Server Web Interface
    • DPX Hyper-V Agent
    • Nodes
      • Adding a Client Node to the Master Server during Client Deployment
      • Adding a Client Node from the Master Server Level
      • Adding a vStor Storage Node
      • Adding a Configured Hyper-V Host as a DPX Node
      • Adding Other Node Types to the Master Server
      • Adding a Node Group
    • Devices
      • Adding a Device Cluster
      • Adding a Device
      • Adding a Tape Library
      • Adding a Tape Library Device
    • Media
      • Adding a Media Pool
      • Adding Media Volumes
    • Tape Libraries
      • Tape Library Deployment
      • Tape Library Setup
      • Manual Tape Library Installation
      • Tape Library Verification
      • Manual Tape Library Configuration
      • Setting up LTO Tape Drives for Hardware Encryption
        • Assigning and Unassigning Media to/from Tape Library Slots
    • User Configuration
      • Configure Administrators Window
    • Other Components of the DPX Suite
  • Storage
    • Backup Destinations
    • Tape Storage
    • vStor
    • Disk Directory
    • NetApp
      • NetApp SnapVault Management
        • Terminology for NetApp SnapVault Management
        • NetApp SnapVault Management Setup and Configuration
    • Cloud Storage
      • Registering AWS S3 Cloud Storage
      • Registering a Generic Cloud Storage
  • Backup
    • Introduction and Backup Types
    • File Backup
      • Creating a File Backup Job
        • Job Source Options for File Backup
        • Job Destination Options for File Backup
        • Other Job Options for File Backup
      • Editing a File Backup Job
      • Scheduling a File Backup Job
    • Block Backup
      • Prerequisites
      • Creating a Block Backup Job
        • Job Options for Block Backup
      • Editing a Block Backup Job
      • Scheduling a Block Backup Job
      • Forcing a Base Backup
      • Backing up System State
      • Backing up System Table
      • NetApp SnapVault Management Backup
    • Application Backup
      • Microsoft SQL Server Backup
        • Creating a Microsoft SQL Server Backup Job
        • AlwaysOn Database Backup
      • Microsoft Exchange Server Backup
        • Creating a Microsoft Exchange Server Backup Job
      • Microsoft SharePoint Server Backup
        • SharePoint Installation and Configuration Requirements
        • Creating a Microsoft SharePoint Server Backup Job
      • SAP HANA Backup
      • Oracle Database Backup
        • Creating an Oracle Database Backup Job
      • OpenText GroupWise Backup
        • Creating a GroupWise Backup Job
    • Bare Metal Recovery (BMR) Backup
      • Creating a BMR Backup Job
    • Catalog Backup
      • General Considerations
      • Creating a Catalog Backup Job
        • Job Options for Catalog Backup
      • Editing a Catalog Backup Job
      • Scheduling a Catalog Backup Job
    • NDMP Backup (desktop interface only)
      • Prerequisites
      • Creating an NDMP Backup Job
        • Job Source Options for NDMP Backup
        • Job Destination Options for NDMP Backup
        • Other Job Options for NDMP Backup
      • Editing an NDMP Backup Job
      • Scheduling an NDMP Backup Job
    • Image Backup (desktop interface only)
      • Creating an Image Backup Job
      • Editing an Image Backup Job
      • Scheduling an Image Backup Job
    • Agentless Backup for VMware and Hyper-V
      • Agentless Backup for VMware
        • Agentless Backup for VMware Complements Block Data Protection
        • Agentless VMware Backup Architecture and Data Flow
        • Environmental Requirements for Agentless VMware Backup
        • Best Practices for Agentless VMware Backup
        • Creating an Agentless VMware Backup Job
          • Job Source Options for Agentless VMware Backup
          • Other Job Options for Agentless VMware Backup
        • Editing an Agentless VMware Backup Job
        • Scheduling a VMware Backup Job
        • Application-Consistent Protection
        • Architecture and Data Flow
      • Agentless Backup for Microsoft Hyper-V
        • Creating a Hyper-V Backup Job
        • Editing a Hyper-V Backup Job
        • Scheduling a Hyper-V Backup Job
    • Differential and Incremental Backups
    • Archive
      • Creating an Archive Job for Block Backup
      • Creating an Agentless VMware Archive Job
  • Restore
    • Introduction and Restore Modes
    • Restore Modes in the Web Interface
      • Full VM Restore for VMware
      • Full VM Restore for Hyper-V
      • Instant VM Restore
      • Multi-VM Restore 🆕
        • Job Options for Multi-VM Restore
        • Advanced Filters
      • Agentless File Restore
      • File Restore from Block Backup
        • Advanced Job Options
      • Instant Access
      • Virtualization
      • Application Restore
        • Microsoft SQL Server Restore
        • Microsoft Exchange Server Restore
        • Microsoft Sharepoint Server Restore
        • Oracle Database Restore
        • OpenText GroupWise Restore
      • File Restore from File Backup
        • Job Options for File Restore from File Backup
    • Restore Modes in the Desktop Interface
      • File Restore
        • Creating a File Restore Job
      • Image Restore
        • Creating an Image Restore Job
      • NDMP Restore
        • Creating an NDMP Restore Job
      • Block Restore
        • Creating a Block Restore Job
          • Block Restore Job Options
        • Specifying Mount Points
        • Restoring Block Data with Instant Access
        • Restoring BMR Data with Virtualization
        • NetApp SnapVault Management Restore
      • Agentless VMware Restore
        • Creating an Agentless VMware Restore Job
          • Agentless VMware Restore Job Operations
        • Rapid Return to Production (RRP)
      • Tape Restore
        • Creating a Tape Restore Job
      • Application Restore
      • Scheduling a Restore Job in the Desktop Interface
        • Previewing Scheduled Jobs in the Desktop Interface
      • Restore Job Source Options
    • Catalog Restore
      • Creating a Catalog Restore Job
    • Bare Metal Recovery (BMR) Restore
    • Recovering Archived Backups
      • Recovering a VMware Archive
  • Web Interface
    • Log-in Page
    • Dashboard
    • Job Monitor
    • Job Manager
    • Schedule Overview
    • Reports
      • Reports Templates
    • Nodes
    • Devices & Pools
    • Events
    • Configuring Enterprise Information
    • Configuring Custom SSL Certificates
  • Desktop Interface
    • Connect to DPX Window
    • Main Window
    • Common Menu Bar Options
    • Function Tabs Desktop Interface
      • Backup Tab
      • Restore Tab
      • Monitor Jobs Tab
      • Control Devices Tab
      • Reports Tab
      • Catalog Tab
      • Copy Tab
      • Manage Tapes Tab
      • Configure Tab
      • [Legacy] Analytics Tab
    • Common Function Window Tasks
    • Configuring Parameters
    • Configuring the Enterprises
      • Editing an Enterprise Configuration
      • Configuring Devices
  • BARE METAL RECOVERY
    • Bare Metal Recovery Overview
    • Bare Metal Recovery for Windows
    • Bare Metal Recovery for Linux
    • Recovery from a Replicated or Alternate Data Resource
  • MAINTENANCE
    • Condense
      • Starting a Condense Job
      • Scheduling a Condense Job (desktop interface only)
    • Job-Related Information
      • Job Return Codes
      • Job Status and Available Actions
    • Collecting Logs
    • Getting Node Information
    • File Exclusion Rules
    • Managing Licenses
    • Pre-Scripts and Post-Scripts
    • Updating DPX
      • Command Line Update
      • Online Autoupdate Method
      • Offline Autoupdate Method
  • Miscellaneous
    • Configuring Keyrings
      • Adding a Keyring
      • Adding a Key
    • SNMP Interface
    • Troubleshooting
      • Troubleshooting Unsuccessful Multi-VM Restore Cleanup
      • Troubleshooting Installation of the Catalogic DPX Client on UNIX and UNIX-like Systems
      • Managing the CMAgent Service
    • Technical Support
    • Terminology
    • Acronyms
    • Default Ports
Powered by GitBook
On this page
  1. Installation and Configuration
  2. Nodes

Adding a Client Node from the Master Server Level

PreviousAdding a Client Node to the Master Server during Client DeploymentNextAdding a vStor Storage Node

This procedure describes adding an already existing DPX Client machine as a node to the DPX Master Server. This procedure is only possible if a DPX Client is already installed on the machine you want to add as a node. The DPX Client and the DPX Master Server must also be in the same network.

Before you start, make sure the following conditions are met:

  • The Catalogic DPX Master Server is deployed and can be accessed through either web or desktop interface

  • At least one Catalogic DPX Client is deployed within the same network

Procedure

  1. Open a web browser and go to the Master Server’s IP address.

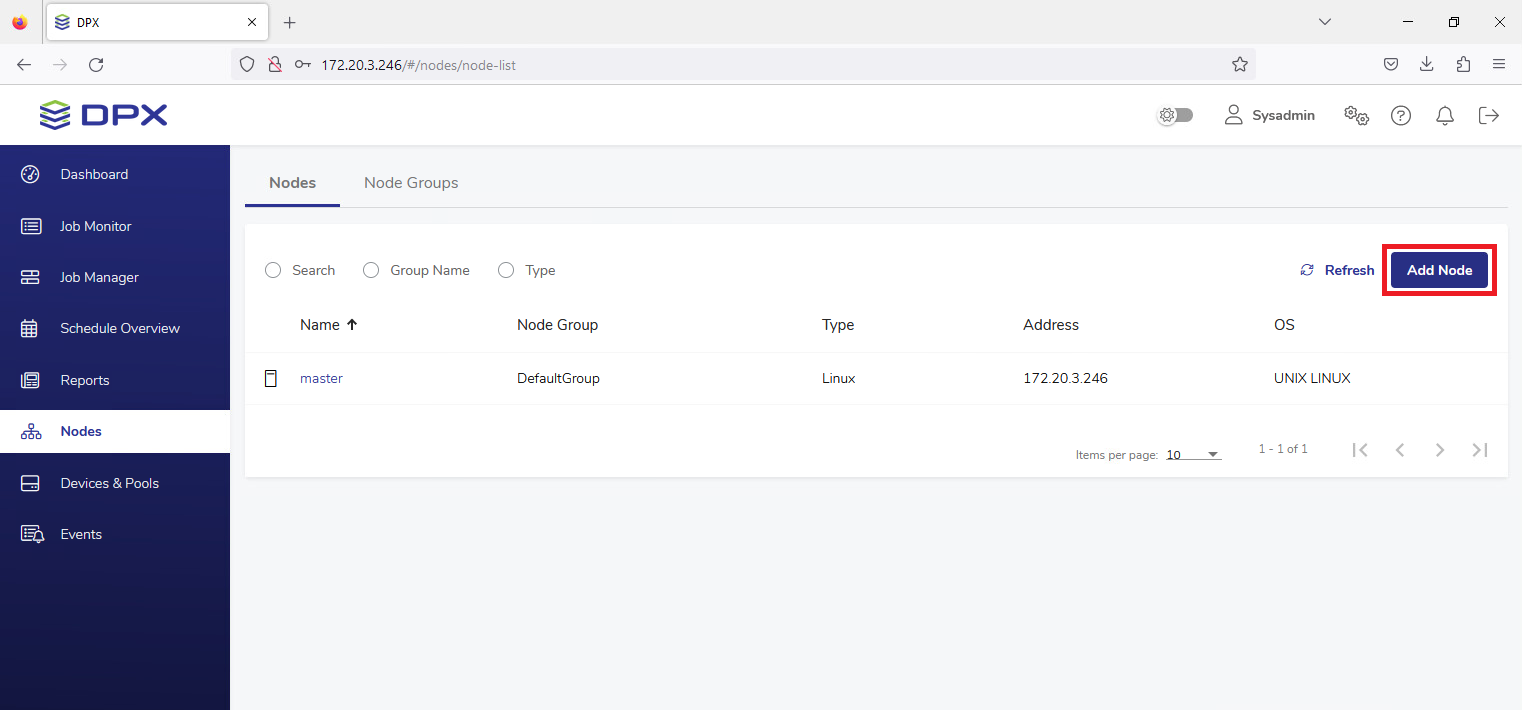
  2. Go to the Nodes section in the sidebar. A list of all nodes added to the DPX Master Server will be shown. At least one node, master, should be already on the list. This is the Master Server itself – compare the IP address in the list and in the web browser’s address bar. The Master Server can also serve as a client to back up data from itself.

Tip. If you expect a node to be already on the list but you cannot find it, try refreshing the view and then search for the node by its name, group or type.

  1. Click the Add Node button in the upper right corner.

  1. Fill in all other required fields: specify the name for the new node, provide a valid resolvable hostname or IP address, and select the group for the node.

Note. The Node Name must be unique throughout the Enterprise, regardless of the Node Group it is saved in.

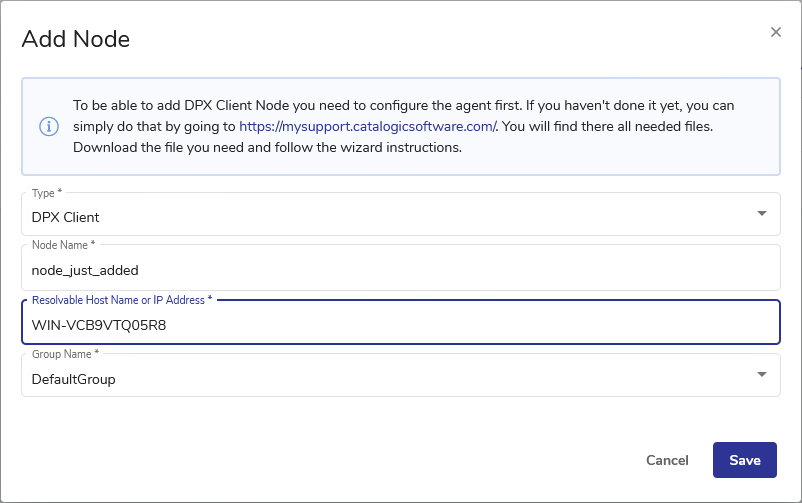
Tip. Providing the hostname is recommended over providing an IP address – in case the IP address changes, the hostname can still be resolved to the new IP address, and the connection between the server and the client will remain functional.

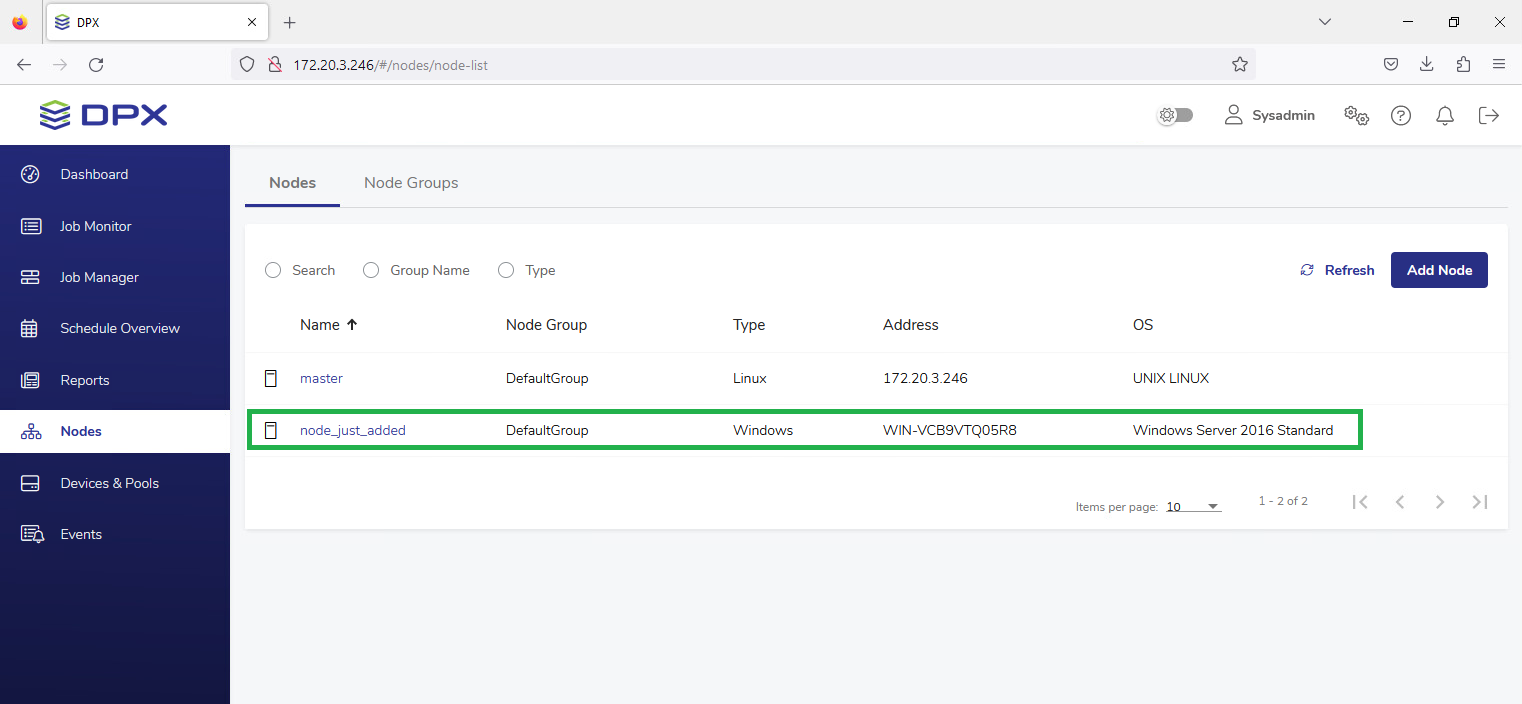
  1. Click Save. The node is now added and is visible in the nodes list.

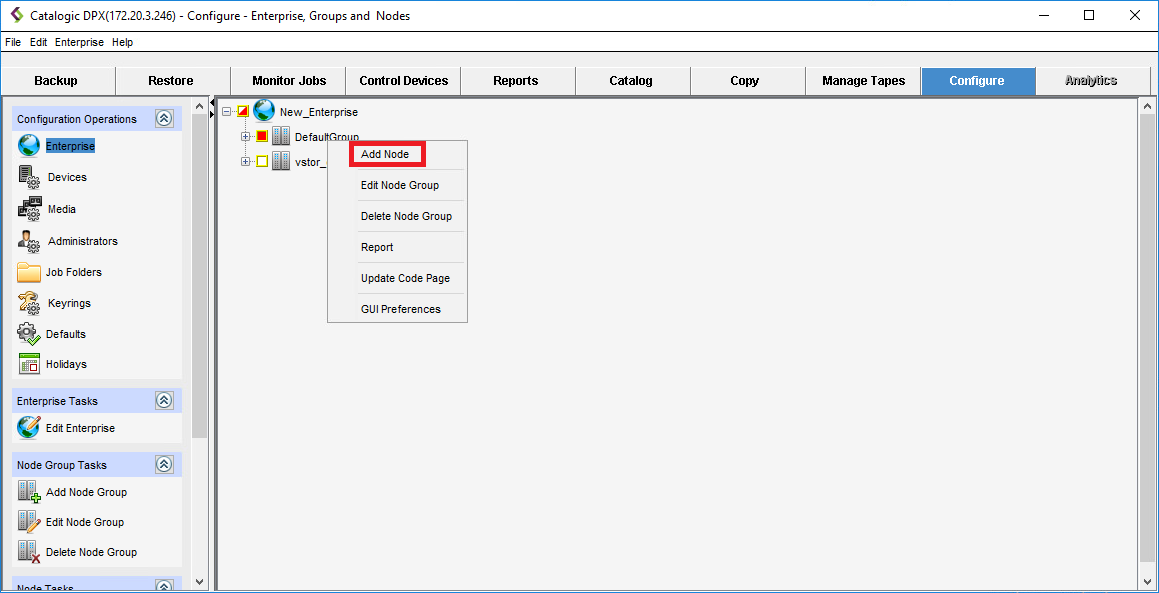
  1. Go to the Configure tab and select Enterprise under Configuration Operations.

    There should be at least one node group already visible, the DefaultGroup. You can add a new node to one of the existing node groups or create a new node group (see the next section).

  2. Right-click the node group name or icon to display the context menu. Then select Add Node. The selection check box next to the node group icon indicates the selection and the Add Node dialog appears.

  1. Complete the fields in the ADD NODE pane.

  2. Enter the logical name for the node. You can use up to 48 characters, no spaces. This is the name that DPX uses for the node. Note the following:

    • Any node that uses an iSCSI initiator must conform to iSCSI initiator and Microsoft machine naming limitations. Some characters may be impermissible in the node name. For example underscore (_) should not be used.

    • On Windows, DPX does not support nodes using names reserved by Windows for specific devices: CON, PRN, AUX, NUL. Note also that the string BMR is reserved.

  3. Enter the node hostname. Alternatively, you may provide its network IP address.

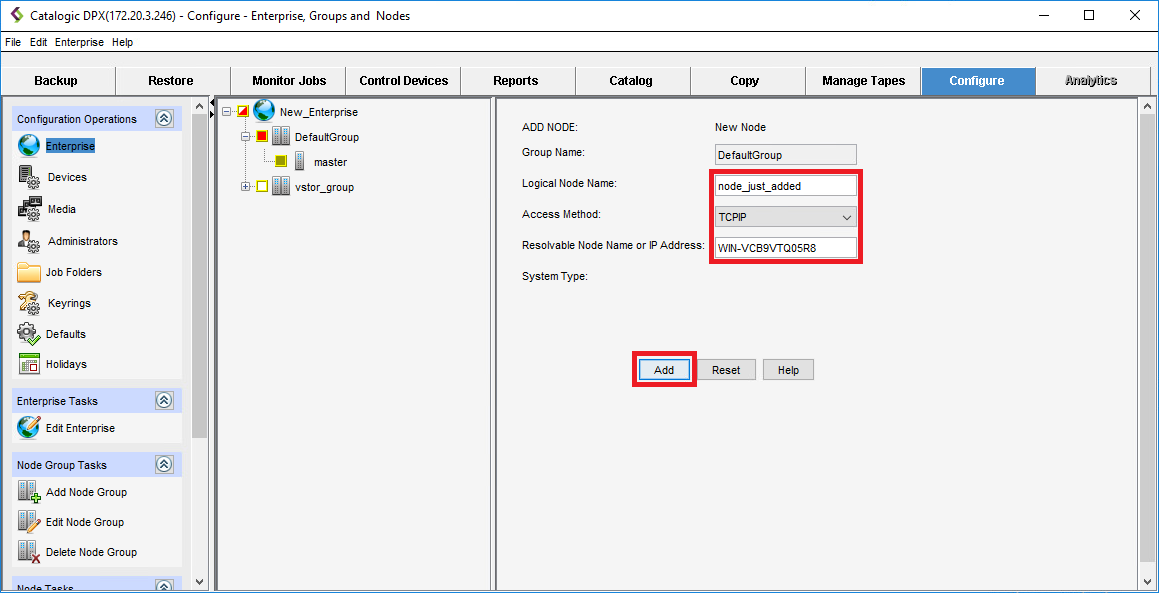
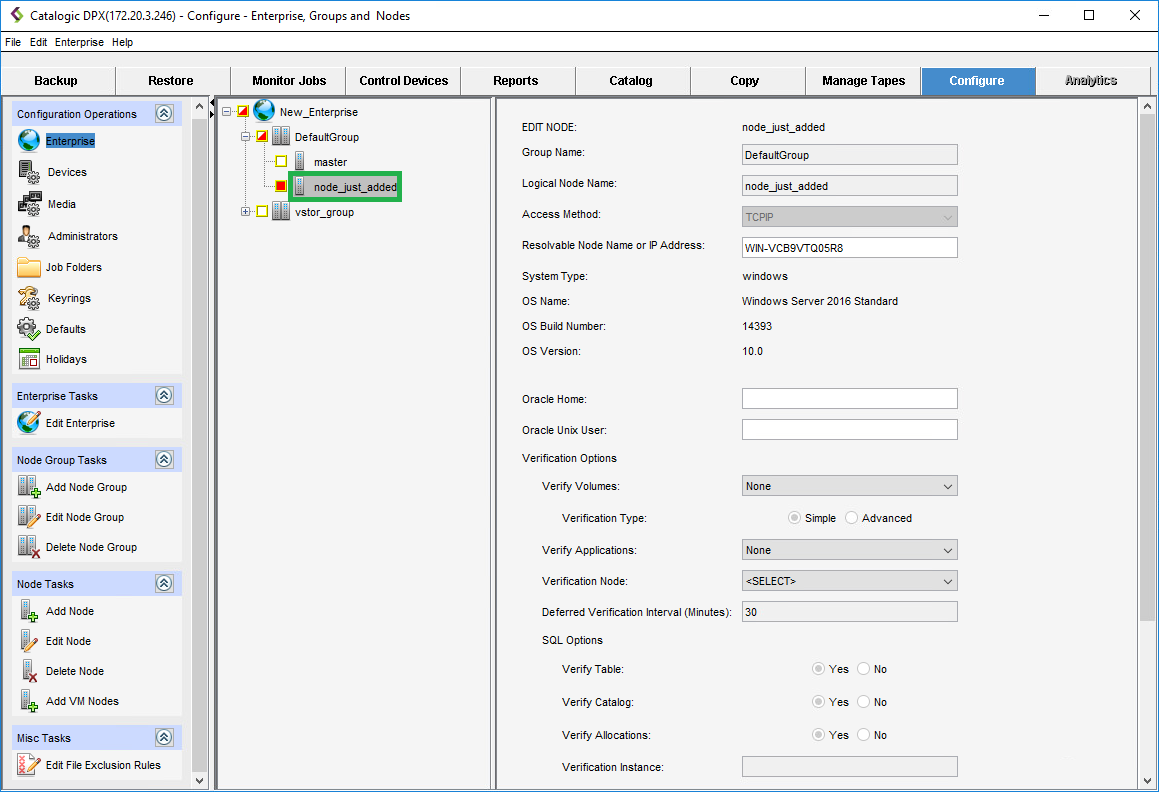
  1. Select Add. The node is now added. You can see it in your Enterprise tree, and its parameters are visible in the EDIT NODE pane.

The Add Node dialog will open. Select the node Type: DPX Client. For other node types, see .

Tip. If you encounter a timeout error or the hostname provided cannot be resolved to a valid IP address, double-check your machine’s firewall settings, ensuring all for the DPX Client deployment are met, including the ports allowed.

See also. .

Select the Access Method. For DPX Client nodes, this is TCPIP. For other node types, see .

See also. .

Adding Other Node Types to the Master Server
Adding a Node Group
Adding a Node Group
Prerequisites