DPX 4.11 Guide
Catalogic SoftwareKnowledge BaseMySupport
  • Welcome to DPX!
  • Introduction
    • About DPX
  • Installation and Configuration
    • How to Start – Basic Configuration
      • Protocols Used for Backup and Restore Data Transfer
    • DPX Master Server
      • Deploying DPX with VMware vSphere
        • Auxiliary Tasks for VMware Deployment
      • Deploying DPX with Microsoft Hyper-V
        • Auxiliary Tasks for Hyper-V Deployment
      • DPX Master Server Interface
      • Connecting to DPX Master Server via SSH
      • Configuration
    • DPX Client
      • DPX Client for Microsoft Windows
        • Requirements
        • Installation
        • How to Uninstall
      • DPX Client for Linux
        • Requirements
        • Installation
        • How to Uninstall
      • Automated Deployment of DPX Client
      • Further Actions with DPX Client
    • DPX Proxy Server
      • Deploying DPX Proxy Server for VMware
      • DPX Proxy Server Web Interface
    • DPX Hyper-V Agent
    • Nodes
      • Adding a Client Node to the Master Server during Client Deployment
      • Adding a Client Node from the Master Server Level
      • Adding a vStor Storage Node
      • Adding a Configured Hyper-V Host as a DPX Node
      • Adding Other Node Types to the Master Server
      • Adding a Node Group
    • Devices
      • Adding a Device Cluster
      • Adding a Device
      • Adding a Tape Library
      • Adding a Tape Library Device
    • Media
      • Adding a Media Pool
      • Adding Media Volumes
    • Tape Libraries
      • Tape Library Deployment
      • Tape Library Setup
      • Manual Tape Library Installation
      • Tape Library Verification
      • Manual Tape Library Configuration
      • Setting up LTO Tape Drives for Hardware Encryption
        • Assigning and Unassigning Media to/from Tape Library Slots
    • User Configuration
      • Configure Administrators Window
    • Other Components of the DPX Suite
  • Storage
    • Backup Destinations
    • Tape Storage
    • vStor
    • Disk Directory
    • NetApp
      • NetApp SnapVault Management
        • Terminology for NetApp SnapVault Management
        • NetApp SnapVault Management Setup and Configuration
    • Cloud Storage
      • Registering AWS S3 Cloud Storage
      • Registering a Generic Cloud Storage
  • Backup
    • Introduction and Backup Types
    • File Backup
      • Creating a File Backup Job
        • Job Source Options for File Backup
        • Job Destination Options for File Backup
        • Other Job Options for File Backup
      • Editing a File Backup Job
      • Scheduling a File Backup Job
    • Block Backup
      • Prerequisites
      • Creating a Block Backup Job
        • Job Options for Block Backup
      • Editing a Block Backup Job
      • Scheduling a Block Backup Job
      • Forcing a Base Backup
      • Backing up System State
      • Backing up System Table
      • NetApp SnapVault Management Backup
    • Application Backup
      • Microsoft SQL Server Backup
        • Creating a Microsoft SQL Server Backup Job
        • AlwaysOn Database Backup
      • Microsoft Exchange Server Backup
        • Creating a Microsoft Exchange Server Backup Job
      • Microsoft SharePoint Server Backup
        • SharePoint Installation and Configuration Requirements
        • Creating a Microsoft SharePoint Server Backup Job
      • SAP HANA Backup
      • Oracle Database Backup
        • Creating an Oracle Database Backup Job
      • OpenText GroupWise Backup
        • Creating a GroupWise Backup Job
    • Bare Metal Recovery (BMR) Backup
      • Creating a BMR Backup Job
    • Catalog Backup
      • General Considerations
      • Creating a Catalog Backup Job
        • Job Options for Catalog Backup
      • Editing a Catalog Backup Job
      • Scheduling a Catalog Backup Job
    • NDMP Backup (desktop interface only)
      • Prerequisites
      • Creating an NDMP Backup Job
        • Job Source Options for NDMP Backup
        • Job Destination Options for NDMP Backup
        • Other Job Options for NDMP Backup
      • Editing an NDMP Backup Job
      • Scheduling an NDMP Backup Job
    • Image Backup (desktop interface only)
      • Creating an Image Backup Job
      • Editing an Image Backup Job
      • Scheduling an Image Backup Job
    • Agentless Backup for VMware and Hyper-V
      • Agentless Backup for VMware
        • Agentless Backup for VMware Complements Block Data Protection
        • Agentless VMware Backup Architecture and Data Flow
        • Environmental Requirements for Agentless VMware Backup
        • Best Practices for Agentless VMware Backup
        • Creating an Agentless VMware Backup Job
          • Job Source Options for Agentless VMware Backup
          • Other Job Options for Agentless VMware Backup
        • Editing an Agentless VMware Backup Job
        • Scheduling a VMware Backup Job
        • Application-Consistent Protection
        • Architecture and Data Flow
      • Agentless Backup for Microsoft Hyper-V
        • Creating a Hyper-V Backup Job
        • Editing a Hyper-V Backup Job
        • Scheduling a Hyper-V Backup Job
    • Differential and Incremental Backups
    • Archive
      • Creating an Archive Job for Block Backup
      • Creating an Agentless VMware Archive Job
  • Restore
    • Introduction and Restore Modes
    • Restore Modes in the Web Interface
      • Full VM Restore for VMware
      • Full VM Restore for Hyper-V
      • Instant VM Restore
      • Multi-VM Restore 🆕
        • Job Options for Multi-VM Restore
        • Advanced Filters
      • Agentless File Restore
      • File Restore from Block Backup
        • Advanced Job Options
      • Instant Access
      • Virtualization
      • Application Restore
        • Microsoft SQL Server Restore
        • Microsoft Exchange Server Restore
        • Microsoft Sharepoint Server Restore
        • Oracle Database Restore
        • OpenText GroupWise Restore
      • File Restore from File Backup
        • Job Options for File Restore from File Backup
    • Restore Modes in the Desktop Interface
      • File Restore
        • Creating a File Restore Job
      • Image Restore
        • Creating an Image Restore Job
      • NDMP Restore
        • Creating an NDMP Restore Job
      • Block Restore
        • Creating a Block Restore Job
          • Block Restore Job Options
        • Specifying Mount Points
        • Restoring Block Data with Instant Access
        • Restoring BMR Data with Virtualization
        • NetApp SnapVault Management Restore
      • Agentless VMware Restore
        • Creating an Agentless VMware Restore Job
          • Agentless VMware Restore Job Operations
        • Rapid Return to Production (RRP)
      • Tape Restore
        • Creating a Tape Restore Job
      • Application Restore
      • Scheduling a Restore Job in the Desktop Interface
        • Previewing Scheduled Jobs in the Desktop Interface
      • Restore Job Source Options
    • Catalog Restore
      • Creating a Catalog Restore Job
    • Bare Metal Recovery (BMR) Restore
    • Recovering Archived Backups
      • Recovering a VMware Archive
  • Web Interface
    • Log-in Page
    • Dashboard
    • Job Monitor
    • Job Manager
    • Schedule Overview
    • Reports
      • Reports Templates
    • Nodes
    • Devices & Pools
    • Events
    • Configuring Enterprise Information
    • Configuring Custom SSL Certificates
  • Desktop Interface
    • Connect to DPX Window
    • Main Window
    • Common Menu Bar Options
    • Function Tabs Desktop Interface
      • Backup Tab
      • Restore Tab
      • Monitor Jobs Tab
      • Control Devices Tab
      • Reports Tab
      • Catalog Tab
      • Copy Tab
      • Manage Tapes Tab
      • Configure Tab
      • [Legacy] Analytics Tab
    • Common Function Window Tasks
    • Configuring Parameters
    • Configuring the Enterprises
      • Editing an Enterprise Configuration
      • Configuring Devices
  • BARE METAL RECOVERY
    • Bare Metal Recovery Overview
    • Bare Metal Recovery for Windows
    • Bare Metal Recovery for Linux
    • Recovery from a Replicated or Alternate Data Resource
  • MAINTENANCE
    • Condense
      • Starting a Condense Job
      • Scheduling a Condense Job (desktop interface only)
    • Job-Related Information
      • Job Return Codes
      • Job Status and Available Actions
    • Collecting Logs
    • Getting Node Information
    • File Exclusion Rules
    • Managing Licenses
    • Pre-Scripts and Post-Scripts
    • Updating DPX
      • Command Line Update
      • Online Autoupdate Method
      • Offline Autoupdate Method
  • Miscellaneous
    • Configuring Keyrings
      • Adding a Keyring
      • Adding a Key
    • SNMP Interface
    • Troubleshooting
      • Troubleshooting Unsuccessful Multi-VM Restore Cleanup
      • Troubleshooting Installation of the Catalogic DPX Client on UNIX and UNIX-like Systems
      • Managing the CMAgent Service
    • Technical Support
    • Terminology
    • Acronyms
    • Default Ports
Powered by GitBook
On this page
  1. Backup
  2. Agentless Backup for VMware and Hyper-V
  3. Agentless Backup for VMware
  4. Creating an Agentless VMware Backup Job

Other Job Options for Agentless VMware Backup

PreviousJob Source Options for Agentless VMware BackupNextEditing an Agentless VMware Backup Job

Last updated 9 months ago

Apart from source options, DPX offers some additional backup job options, such as Job Notification Options. They are available from both interfaces as presented below.

The Proxy Selection section

If a backup job backs up multiple VMs, DPX by default uses available proxy servers for load balancing. If you prefer one or more specific proxy servers, specify this in the Proxy Selection section.

To set proxy servers for a backup job:

  1. Go to the Advanced Options section at the bottom of the job definition view (scroll down if necessary) and expand it. Click the Proxy Selection header.

  1. The Proxy Selection section consists of the Automatically Select toggle. By default, the toggle is on. DPX chooses the proxy servers to use for the backup job and how many to use for load balancing. When the toggle is off, the list of all proxy servers is displayed and you can choose which proxy servers will be used for the backup job. Multiple selection is possible.

The Notification Options section

The Notification Options section controls who receives messages pertaining to the current job when it is run.

To access the job notification options, go to the Advanced Options section at the bottom of the job definition view (scroll down if necessary) and expand it. Click the Notification options header.

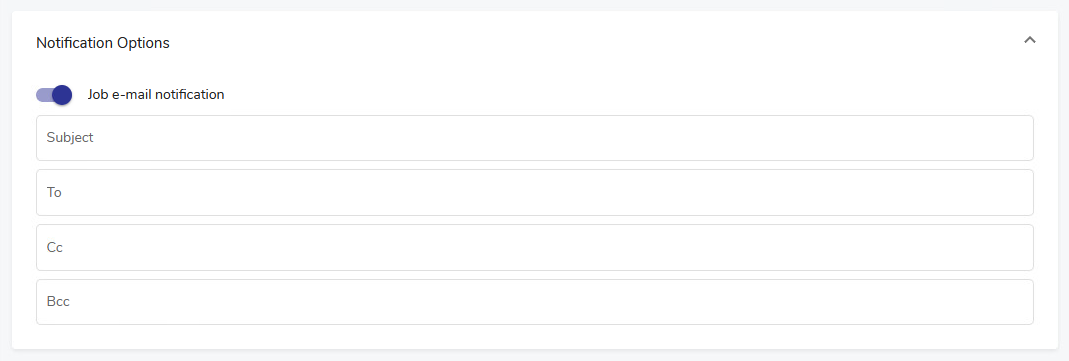
This section includes the Job e-mail notification toggle.

Toggle on

The notification is sent as specified below the toggle (additional fields will appear – see below).

Toggle off

Subject

The subject of your message. The subject line usually contains a combination of straight text and variable elements. Variables, which must begin with %, are replaced with actual corresponding values. If you enclose variables in double quotation marks, those variables are treated as literal values. You can embed the following variables:

  • %JOBNAME

  • %JOBID

  • %JOBTYPE

  • %RC

Use %RC to include the return code in the message for this run of the job, when applicable.

To

The email address of the primary recipient of your message. Only one “To” address is permitted.

Cc

Carbon Copy. The email address(es) of the secondary recipient(s) of your message. Use a semicolon to delimit multiple email addresses.

Bcc

Blind Carbon Copy. The email address(es) of the secondary recipient(s) not identified to other recipients. Use a semi-colon to delimit multiple email addresses.

Note. Note that the following characters are invalid in all fields: < > ; and '.

The Script Options section
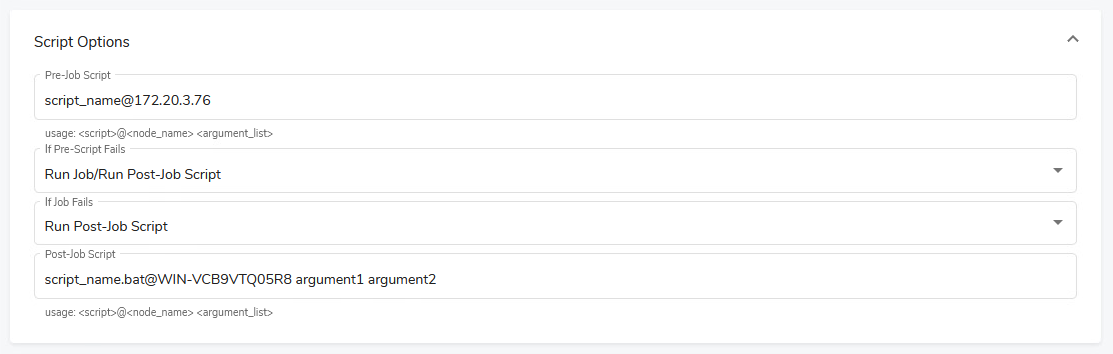
Pre-Job Script

Enter the name of a script to execute prior to the actual job.

Basic usage: <script>@<node_name> <argument_list>

If Pre-Script fails

The action be taken if the Pre-Job Script fails to successfully complete:

  • Run Job/Run Post-Job Script

  • Skip Job/Run Post-Job Script

  • Skip Job/Skip Post-Job Script

If Job fails

The action to be taken if the Job fails to successfully complete:

  • Run Post-Job Script

  • Skip Post-Job Script

Post-Job Script

Enter the name of a script to execute after the actual job.

Basic usage: <script>@<node_name> <argument_list>

Selecting Proxy Servers

If a backup job backs up multiple VMs, DPX by default uses available proxy servers for load balancing. If you prefer one or more specific proxy servers, specify this in the Set Proxy dialog.

To set proxy servers for a backup job:

  1. On the backup Task Panel, under Other Tasks, click Set Proxy. The Set Proxy dialog appears.

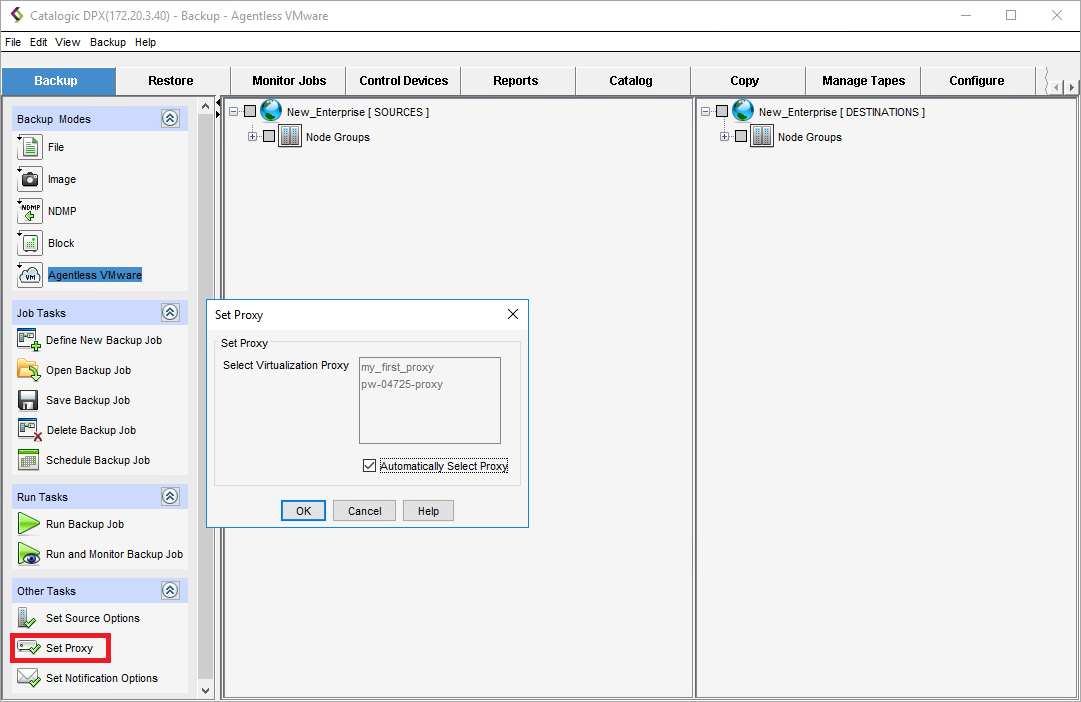
  2. the Set Proxy dialog consists of a list of Proxy Server nodes added to the Enterprise, and the Automatically Select Proxy checkbox. By default, the checkbox is selected and the list is disabled. DPX chooses the proxy servers to use for a backup job and how many to use for load balancing. If you unselect this option, the displayed virtualization proxy servers become selectable, and you can choose the proxy servers to use for the backup job. Use [Ctrl + click] for multiple selection.

  3. Click OK. The Set Proxy options are now saved.

Job Notification Options

The Set Job Notification Options dialog controls who receives messages about the current job when it is run.

To set backup job notification options:

  1. Open the Set Job Notification Options dialog box by doing one of the following:

    • Right-click the Enterprise name or icon to display a context menu. Then select Set Notification Options.

    • From the menu bar, select Backup > Set Notification Options.

    • On the task panel, click Set Notification Options.

    The Set Job Notification Options dialog box appears.

  2. Complete the Set Job Notification Options dialog box as needed.

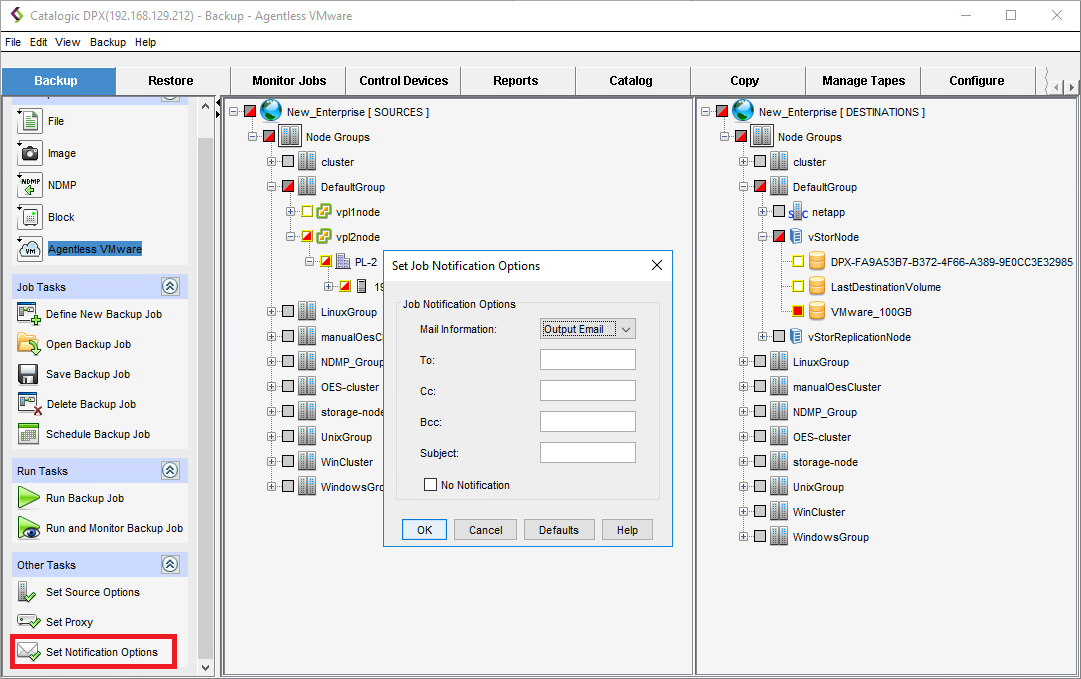
An explanation of each field and the available choices follows:

Mail information

Two sets of mail information can be specified:

Output Email

Specifies that the subsequent fields apply to reports that are sent when a job has completed.

Operator Email

Specifies that the subsequent fields apply to mount requests, error messages, and informational messages that are sent during a job.

To

The email address of the primary recipient of your message. Only one “To” address is permitted.

Cc

Carbon Copy. The email address(es) of the secondary recipient(s) of your message. Use a semicolon to delimit multiple email addresses.

Bcc

Blind Carbon Copy. The email address(es) of the secondary recipient(s) not identified to other recipients. Use a semi-colon to delimit multiple email addresses.

Subject

The subject of your message. The subject line usually contains a combination of straight text and variable elements. Variables, which must begin with %, are replaced with actual corresponding values. If you enclose variables in double quotation marks, those variables are treated as literal values. You can embed the following variables:

  • %JOBNAME

  • %JOBID

  • %JOBTYPE

  • %RC

Use %RC to include the return code in the message for this run of the job, when applicable.

No Notification

Selecting this check box option temporarily disables notifications for the job without deleting the currently defined job notification data.

Note. Note that the following characters are invalid in all fields: < > ; and '.

The notification is sent to the default e-mail address configured in the section.

Note. DPX emailing must be enabled when you first configure your Enterprise. At that time, you supply general system information, including SMTP Host Name and SMTP Port. See the section.

See also. For detailed information about pre- and post-job scripts, including all valid definitions, see .

Note. DPX emailing must be enabled when you first configure your Enterprise. At that time, you supply general system information, including SMTP Host Name and SMTP Port. See .

See also. More information can be found in in the DPX 4.9 Reference Guide.

Pre-Scripts and Post-Scripts
Editing an Enterprise Configuration
Administrator E-mail Settings
Configuration