Configure Administrators Window
Restrictions. Currently, full user management is only available through the desktop interface. The user management functionality through the web interface will be implemented in future versions of DPX.
To launch the Configure Administrators window, click the Configure tab on the Function Tab bar of the window, then click Administrators in the task panel.
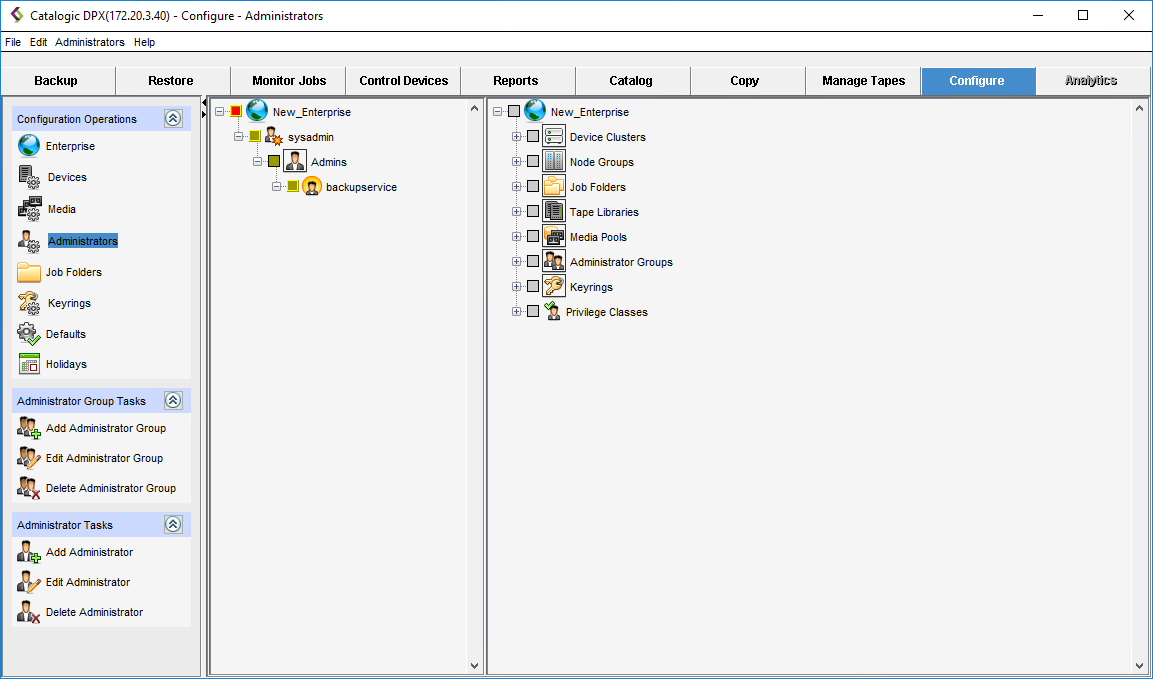
The first time the system administrator opens the Configure Administrators window, the sysadmin administrator group is visible in the Administrator tree in the left pane.
Below is a sample view of the Configure Administrators window.
Administrator Groups
Configure Administrators allows you to add new administrator groups to fulfill limited or broad functions.
Adding an Administrator Group
To add an administrator group to your Enterprise:
Make sure you are in the Configure tab, and the Administrators section is selected.
In the left pane, select the Enterprise.
Add a new administrator group by doing one of the following:
Right-click the Enterprise icon to bring up the context menu and select Add Administrator Group.
From the menu toolbar, select Administrators > Add Administrator Group.
On the task panel select, click Add Administrator Group.
The Add Administrator Group dialog appears in the right pane of the Configure Administrators window.
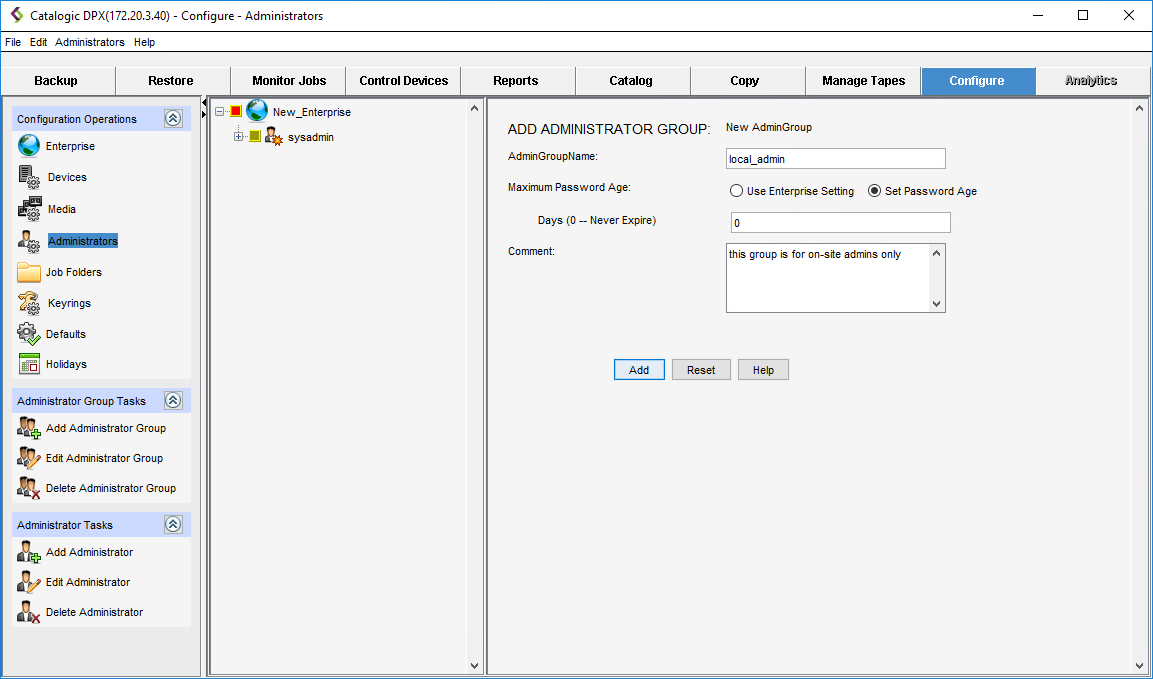
Complete the active fields in the Add Administrator Group dialog.
AdminGroupName
Enter the name for the new administrator group. You can use up to 48 alphanumeric characters, no spaces.
Maximum Password Age
The Password Age is the number of days that a password can be used by an administrator before it expires.
Selecting Use Enterprise Setting imports the default password age set in the Edit Enterprise dialog. Selecting Set Password Age exposes an edit field in which you must enter a password applicable to this administrator group. The password age must be between 0 and 999, where 0 means “never expire”. For more information, see Editing an Enterprise Configuration.
Comment
Enter an optional comment. You can use up to 48 alphanumeric characters, no spaces.
Select Add on the task menu at the top right of the right pane. If you are unable to see the task menu, resize the right pane.
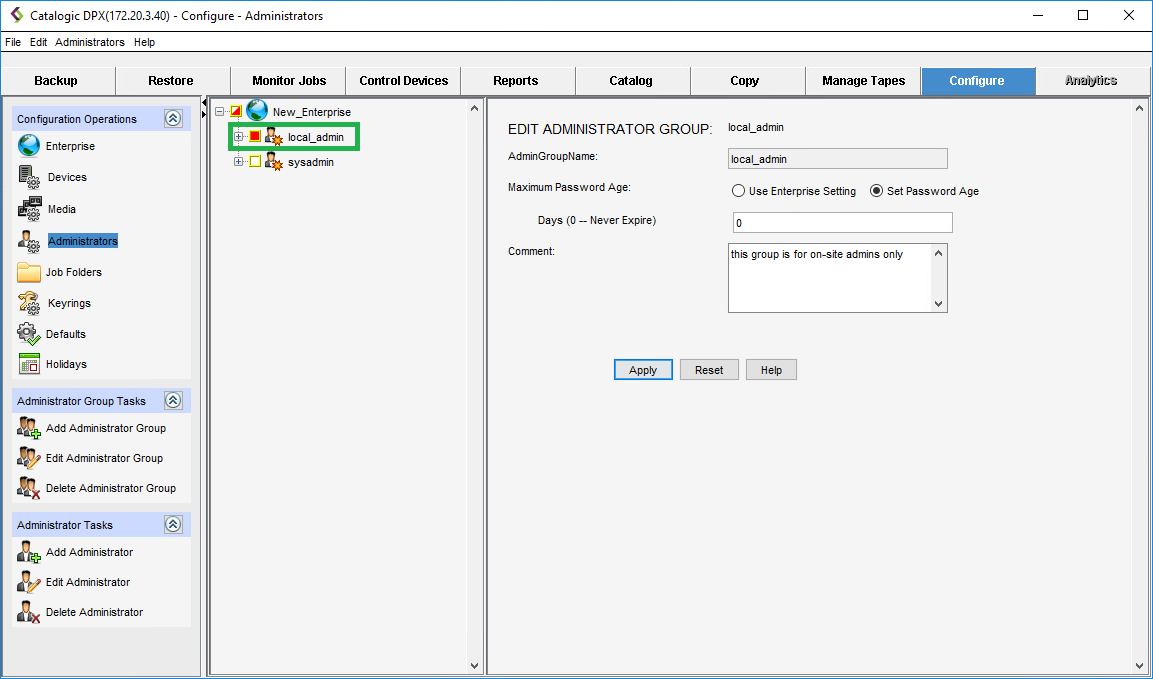
The new administrator group appears in the Administrator tree in the left pane. The right pane changes to Edit Administrator Group.
Editing an Administrator Group
To edit an administrator group in your Enterprise:
Make sure you are in the Configure tab, and the Administrators section is selected.
Open the Edit Administrator Group dialog in the right pane by doing one of the following:
Right-click the administrator group name or icon to display a context menu. The selection is indicated by the selection check box next to the administrator group icon. Then select Edit.
In the left pane, select the administrator group you want to edit and do one of the following:
From the menu bar, select Administrators > Edit Administrator Group.
On the task panel, click Edit Administrator Group.
The Edit Administrator Group dialog appears in the right pane.
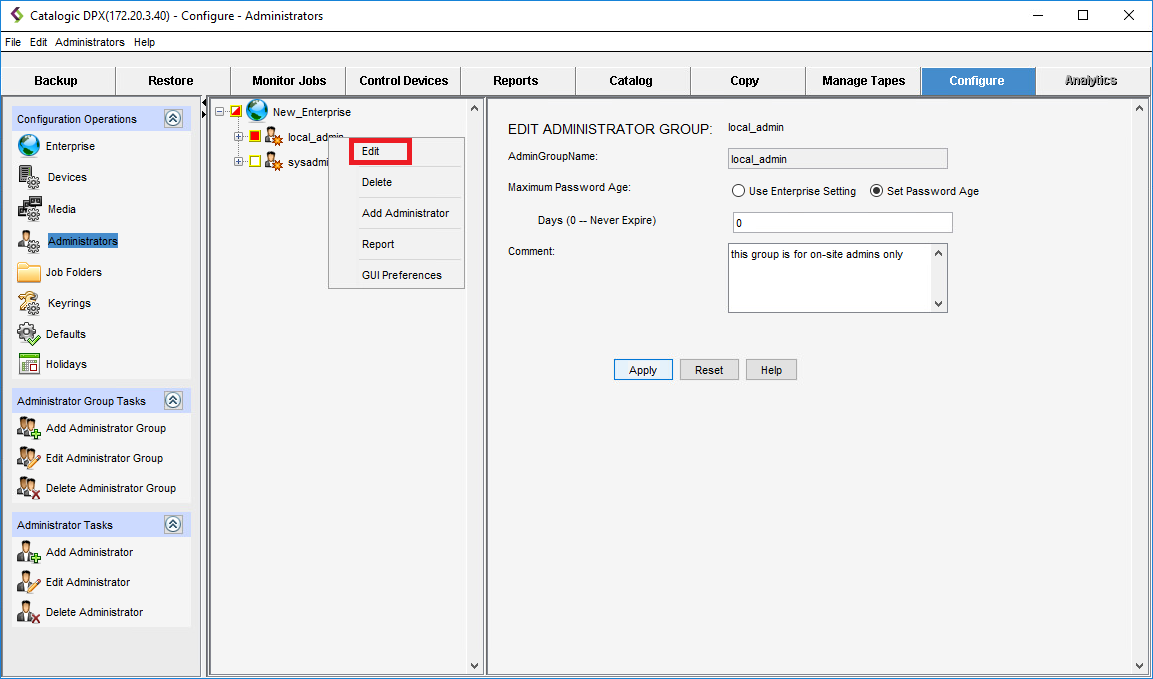
Revise the fields as needed.
Select Apply. The changes are now implemented.
Deleting an Administrator Group
Note. Before you can delete an administrator group, you must delete all of its administrators. See Deleting an Administrator below.
The SYSADMIN administrator group cannot be deleted.
To delete an administrator from your Enterprise:
Make sure you are in the Configure tab, and the Administrators section is selected.
Do one of the following:
Right-click the administrator group name or icon to display a context menu. The selection is indicated by the selection check box next to the administrator group icon. Then select Delete.
In the left pane, select the administrator group you want to delete and do one of the following:
From the menu bar, select Administrator > Delete Administrator Group.
On the task panel, click Delete Administrator Group.
The Proceed with administrator group deletion message box appears.
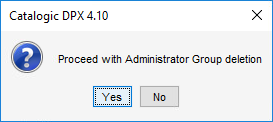
Click Yes. The administrator group disappears from the Administrator tree.
Administrators
Adding an Administrator
DPX allows you to add new administrators to administrator groups.
To add an administrator to your Enterprise:
Make sure you are in the Configure tab, and the Administrators section is selected.
In the left pane, select the Administrator Group that you want to add the new administrator to.
Add a new administrator by doing one of the following:
Right-click the Administrator Group icon to bring up the context menu and select Add Administrator.
From the menu toolbar, select Administrator > Add Administrator.
On the task panel select, click Add Administrator.
The Add Administrator dialog appears in the right pane of the Configure Administrators window.
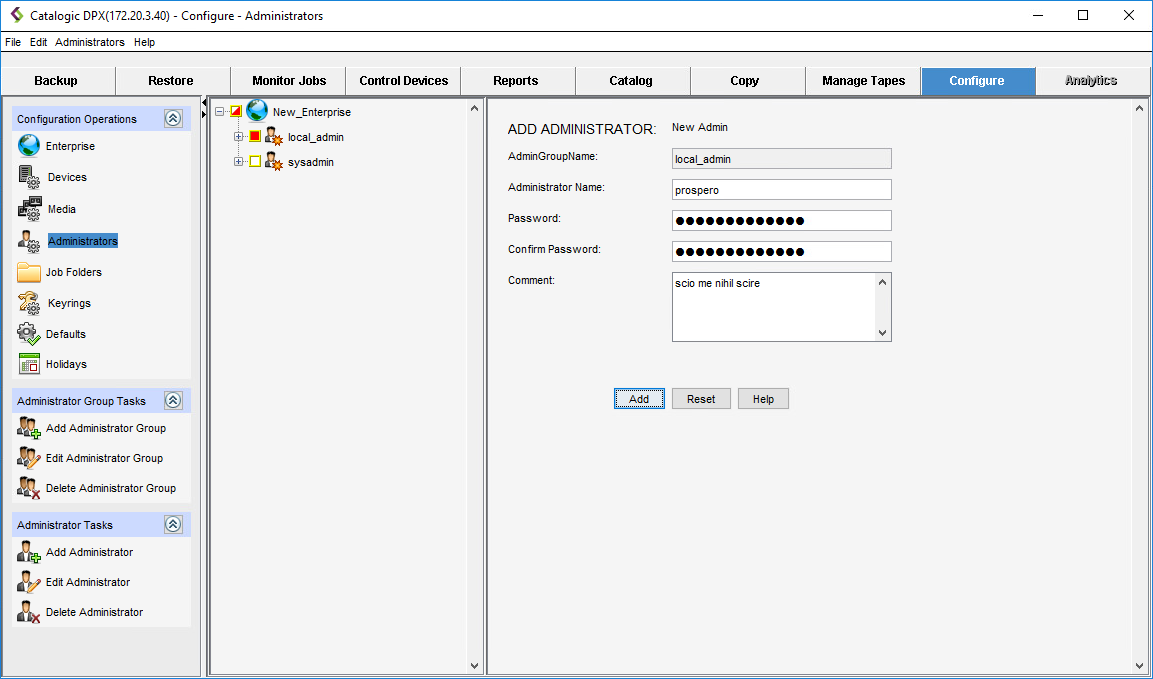
The fields displayed in the Add Administrator dialog depend on the Authentication Mode selected in the Edit Enterprise function: Native or LDAP. If a field is displayed in only one of the authentication modes, the applicable mode is indicated in brackets
[]after the field name in the description below. Otherwise, the field is common to both modes. For more information about Authentication Mode, see Editing an Enterprise Configuration.AdminGroupName
This field is populated automatically based on the administrator group previously selected.
Administrator Name [Native authentication mode]
Enter the user name for the new administrator. You can use up to 48 alphanumeric characters. If the name exists in native mode and you want to use it in LDAP mode, you must first remove the name from native mode.
Password [Native authentication mode]
Enter a password for the new administrator.
A valid password must meet the following criteria:
The password is between six and fourteen characters.
The password cannot include the user name or the strings “sysadmin”, “administrator” or “admin”.
The password contains English characters and at least one digit.
Confirm Password [Native authentication mode]
Enter the password again to confirm it.
LDAP Username [LDAP authentication mode]
The username is provisioned from the LDAP server, thus no password is necessary. DPX validates the username. UTF-8 encoded usernames are supported. The supported length of the username is up to 48 bytes ASCII or approximately 24 double bytes, depending on the language. Spaces are not supported in the username.
Forest walking or referral chasing is supported with AD.
The username must conform to the type selected in the Username Attribute field in the Edit Enterprise pane.
This field only appears when the LDAP mode is enabled.
Comment
Enter an optional comment.
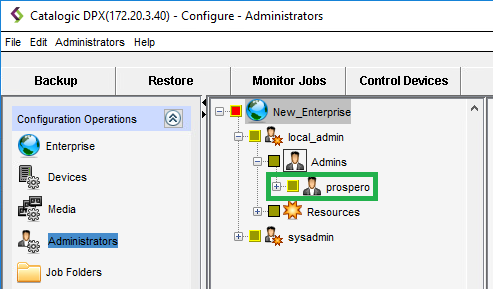
Select Add. The new administrator appears in the Administrator tree in the left pane. You might need to refresh the view by clicking Administrators in the task panel.
Moving Administrators
An administrator can change the administrator group by using drag-and-drop in the left pane of the Configure Administrators window. If so privileged, an administrator can temporarily become a system administrator by being dragged to the SYSADMIN administrator group. In this case, the administrator’s original privilege classes will be preserved so that when they are dragged back to a different administrator group, they still have the same privilege classes.
Editing an Administrator
To edit an administrator in your Enterprise:
Make sure you are in the Configure tab, and the Administrators section is selected.
Open the Edit Administrator dialog in the right pane by doing one of the following:
Right-click the administrator name or icon to display a context menu. The selection is indicated by the selection check box next to the administrator icon. Then select Edit.
In the left pane, select the administrator you want to edit and do one of the following:
From the menu bar, select Administrator > Edit Administrator.
On the task panel, click Edit Administrator.
The Edit Administrator dialog appears in the right pane.
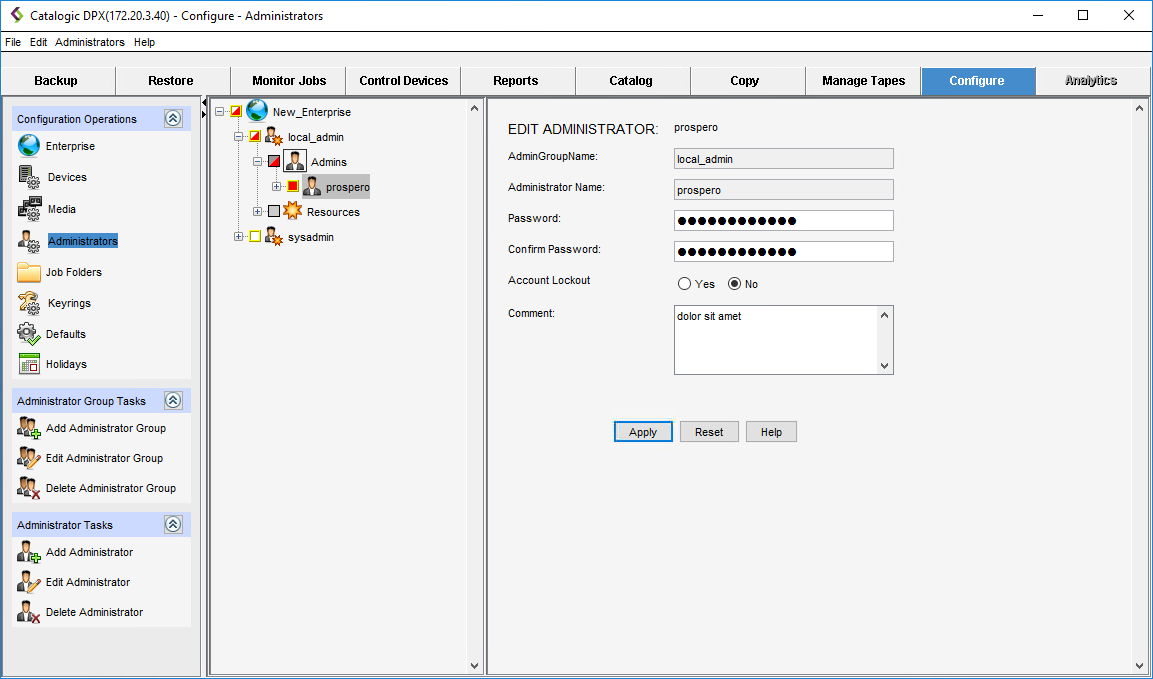
Revise the Password and/or optional Comment fields as needed.
Select Apply. The changes are now implemented.
Deleting an Administrator
Note. Before you can delete an administrator you must unassign all of its resources.
To delete an administrator from your Enterprise:
Make sure you are in the Configure tab, and the Administrators section is selected.
Do one of the following:
Right-click the administrator name or icon to display a context menu. The selection is indicated by the selection check box next to the administrator icon. Then select Delete.
In the left pane, select the administrator you want to delete and do one of the following:
From the menu bar, select Administrator > Delete Administrator.
On the task panel, click Delete Administrator.
The Proceed with administrator deletion message box appears.
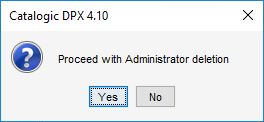
Click Yes. The administrator disappears from the Administrator tree.
Resources and Privilege Classes
Assigning Resources and Privilege Classes
Assigning resources to an administrator group involves giving that group access to various objects within DPX that are necessary for carrying out tasks such as backup, restore, and migrate. Resources such as Device Clusters, Node Groups, Tape Libraries, Media Pools, Job Folders, Administrator Groups, and Keyrings can be assigned to an administrator group. When a resource is assigned to a group, all members of that group can potentially access the resource, subject to their individual privilege classes.
Note. Resources are assigned to administrator groups. Privilege Classes are assigned to individual administrators.
The following table describes the selectable resources that can be assigned to an administrator group:
Device Clusters, Node Groups, Tape Libraries, and Media Pools
These are the resources that an administrator can use in carrying out tasks such as backup, restore, and migrate.
Job Folders
Job folders contain the defined jobs that a particular administrator can carry out.
Administrator Groups
Administrator groups (other than the SYSADMIN administrator group) can be assigned to other administrator groups. See Hierarchical Administrator Groups.
Keyrings
Keyrings contain keys for data-encrypted jobs.
To assign a resource to an administrator group:
In the left pane of the Configure Administrator window, click the Enterprise (globe) icon or select Administrator > Show Assignable from the menu bar. The Resource Tree will appear in the right pane.
Expand the left pane until you see the administrator group to which you want to assign resources.
Expand the Resource Tree in the right pane until you can see the resource you want to assign.
Select the checkbox of the resource you want to assign.
With your mouse, drag the resource to the left pane and drop it on the administrator group you want to assign the resource to. When you release the mouse button, the resource is assigned and appears in the left pane beneath the administrator group.
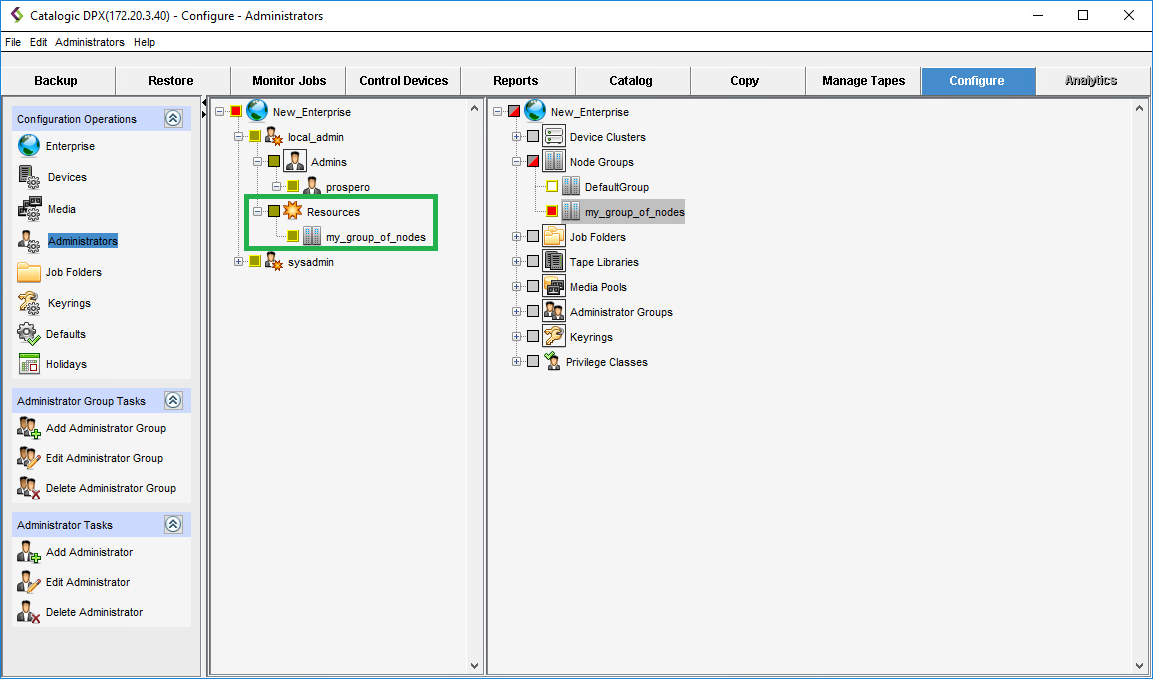
Note. The SYSADMIN administrator group is not draggable from the right pane.
To assign a privilege class to an administrator:
In the left pane of the Configure Administrator window, click the Enterprise (globe) icon or select Administrator > Show Assignable from the menu bar. The Resource Tree will appear in the right pane.
Expand the left pane until you see the administrator to which you want to assign privilege classes.
Expand the privilege class tree in the right pane until you can see the privilege class you want to assign.
Select the checkbox of the privilege class you want to assign.
With your mouse, drag the privilege class to the left pane and drop it on the administrator you want to assign the privilege class to. When you release the mouse button, the privilege class is assigned and appears in the left pane beneath the administrator.
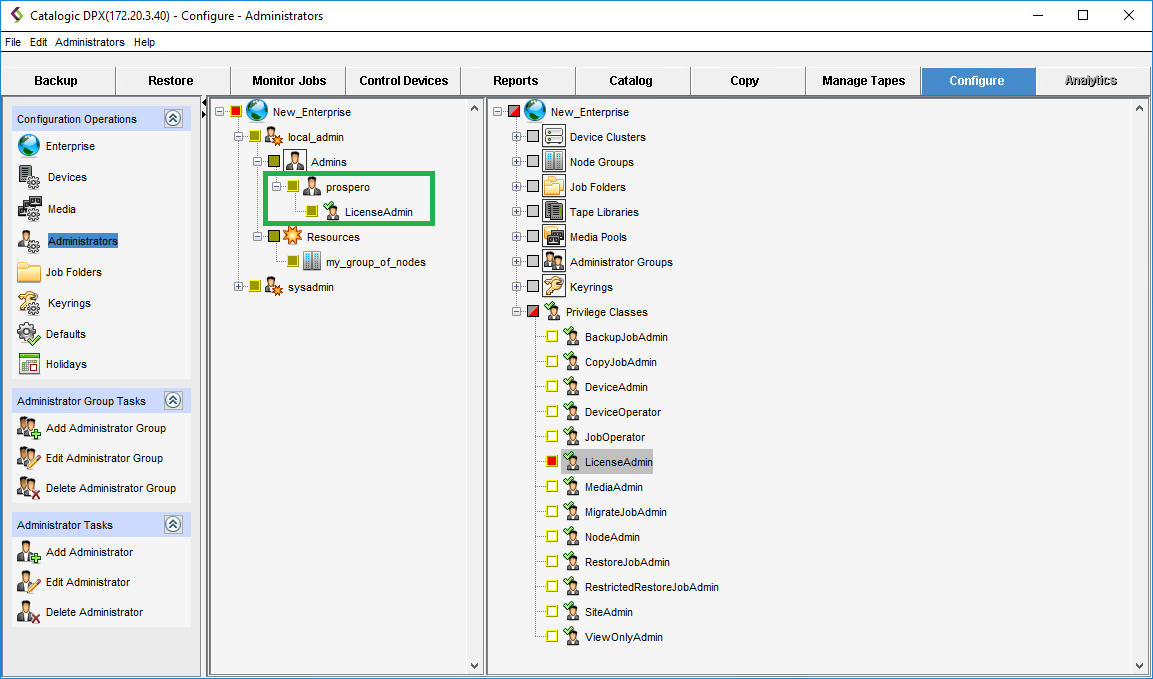
Note. You can also assign privilege classes by dragging them from one administrator to another in the left pane of the Configure Administrators window.
Unassigning Resources and Privilege Classes
To unassign a resource from an administrator group:
Make sure you are in the Configure tab, and the Administrators section is selected.
Do one of the following:
In the left pane, right-click an assigned resource to display a context menu. The selection is indicated by the selection check box next to the assigned resource icon. Then select Unassign.
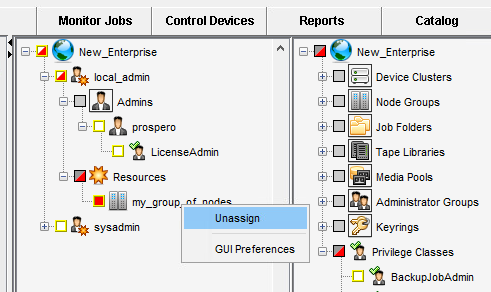
In the left pane, select the assigned resource you want to unassign. Then, from the menu bar, select Administrator > Unassign Resources.
A Confirm unassign resources message box appears.
Click Yes.
The resource disappears from the Administrator tree.
To unassign a privilege class from an administrator:
Make sure you are in the Configure tab, and the Administrators section is selected.
Do one of the following:
Right-click the assigned privilege class to display a context menu. The selection is indicated by the selection check box next to the assigned resource icon. Then select Unassign.
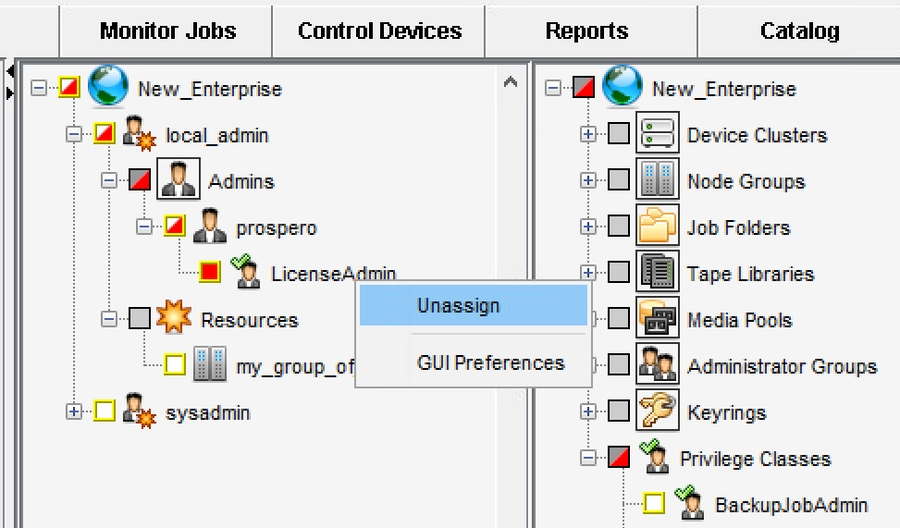
In the left pane, select the assigned privilege class you want to unassign. Then, from the menu bar, select Administrator > Unassign Privilege Classes.
A Confirm unassign privilege class message box appears.
Click Yes. The privilege class disappears from the Administrator tree.
Reports
Generating an Administrator Group Report
To generate and view an Administrator Group report:
Open the Administrator Group Report by doing one of the following:
Click the Reports Tab and select Administrator Group Report.
Right-click Reports on the Function Tab Bar and select Administrator Group Report from the context menu.
In the left pane of the Configure Administrators window, right-click on any administrator group name or icon to display a context menu. Then select Report.
From the menu bar of the Configure Administrators window, select Administrators > Administrator Group Report.
The Administrator Group Report window appears. The fields in this report are Name and Resources.
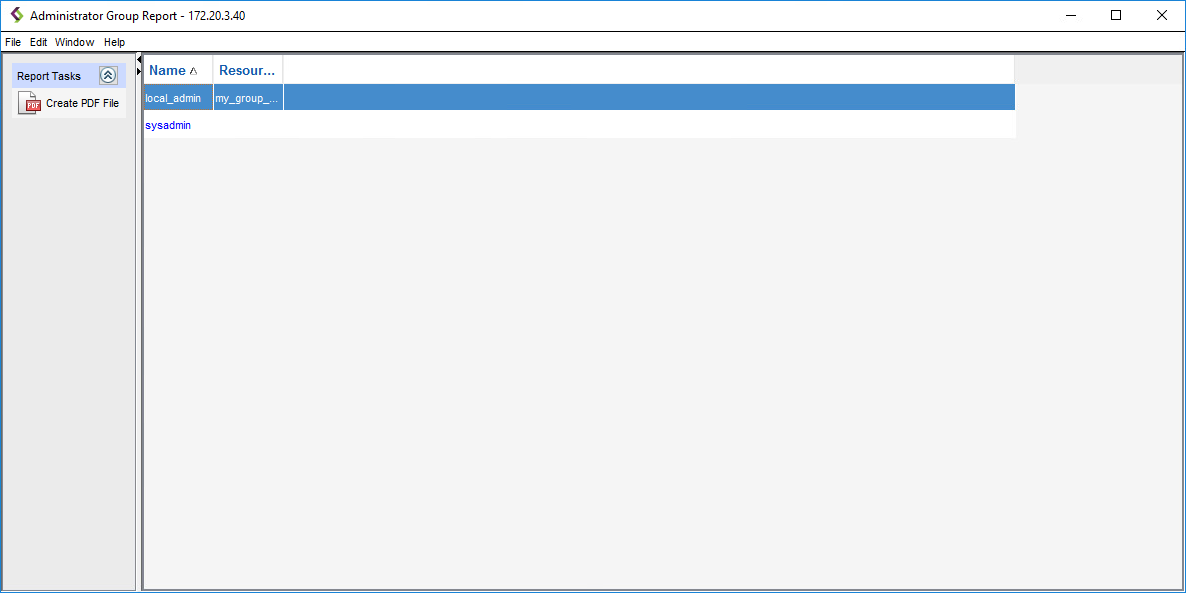
Click Create PDF File.
Complete the Generate Report dialog:
Enter the filename in the Title field.
Select the orientation.
Enter the full path to a directory that contains the font
arialuni.ttf. If no directory is specified, the default font is applied to the report.Select the Yes radio button to generate the report as a Microsoft Excel readable file with the
.csvextension.
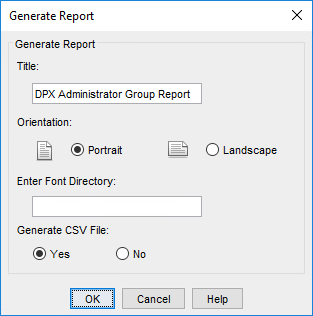
Click OK to generate the report. The report will open in an Acrobat window. To print the report, click the Acrobat Print icon. When a report is generated, an Acrobat file named
BEXReportReportName.pdfand, optionally, a Microsoft Excel readable file namedBEXReportReportName.csvare created on your local disk. The report files are created in your computer’s default temporary directory, as defined by the environmental variable%TEMP%or%TMP%.
Generating an Administrator Report
To generate and view an Administrator report:
Open the Administrator Report by doing one of the following:
Click the Reports Tab and select Administrator Report.
Right-click Reports on the Function Tab Bar and select Administrator Report from the context menu.
In the left pane of the Configure Administrators window, right-click on any administrator name or icon to display a context menu. Then select Report.
From the menu bar of the Configure Administrators window, select Administrators > Administrator Report.
The Administrator Report window appears. The fields in this report are Name, Group Name, and Privilege Classes.
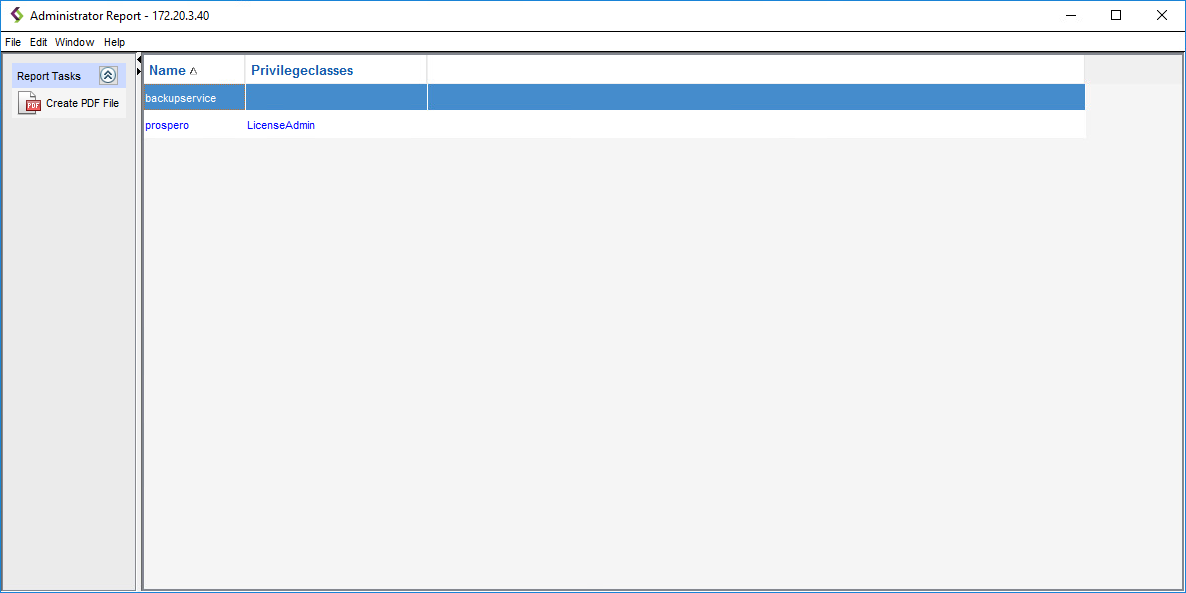
Click Create PDF File.
Complete the Generate Report dialog:
Enter the filename in the Title field.
Select the orientation.
Enter the full path to a directory that contains the font
arialuni.ttf. If no directory is specified, the default font is applied to the report.Select the Yes radio button to generate the report as a Microsoft Excel readable file with a
.csvextension.
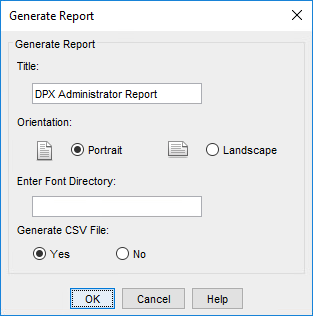
Click OK to generate the report. The report will open in an Acrobat window. To print the report, click the Acrobat Print icon. When a report is generated, an Acrobat file named
BEXReportReportName.pdfand, optionally, a Microsoft Excel readable file namedBEXReportReportName.csvare created on your local disk. The report files are created in your computer’s default temporary directory, as defined by the environmental variable%TEMP%or%TMP%.
Last updated