
Job Options for File Restore from File Backup
This chapter details the various options available when configuring Restoring files protected by file backup jobs.
General Options
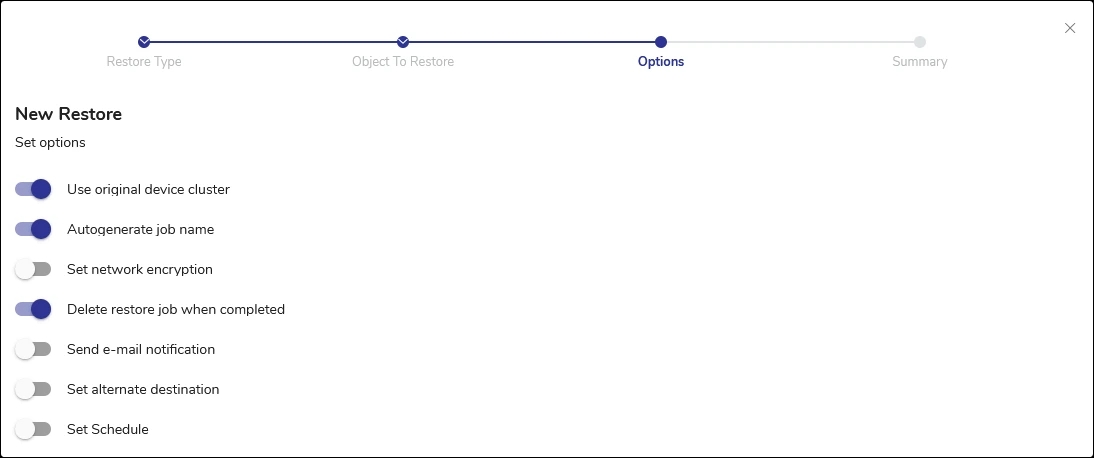
Use Original Device Cluster
This option is enabled by default and allows files to be restored to the original device cluster from which they were backed up, ensuring data consistency.
Autogenerate Job Name
Enabled by default, this option automatically generates a job name based on the Unix timestamp of the backup job.
Set Network Encryption
This option enables encryption for data during the restore process, enhancing security, especially over unsecured networks.
Delete Restore Job When Completed
Enabled by default, this setting automatically deletes the restore job from the system once the process is complete.
Send E-mail Notification
Configures the system to send an email notification upon the completion of the restore job.
To
The email address of the primary recipient of your message. Only one “To” address is permitted.
Cc
Carbon Copy. The email address(es) of the secondary recipient(s) of your message. Use a semicolon to delimit multiple email addresses.
Bcc
Blind Carbon Copy. The email address(es) of the secondary recipient(s) not identified to other recipients. Use a semi-colon to delimit multiple email addresses.
Subject
The subject of your message. The subject line usually contains a combination of straight text and variable elements. Variables, which must begin with %, are replaced with actual corresponding values. If you enclose variables in double quotation marks, those variables are treated as literal values. You can embed the following variables:
%JOBNAME%JOBID%JOBTYPE%RC
Use %RC to include the return code in the message for this run of the job, when applicable.
Set Alternate Destination
Allows the restoration of files to a different location than originally backed up, useful for testing or recovery scenarios where the original location is unavailable. If enabled, select the destination node and absolute path within the node from the dropdown menu.

Set Schedule
Enables scheduling of the restore job to run at a specific time or regularly. The time field is using your browser’s time zone. For example, if you have DPX in London and access the DPX web interface from New York, specify the time in US Eastern Time.
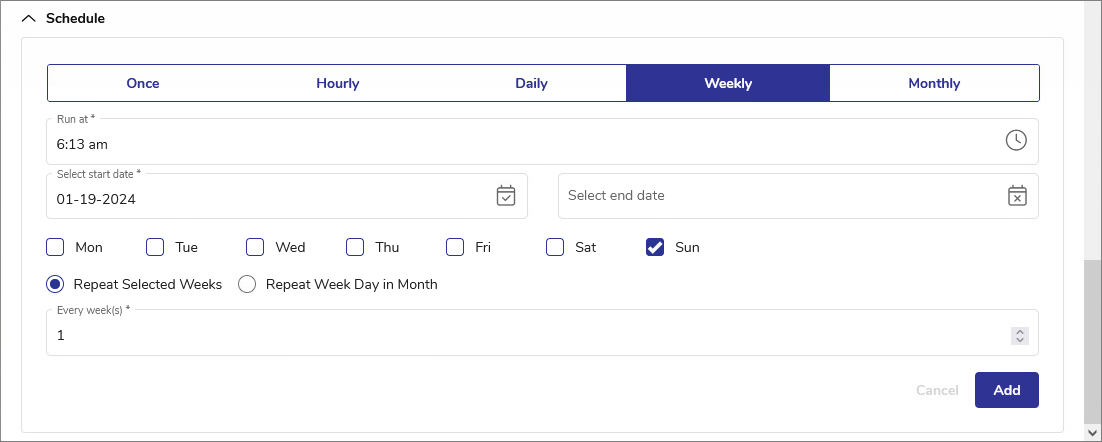
Important. When specifying a schedule, make sure the Delete the restore job on successful completion toggle is switched off. Otherwise, the job will be deleted upon its first successful completion.
Also please note that in the current version of DPX, restore jobs cannot be edited. This also includes job scheduling.
Source Options
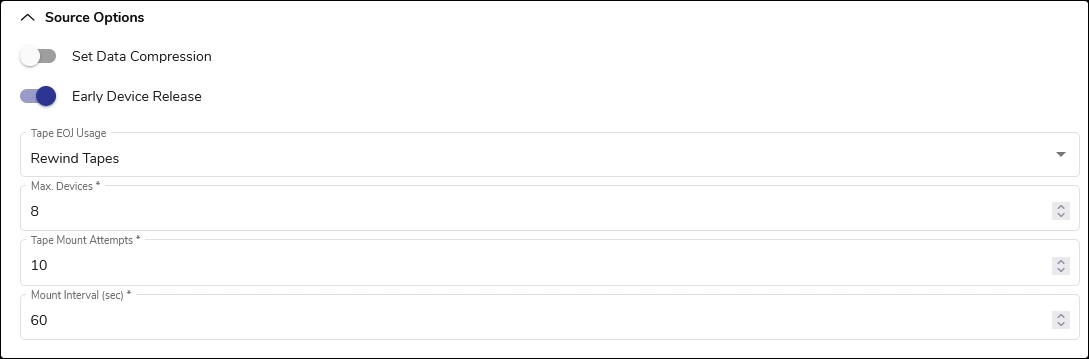
Set Data Compression
This option compresses the data being restored, potentially reducing restore times and network load.
Early Device Release
Controls tape drive usage to optimize the availability of drives for subsequent jobs:
Toggle on
The tape drive is released after the current task with a tape drive finishes so that the next job can use the same tape drive before completing the entire job.
Toggle off
The tape drive holds the tape drive until the entire job is completed.
Tape EOJ Usage
Determines the handling of tapes post-job:
Rewind Tapes
For a standalone tape device, this option rewinds the tape and leaves it in the drive. For a tape library tape drive, this option rewinds, unloads, and returns the tape to its slot.
Unload Tapes
For a standalone tape device, this option rewinds the tape and ejects it from the drive. For a tape library tape drive, this option rewinds, unloads, and returns the tape to its slot.
For DiskDirectory, this option causes empty volsers to be used before new volsers.
Leave Tapes
In the case of standalone tape drives, the tape remains wound to the point where the job ended and stays in the drive. However, for tape library drives, the tape is always attempted to be returned to its slot after the backup operation is completed. The next job attempts to use the tape in the drive instead of mounting a new tape. In the case of a standalone drive, if the currently mounted tape is unacceptable (for example, if the next backup requires a tape from a different media pool), the operator is prompted to mount another tape. In the case of a tape library, if the tape in the drive is rejected for any reason, it unloads the tape, returns it to its slot, and proceeds to select another tape.
Export Tapes
Automates the export of tapes to an I/O port, eliminating manual processes and preparing tapes for their next destination. In environments with physical tape libraries, the availability of an empty I/O port is essential. The system will alert and will return an error code if no port is available, prompting user action. A rescan of ports is recommended to ensure availability.
Max. Devices
Limits the number of storage devices valid for use with this job. Use this option if you want to stop DPX from using all the drives in the selected device cluster so that some drives will be available for other purposes.
Min. Devices
Holds tasks within a job until the number of drives specified are available for each task to use.
Tape Mount Attempts
The maximum number to check a tape in a standalone tape device.
Mount Interval (seconds)
The number of seconds to wait between checking the availability of a tape in a standalone tape device.
Script Options
As with backup jobs, you can add script options for this restore job.
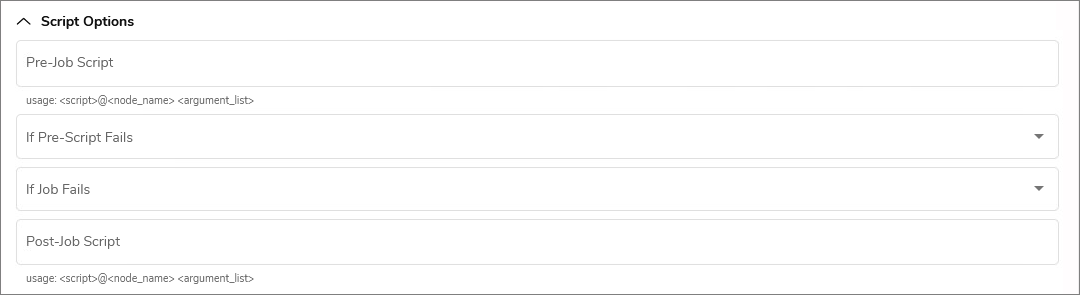
Pre-Job Script
Specifies a script to run before the job starts, with options to handle scenarios where the script fails:
Run Job/Run Post-Job Script
Skip Job/Run Post-Job Script
Skip Job/Skip Post-Job Script
Post-Job Script
Specifies a script to run after the job completes, with options for handling job failure:
Run Post-Job Script
Skip Post-Job Script
See also. For detailed information about pre- and post-job scripts, including all valid definitions, see Pre-Scripts and Post-Scripts.
Destination Options
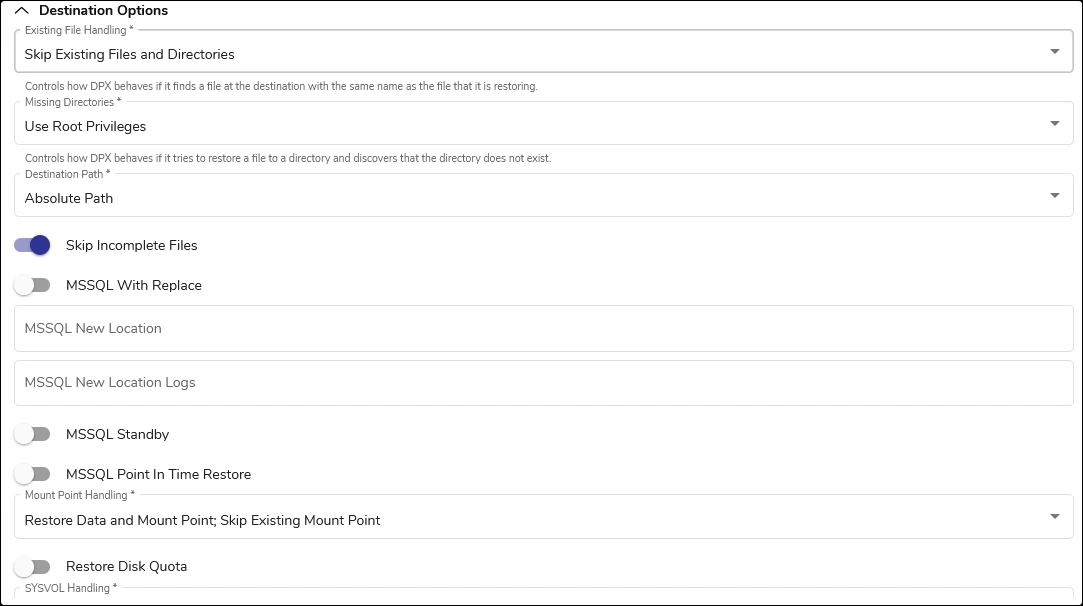
Existing File Handling
Tells DPX how to behave if it finds a file at the destination with the same name as the file that it is restoring.
Skip Existing Files and Directories
Does not write over the existing file or directory if it has the same name as the one being restored.
Replace Existing Files
Restores the file to a temporary file, ensures that the restore is successful, and then writes over the existing file with the like-named file being restored.
Replace Existing Files and Directories
For existing directories, restores directory characteristics only, such as date, time, and owner. For existing files, restores file to a temporary file, ensures that the restore is successful, then writes over the existing file with the like-named file being restored.
Delete Existing Files Before Restore
Deletes the existing file before restoring the like-named file. Use this option when disk space limitations prohibit using Replace Files.
Rename Restored Files
Renames the file being restored to a name derived from the existing file. On NTFS and UNIX, DPX appends .R01 to the filename. If filename.R01 exists, DPX uses .R02 and so on. On FAT, a file extension .R01 is used. For example, the file ABCD.TXT is restored as ABCD.R01. If ABCD.R01 exists, ABCD.R02 is used, and so on.
Missing Directories
Controls how DPX behaves if it tries to restore a file to a directory and discovers that the directory does not exist.
Use Full Privileges
Uses the file privileges the file possessed when it was originally backed up.
Use Parent Privileges
Applies the file privileges of the parent directory into which the files are being restored.
Use Root Privileges
Applies the file privileges of the root directory into which the files are being restored.
Destination Path
Configures the restoration path for the files. This setting allows you to choose whether to preserve the original directory structure or to restore all files to a single specified directory.
Absolute Path
Maintains the original directory structure upon restoration. For instance, if you backed up from C:\NewPrjs\Dev\Bin and restore to C:\NewPrjs\Test, the restored path will be C:\NewPrjs\Test\NewPrjs\Dev\Bin.
Relative Path
Strips the parent directories, placing the files directly into the new restoration directory. For example, backing up from C:\NewPrjs\Dev\Bin and restoring to C:\NewPrjs\Test results in the files being restored to C:\NewPrjs\Test\Bin.
Skip Incomplete Files
Specifies the action to take with files that were not fully restored.
Toggle off
Keep the partially restored file.
Toggle on
Delete the partially restored file.
MSSQL with Replace
When this option is enabled, DPX will overwrite an existing database without performing the usual SQL Server pre-restore tests. This can be useful when you are certain that the restore should proceed, but it bypasses SQL Server's built-in safety checks, so use it with caution1.
MSSQL New Location
This option allows you to restore the database to a different location than the original. It's essential when the original location is not available or when you want to restore the database for testing purposes.
MSSQL New Location Logs
If you're restoring the database to a new location and want to specify a different location for the transaction logs, use this option. This is particularly useful for separating data files from log files.
MSSQL Standby
Prepares the Microsoft SQL Server database to be restored in a standby/read-only mode. This is particularly useful for situations where the database needs to be online during the restore process but should not be modified.
Toggle off
Does not restore the SQL Server database to a standby server.
Toggle on
Restores a SQL Server database to a standby server.
MSSQL Point in Time Restore
This option enables you to restore the database to a specific point in time, using the transaction logs. Ensure that the necessary transaction log backups are available for the point in time you wish to restore to.
Mount Point Handling
This setting governs the restoration of data from backups made through Windows 2000 volume mount points, detailing both the restoration location and the reassignment of mount points.
To ensure a mount point's content is backed up, activate the 'Back Up Content of Mounted Drive' option in the 'Set Job Source Options'. For instance, if C:\mnt\driveD is a mount point for D:, you would select C:\mnt\driveD for the backup instead of D:.
Restore Data (no Mount Point)
Restores data to the current directory structure, regardless of previous mount points. If a directory was a mount point at backup and remains so at restoration, data is restored to the current volume it mounts.
Restore Data and Mount Point; Skip Existing Mount Point
Reestablishes the mount point and restores data to the mounted volume unless the directory now mounts a different volume, in which case the mount point is not reestablished.
Restore Data and Mount Point; Replace Existing Mount Point
Always reestablishes the original mount point and restores data to the mounted volume, even if the directory mounts a different volume at restoration. This setting is the default during reconstructive restores.
Note. if a directory was a mount point during backup but is now a standard directory with local files at the time of restoration, the mount point will not be recreated. Instead, the data will be restored to the directory that previously functioned as a mount point.
Note. Be aware that for Reconstructive Restores, DPX will default to the Restore Data and Mount Point; Replace Existing Mount Point option, regardless of the initially selected setting.
Restore Disk Quota
Using disk quotas, administrators can limit the amount of data each user can store on a Windows 2000 NTFS or NSS volume. This field determines whether to restore disk quotas.
Toggle off
Disk quota settings are not restored.
Toggle on
Disk quota settings are restored.
Note. Backing up an entire volume is not a prerequisite for preserving disk quota settings. Any backup operation from a supported volume will automatically include this information. Similarly, when restoring, it is not mandatory to restore the entire volume to recover disk quota settings.
if you are restoring to a new location, disk quota settings will only be reinstated if the new location is the root directory of a similar volume, and the Destination Path is configured to Absolute Path.
SYSVOL Handling
If the Enterprise has more than one domain controller, you can choose whether to replicate SYSVOL files and folders to the other controllers as part of the Windows 2000+ System State restore.
Authoritative Restore
Restores SYSVOL files and folders in a primary manner and forces that data to be replicated to the other primary domain controllers.
Non-Authoritative Restore
Restores SYSVOL files and folders locally and allows that data to get updated via the normal replication process. This is the default setting.
Attention! When there are replication partners, selecting Authoritative Restore can result in unexpected behavior. For more information, see Creating vStor Partnerships in vStor 4.11 Documentation.
To execute an authoritative restore of the Active Directory, it is necessary to run the Microsoft Ntdsutil utility. This step should be performed after the System State data has been restored but before rebooting the domain controller. For detailed guidance on using the Ntdsutil utility and performing an authoritative restore, please consult the Microsoft documentation.
Cluster Handling
If your Enterprise contains clusters, you can choose whether to restore the cluster quorums as part of the Windows 2000+ System State restore.
Do Not Restore Cluster Quorum
DPX does not restore the cluster quorum. This is the default setting.
Restore Cluster Quorum
DPX restores the cluster quorum. However, if other cluster nodes are active or if the cluster quorum has changed since backup, the cluster quorum restore may terminate.
Restore Cluster Quorum (Force the Recovery)
DPX restores the cluster quorum even if other cluster nodes are active or if the cluster quorum has changed since backup. Any changes made to the cluster quorum after the backup will be lost.
Restore Security
Determines whether DPX restores security information associated with each file or folder.
Toggle off
Restores all security information associated with the files and directories, including NTFS security properties, UNIX/Linux ACLs, and trustee settings in NetWare or OES environments. This is the default setting.
Toggle on
Does not overwrite security information in the restoration destination directories.
Retry Failed File (NT/Win2K)
Determines how to handle files that fail when you attempt to restore them. This applies only to Windows.
No
Does not retry restoring files that failed during the initial attempt. This is the default setting.
Retry Open File
Attempts to restore files that were open and failed in the initial restore attempt. A system reboot is required after the restore to access the files.
Retry All Failure
Retries the restoration of all files that failed during the initial attempt, including open files. A system reboot is necessary post-restore to access the files.
Last updated