Job Source Options for File Backup
Catalogic DPX offers a variety of source options for File backup. All of them are available from both interfaces, but the access thereto may slightly differ. See details for each interface below.
To access the job source options, do the following:
Go to Job Manager in the sidebar.
Open an already existing backup job. Or create a new File backup job, by clicking the New Backup Job button in the upper right corner and then selecting Backup Type File.
Go to the Advanced Options section at the bottom (scroll down if necessary) and expand it. Click any of the following section headers to expand it. Each field and the available choices are explained below.
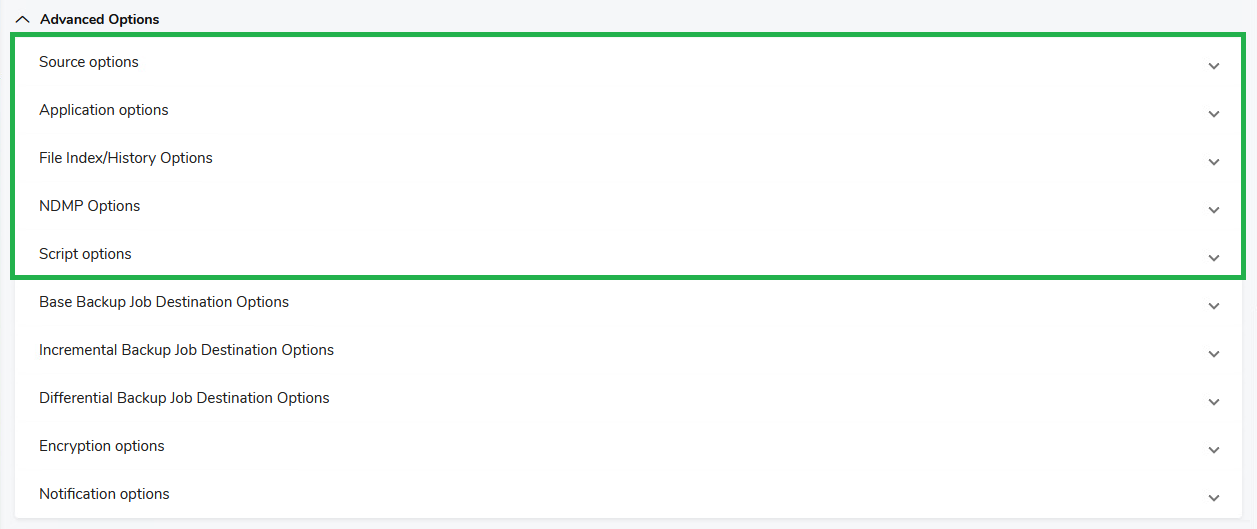
Note. The Advanced Options section in the web interface also includes job destination options which are discussed in a separate section for the sake of clarity. See Job Destination Options for File Backup.
The Source Options section
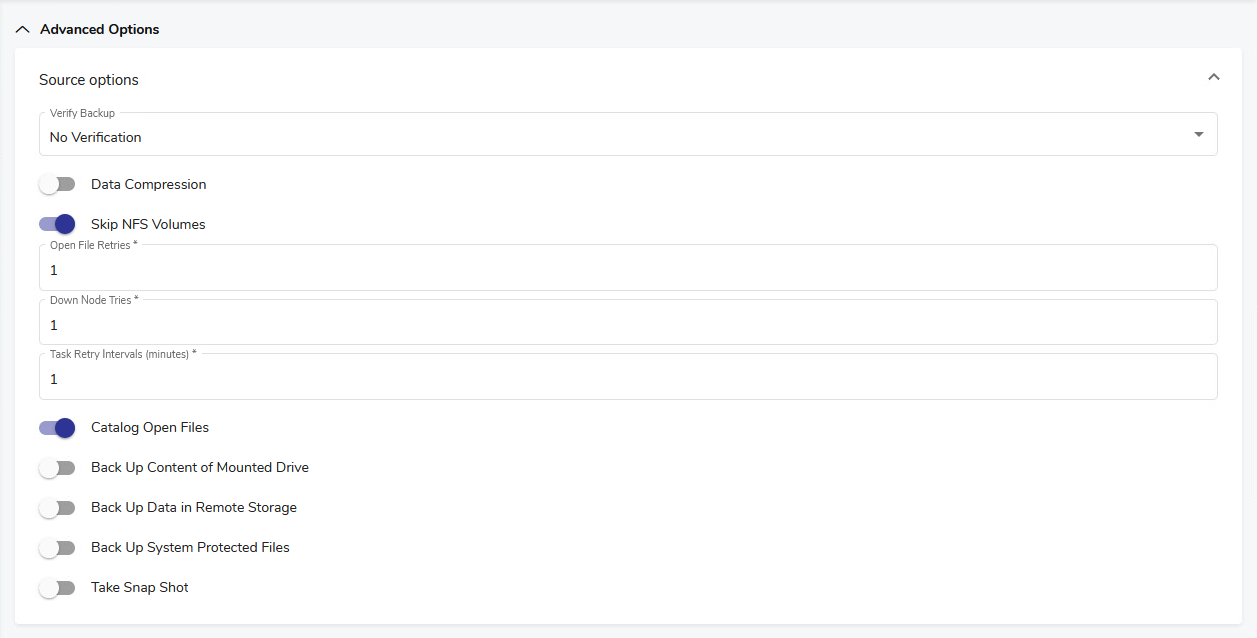
Verify Backup drop-down
Controls the data verification technique for writing data to a media volume. The higher the verification level, the greater the safety and the longer a backup takes. Each verification level builds upon the preceding level. For example, level 3 performs level 1 and level 2 verification as well. Select one of the following options:
No Verification
Writes data to the media volume without verification. This is the fastest option and relies on the tape device for data verification.
Level 1
Reads the tape to ensure that it is readable.
Level 2
Reads the tape and ensures that the SIDF headers are present and contain the correct information.
Level 3 Ensures that the checksum of each file on the tape matches the one contained in the SIDF header for that file. This verification is only performed if the Checksum Files toggle is set to Enabled in the Job Destination Options section. The tape and SIDF headers are also read and verified (levels 1 and 2).
Data Compression toggle
Compresses data prior to network transmission.
Toggle on
Compress data prior to transmission at the node being backed up. This setting is recommended if there is processing power available on the client nodes and network bandwidth is limited. The setting minimizes the impact of data transmission on data lines.
Toggle off
Disable data compression.
Skip NFS Volumes toggle
Determines expected behavior when encountering an NFS (network file system) volume during a backup operation. NFS volumes are remotely mounted volumes owned by another node. This option also controls the backup behavior of drives mapped to the Microsoft Windows node (CIFS mount point).
Toggle on
Back up NFS volumes and drives mapped to the Microsoft Windows nodes.
Toggle off
Do not back up NFS volumes or drives mapped to the Microsoft Windows nodes.
Open File Retries entry field
If you are not using an open file manager, this option controls how many times DPX attempts to back up an open file. If you enter zero, DPX skips open files. If you enter a number, DPX waits until all the files on the node have been backed up then tries again to save the open files. DPX attempts this the number of times you enter here.
Down Node Retries entry field
Controls how DPX behaves when it cannot establish contact with a node during a backup operation. If you enter zero, DPX skips unreachable nodes. If you enter a number, DPX waits until all the reachable nodes have been backed up and then retries the nodes that it could not back up on its first attempt. The number you enter determines how many times DPX tries to reach unreachable nodes.
Task Retry Intervals (Minutes) entry field
Determines how long to wait before retrying failed tasks.
When a task fails (due to permission problems, open files, interim job changes, etc.), it waits the number of minutes specified in this field before attempting that task again. Because the same failure might occur if the task is retried too soon, it is better to allow some time for an error to be corrected before retrying the task. A task is only retried once. Failing tasks appear in error message lists in the Job Log. All tasks are subject to retry.
Catalog Open Files toggle
If you are not using an open file manager, this option tells Catalogic DPX whether to catalog open files encountered on UNIX systems. On UNIX nodes, Catalogic DPX backs up the file and then checks to determine if it has been modified while the backup transpired. If it has, the file is considered open. Cataloging open files is not generally recommended.
Toggle on
Catalog the backed-up file if detected that the file has been modified during the backup process and the number specified in the Open File Retries field has been reached. DPX catalogs its last attempt to back up an open file if it finds the file is still open. Note that cataloging a file that has been modified during the backup can compromise the integrity of the file when that file is restored.
Toggle off
Do not save the backed-up file if DPX detects that the file has been modified during the backup process and the number specified in the Open File Retries field has been reached.
Back Up Content of Mounted Drive toggle
Tells DPX whether to back up data on a mounted drive (volume). This field only applies to NTFS volume mount points on Windows 2000 and higher machines.
Toggle on
Data on a mounted drive is backed up through a volume mount point.
Toggle off
Data on a mounted drive is not backed up through a volume mount point. Whether the directory is restored as a volume mount point or not depends on the Set Job Destination Options.
Note. If the toggle is set to On, and if you select both a volume mount point and the drive itself, duplicate backups might occur.
Back Up Data in Remote Storage toggle
Remote Storage Service (RSS) is the Hierarchical Storage Management (HSM) system for Windows 2000 and higher, which automatically migrates files from disk to remote media, like tape. If the Windows administrator configures this service and disk space becomes low, files not modified for a specified period of time are sent to remote storage. A link (stub file) to the remote storage is kept in their place. Users can recall these stub files by accessing their links. This field determines whether DPX should back up links to these files or the files themselves.
Toggle on
Files on remote storage are backed up by DPX. In this case, files are backed up from tape to tape. At restore, files are restored to disk. However, because file dates are not affected by backup and restore, it is likely that the files will automatically be sent back to remote storage.
Toggle off
Files on remote storage are not backed up. DPX backs up their links.
Note. The tape devices and the media pool used by Windows for remote storage service cannot be shared with DPX.
Back Up System Protected Files toggle
Tells DPX whether to back up System Protected Files as part of the System State Backup. This applies only to Windows 2000 and higher backups.
Toggle on
System-protected files are backed up as part of System State.
Toggle off
System-protected files are not backed up as part of System State.
Take Snap Shot toggle
Restrictions. This option applies only to 32-bit Windows XP or higher.
If this option is selected, DPX first creates a snapshot of the current state of all data to be backed up. Then, DPX backs up the snapshot to the destination server. This enables DPX to back up open files.
Toggle on
Take a snapshot of the current data condition, then back up the snapshot.
Toggle off
Do not take a snapshot first.
The Application Options section
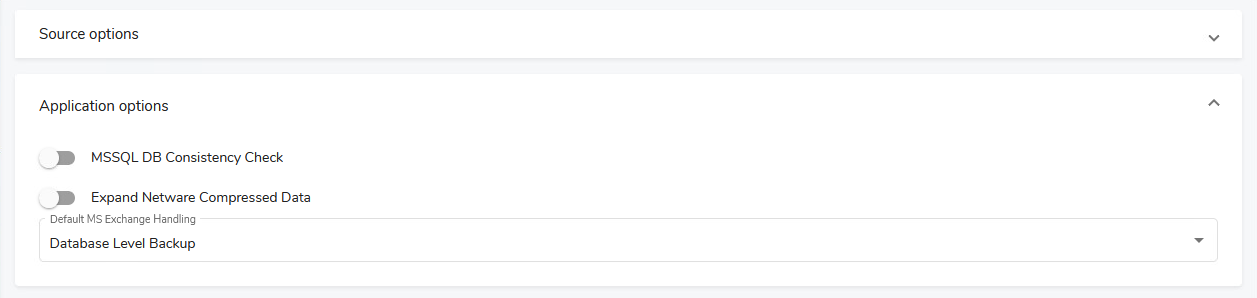
MSSQL DB Consistency Check toggle
Tells DPX to run a consistency check on SQL Server before backing up a SQL Server database. The check runs three utilities that Microsoft recommends before a backup: DBCC CHECKDB, DBCC CHECKALLOC, and DBCC CHECKCATALOG.
Toggle on
Performs the consistency check.
Toggle off
Does not perform the consistency check.
Expand Netware Compressed Data toggle
Tells DPX whether to expand compressed data. This applies only to supported versions of NetWare.
Toggle on
Expand compressed data when performing the backup. Select this option if you want to restore to an uncompressed volume. DPX cannot restore compressed data to an uncompressed volume.
Toggle off
Do not expand the compressed data. If you choose this option, you can restore this data only to a compressed volume.
Default MS Exchange Handling drop-down
Controls whether Exchange backup occurs at the database or individual message level.
Database Level Backup
EXCHANGE and EXCH2000 disks appear on the Backup File definition screen; EXCHANGEFS and EXCH2000FS disks do not appear. If you back up an entire server, database level backups are performed; folder level backups are not. Database Level Backup is the default.
Folder Level Backup
EXCHANGEFS and EXCH2000FS disks appear on the Backup File definition screen; EXCHANGE and EXCH2000 disks do not appear. If you back up an entire server, folder level backups are performed; database level backups are not.
Both Database and Folder Level Backup
All Exchange disks appear on the Backup File definition screen. If you back up an entire server, both database and folder level backups of Exchange disks are performed.
The NDMP options section
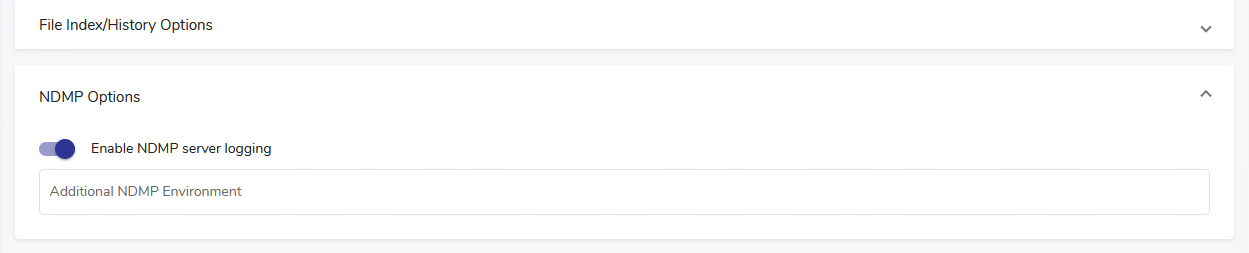
Enable NDMP Server Logging toggle
Controls the routing of NDMP server-generated log messages to the job log file.
Toggle on
All NDMP server log messages will be routed to the master server’s job log file. Yes is the default.
Toggle off
The NDMP server log messages will be logged locally in the NDMP client node log file instead of in the master server’s job log file.
Additional NDMP Environment input field
This option allows you to introduce any additional NDMP environment variables that are necessary for the backup task. Specify your environment variables as an ASCII string with an environment variable name and value pairs using the following syntax:
Note. Syntax validation is not performed on the specified value at job definition time, but rather at run time. Only valid entries are added to the NDMP operation environment.
Note. Alternative syntax, e.g. env1name value;env2name value;... (semicolon-delimited, no equal sign) or env1name valueenv2name value... (no delimiter, no equal sign) may be displayed in the interface. However, for the sake of clarity, the env1name=value,env2name=value,... version is strongly recommended.
Attention! Do not specify any of the following NDMP environment variables in your variable string because DPX controls these specifically:
BASE_DATE
DEBUG
DIRECT
DUMP_DATE
EXTRACT
FILES
FILESYSTEM
HIST
LEVEL
PREFIX
RECOVER_FILEHIST
SINCE_TIME
TYPE
UPDATE
VERBOSE
Specifying the variables above may cause unexpected results due to the unpredictability of the order in which they are evaluated.
NDMP servers from different vendors may support different NDMP environment variables. Except for a few well-known environment variable names, there is currently no standardized set of such variables. This option allows you to add environmental variables specific to your NDMP server.
The Script Options section
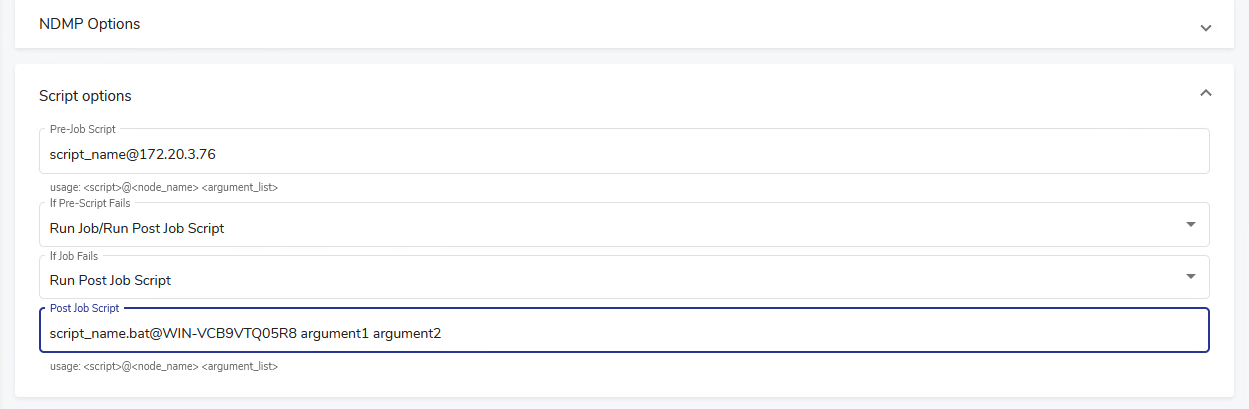
Pre-Job Script
Enter the name of a script to execute prior to the actual job.
Basic usage: <script>@<node_name> <argument_list>
If Pre-Script fails
The action be taken if the Pre-Job Script fails to successfully complete:
Run Job/Run Post-Job Script
Skip Job/Run Post-Job Script
Skip Job/Skip Post-Job Script
If Job fails
The action to be taken if the Job fails to successfully complete:
Run Post-Job Script
Skip Post-Job Script
Post-Job Script
Enter the name of a script to execute after the actual job.
Basic usage: <script>@<node_name> <argument_list>
See also. For detailed information about pre- and post-job scripts, including all valid definitions, see Pre-Scripts and Post-Scripts.
To access the job source options for File backup, do the following:
Go to the Backup tab.
In the Backup Modes section, select File.
Open an already existing backup job by selecting Open Backup Job in the Job Tasks section. Or go directly to step 4 to set source options for the new job you will be defining directly afterward.
Go to the Other Tasks section in the task panel (scroll down if necessary) and select Set Source Options. The Set Job Source Options dialog will appear.
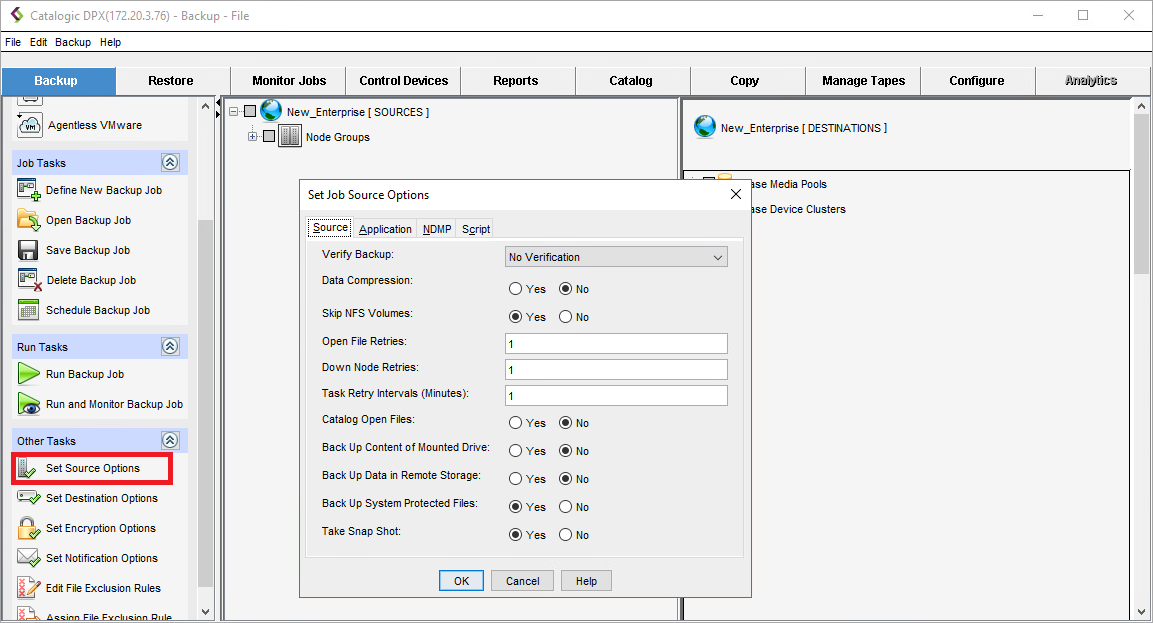
The Set Job Source Options dialog allows you to set options related to backup sources. This section provides an explanation of each field in the dialog and the available choices.
The Source tab
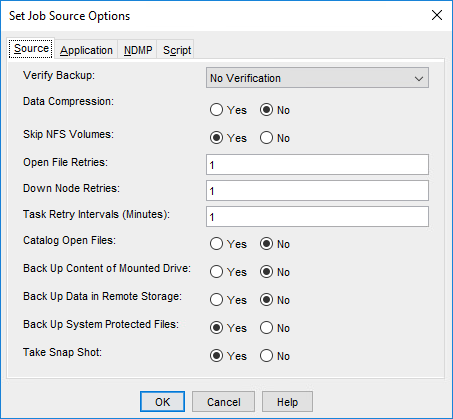
Verify Backup
Controls the data verification technique for writing data to a media volume. The higher the verification level, the greater the safety and the longer a backup takes. Each verification level builds upon the preceding level. For example, level 3 performs level 1 and level 2 verification as well. Select one of the following options:
No Verification
Writes data to the media volume without verification. This is the fastest option and relies on the tape device for data verification.
Level 1
Reads the tape to ensure that it is readable.
Level 2
Reads the tape and ensures that the SIDF headers are present and contain the correct information.
Level 3 Ensures that the checksum of each file on the tape matches the one contained in the SIDF header for that file. This verification is only performed if the Checksum Files feature is set to Yes in Set Job Destination Options. The tape and SIDF headers are also read and verified (levels 1 and 2).
Data Compression
Compresses data prior to network transmission.
Select Yes to compress data prior to transmission at the node being backed up. This setting is recommended if there is processing power available on the client nodes and network bandwidth is limited. This setting minimizes the impact of data transmission on data lines.
Or, select No to disable the data compression.
Skip NFS Volumes
Determines expected behavior when encountering an NFS (network file system) volume during a backup operation. NFS volumes are remotely mounted volumes owned by another node. This option also controls the backup behavior of drives that are mapped to the Microsoft Windows node (CIFS mount point).
Select No to back up NFS volumes and drives that are mapped to the Microsoft Windows nodes.
Or, select Yes so as not to back up NFS volumes or drives that are mapped to the Microsoft Windows nodes.
Open File Retries
If you are not using an open file manager, this option controls how many times DPX attempts to back up an open file. If you enter zero, DPX skips open files. If you enter a number, DPX waits until all the files on the node have been backed up then tries again to save the open files. DPX attempts this the number of times you enter here.
Down Node Retries
Controls how DPX behaves when it cannot establish contact with a node during a backup operation. If you enter zero, DPX skips unreachable nodes. If you enter a number, DPX waits until all the reachable nodes have been backed up and then retries the nodes that it could not back up on its first attempt. The number you enter determines how many times DPX tries to reach unreachable nodes.
Task Retry Intervals (Minutes)
Determines how long to wait before retrying failed tasks.
When a task fails (due to permission problems, open files, interim job changes, etc.), it waits the number of minutes specified in this field before attempting that task again. Because the same failure might occur if the task is retried too soon, it is better to allow some time for an error to be corrected before retrying the task. A task is only retried once. Failing tasks appear in error message lists in the Job Log. All tasks are subject to retry.
Catalog Open Files
If you are not using an open file manager, this option tells Catalogic DPX whether to catalog open files encountered on UNIX systems. On UNIX nodes, Catalogic DPX backs up the file and then checks to determine if it has been modified while the backup transpired. If it has, the file is considered open. Cataloging open files is not generally recommended.
Select No so as not to save the backed-up file if DPX detects that the file has been modified during the backup process and the number specified in the Open File Retries field has been reached.
Or, select Yes to catalog the backed-up file if it detects that the file has been modified during the backup process and the number specified in the Open File Retries field has been reached. Catalogic DPX catalogs its last attempt to back up an open file if it finds the file is still open. Note that cataloging a file that has been modified during the backup can compromise the integrity of the file when that file is restored.
Back Up Content of Mounted Drive
Tells DPX whether to back up data on a mounted drive (volume). This field only applies to NTFS volume mount points on Windows 2000 and higher machines.
Yes
Data on a mounted drive is backed up through a volume mount point.
No
Data on a mounted drive is not backed up through a volume mount point. Whether the directory is restored as a volume mount point or not depends on the Set Job Destination Options.
Note. If set to Yes, and if you select both a volume mount point and the drive itself, duplicate backups might occur.
Back Up Data in Remote Storage
Remote Storage Service (RSS) is the Hierarchical Storage Management (HSM) system for Windows 2000 and higher, which automatically migrates files from disk to remote media, like tape. If the Windows administrator configures this service and disk space becomes low, files not modified for a specified period of time are sent to remote storage. A link (stub file) to the remote storage is kept in their place. Users can recall these stub files by accessing their links. This field determines whether DPX should back up links to these files or the files themselves.
Yes
Files on remote storage are backed up by DPX. In this case, files are backed up from tape to tape. At restore, files are restored to disk. However, because file dates are not affected by backup and restore, it is likely that the files will automatically be sent back to remote storage.
No
Files on remote storage are not backed up. DPX backs up their links.
Note. The tape devices and the media pool used by Windows for remote storage service cannot be shared with DPX.
Back Up System Protected Files
Tells DPX whether to back up System Protected Files as part of the System State Backup. This applies only to Windows 2000 and higher backups.
Yes
System protected files are backed up as part of System State. Yes is the default.
No
System protected files are not backed up as part of System State.
Take Snap Shot
Restrictions. This option applies only to 32-bit Windows XP or higher.
If this option is selected, DPX first creates a snapshot of the current state of all data to be backed up. Then, DPX backs up the snapshot to the destination server. This enables DPX to back up open files.
Yes
Take a snapshot of the current data condition, then back up the snapshot.
No
Do not take a snapshot first.
The Application tab
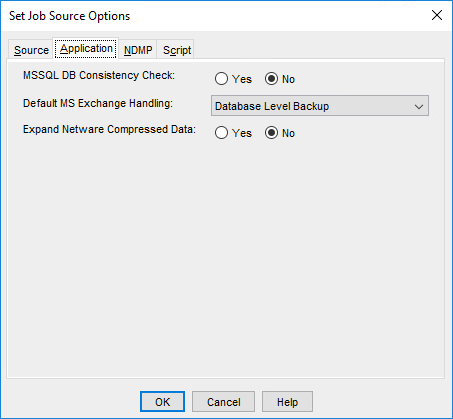
MSSQL DB Consistency Check
Tells DPX to run a consistency check on SQL Server before backing up a SQL Server database. The check runs three utilities that Microsoft recommends before a backup: DBCC CHECKDB, DBCC CHECKALLOC, and DBCC CHECKCATALOG.
Yes
Performs the consistency check.
No
Does not perform the consistency check.
Default MS Exchange Handling
Controls whether Exchange backup occurs at the database or individual message level.
Database Level Backup
EXCHANGE and EXCH2000 disks appear on the Backup File definition screen; EXCHANGEFS and EXCH2000FS disks do not appear. If you back up an entire server, database level backups are performed; folder level backups are not. Database Level Backup is the default.
Folder Level Backup
EXCHANGEFS and EXCH2000FS disks appear on the Backup File definition screen; EXCHANGE and EXCH2000 disks do not appear. If you back up an entire server, folder level backups are performed; database level backups are not.
Both Database and Folder Level Backup
All Exchange disks appear on the Backup File definition screen. If you back up an entire server, both database and folder level backups of Exchange disks are performed.
Expand Netware Compressed Data
Tells DPX whether to expand compressed data. This applies only for supported versions of NetWare.
Yes
Expand compressed data when performing the backup. Select this option if you may want to restore to an uncompressed volume. DPX cannot restore compressed data to an uncompressed volume.
No
Do not expand the compressed data. If you choose this option, you can restore this data only to a compressed volume.
The NDMP tab
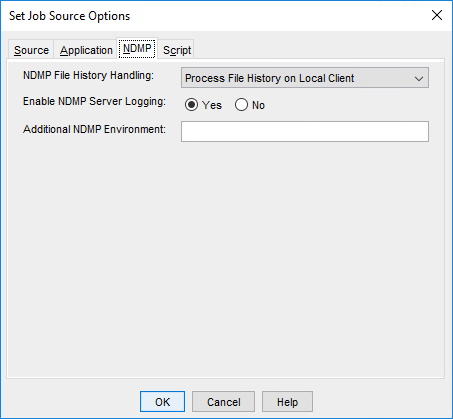
NDMP File History Handling
Controls file history generation for NDMP and Block backup tasks.
For information on using Instant Access for file-level restore, see Instant Access as a File History Alternative in the DPX 4.9 User’s Guide.
Disable File History
Disables NDMP server file history generation.
Process File History on Local Client
Enables NDMP server file history generation and processes the file history data on the NDMP client node. This is the default.
Process File History on Master Server Appliance
Enables NDMP server file history generation but transmits the file history data to the master server node for processing.
See also. Generic NDMP Restore with File History Processing in the DPX 4.9 Reference Guide
Enable NDMP Server Logging
Controls the routing of NDMP server-generated log messages to the job log file.
Yes
All NDMP server log messages will be routed to the master server’s job log file. Yes is the default.
No
The NDMP server log messages will be logged locally in the NDMP client node log file instead of in the master server’s job log file.
Additional NDMP Environment
This option allows you to introduce any additional NDMP environment variables that are necessary for the backup task. Specify your environment variables as an ASCII string with an environment variable name and value pairs using the following syntax:
Note. Syntax validation is not performed on the specified value at job definition time, but rather at run time. Only valid entries are added to the NDMP operation environment.
Note. Alternative syntax, e.g. env1name value;env2name value;... (semicolon-delimited, no equal sign) or env1name valueenv2name value... (no delimiter, no equal sign) may be displayed in the interface. However, for the sake of clarity, the env1name=value,env2name=value,... version is strongly recommended.
Attention! Do not specify any of the following NDMP environment variables in your variable string because DPX controls these specifically:
BASE_DATE
DEBUG
DIRECT
DUMP_DATE
EXTRACT
FILES
FILESYSTEM
HIST
LEVEL
PREFIX
RECOVER_FILEHIST
SINCE_TIME
TYPE
UPDATE
VERBOSE
Specifying the variables above may cause unexpected results due to the unpredictability of the order in which they are evaluated.
NDMP servers from different vendors may support different NDMP environment variables. Except for a few well-known environment variable names, there is currently no standardized set of such variables. This option allows you to add environmental variables specific to your NDMP server.
The Script tab
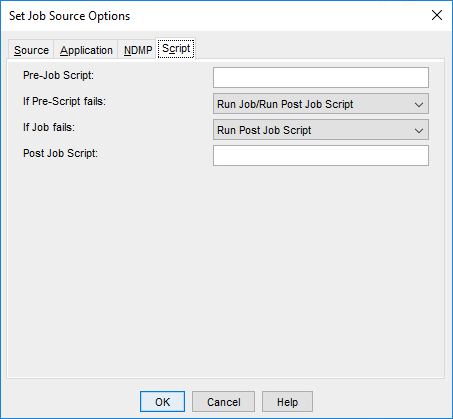
Pre-Job Script
Enter the name of a script to execute prior to the actual job.
Basic usage: <script>@<node_name> <argument_list>
If Pre-Script fails
The action be taken if the Pre-Job Script fails to successfully complete:
Run Job/Run Post-Job Script
Skip Job/Run Post-Job Script
Skip Job/Skip Post-Job Script
If Job fails
The action to be taken if the Job fails to successfully complete:
Run Post-Job Script
Skip Post-Job Script
Post-Job Script
Enter the name of a script to execute after the actual job.
Basic usage: <script>@<node_name> <argument_list>
See also. For detailed information about pre- and post-job scripts, including all valid definitions, see Pre-Scripts and Post-Scripts.
Last updated