DPX 4.12 Guide
  • Welcome to DPX!
  • Introduction
    • About DPX
  • Installation and Configuration
    • How to Start – Basic Configuration
      • Protocols Used for Backup and Restore Data Transfer
    • DPX Master Server
      • Deploying DPX with VMware vSphere
        • Auxiliary Tasks for VMware Deployment
      • Deploying DPX with Microsoft Hyper-V
        • Auxiliary Tasks for Hyper-V Deployment
      • DPX Master Server Interface
      • Connecting to DPX Master Server via SSH
      • Configuration
    • DPX Client
      • DPX Client for Microsoft Windows
        • Requirements
        • Installation
        • How to Uninstall
      • DPX Client for Linux
        • Requirements
        • Installation
        • How to Uninstall
      • Automated Deployment of DPX Client
      • Further Actions with DPX Client
    • DPX Proxy Server
      • Deploying DPX Proxy Server for VMware
      • DPX Proxy Server Web Interface
    • DPX Hyper-V Agent
    • Nodes
      • Adding a Client Node to the Master Server during Client Deployment
      • Adding a Client Node from the Master Server Level
      • Adding a vStor Storage Node
      • Adding a Configured Hyper-V Host as a DPX Node
      • Adding an S3 Object Storage Node
      • Adding Other Node Types to the Master Server
      • Adding a Node Group
    • Devices
      • Adding a Device Cluster
      • Adding a Device
      • Adding a Tape Library
      • Adding a Tape Library Device
    • Media
      • Adding a Media Pool
      • Adding Media Volumes
    • Tape Libraries
      • Tape Library Deployment
      • Tape Library Setup
      • Manual Tape Library Installation
      • Tape Library Verification
      • Manual Tape Library Configuration
      • Setting up LTO Tape Drives for Hardware Encryption
        • Assigning and Unassigning Media to/from Tape Library Slots
    • User Configuration
      • Configure Administrators Window
    • Other Components of the DPX Suite
  • Storage
    • Backup Destinations
    • Tape Storage
    • vStor
    • Disk Directory
    • NetApp
      • NetApp SnapVault Management
        • Terminology for NetApp SnapVault Management
        • NetApp SnapVault Management Setup and Configuration
    • Cloud Storage
      • Registering AWS S3 Cloud Storage
      • Registering a Generic Cloud Storage
  • Backup
    • Introduction and Backup Types
    • File Backup
      • Creating a File Backup Job
        • Job Source Options for File Backup
        • Job Destination Options for File Backup
        • Other Job Options for File Backup
      • Editing a File Backup Job
      • Scheduling a File Backup Job
    • Block Backup
      • Prerequisites
      • Creating a Block Backup Job
        • Job Options for Block Backup
      • Editing a Block Backup Job
      • Scheduling a Block Backup Job
      • Forcing a Base Backup
      • Backing up System State
      • Backing up System Table
      • NetApp SnapVault Management Backup
    • Application Backup
      • Microsoft SQL Server Backup
        • Creating a Microsoft SQL Server Backup Job
        • AlwaysOn Database Backup
      • Microsoft Exchange Server Backup
        • Creating a Microsoft Exchange Server Backup Job
      • Microsoft SharePoint Server Backup
        • SharePoint Installation and Configuration Requirements
        • Creating a Microsoft SharePoint Server Backup Job
      • SAP HANA Backup
      • Oracle Database Backup
        • Enabling Block Backup for Oracle Databases
        • Creating an Oracle Database Backup Job
          • RMAN Cataloging Control
      • OpenText GroupWise Backup
        • Creating a GroupWise Backup Job
    • Bare Metal Recovery (BMR) Backup
      • Creating a BMR Backup Job
    • Catalog Backup
      • General Considerations
      • Creating a Catalog Backup Job
        • Job Options for Catalog Backup
      • Editing a Catalog Backup Job
      • Scheduling a Catalog Backup Job
    • NDMP Backup (desktop interface only)
      • Prerequisites
      • Creating an NDMP Backup Job
        • Job Source Options for NDMP Backup
        • Job Destination Options for NDMP Backup
        • Other Job Options for NDMP Backup
      • Editing an NDMP Backup Job
      • Scheduling an NDMP Backup Job
    • Image Backup (desktop interface only)
      • Creating an Image Backup Job
      • Editing an Image Backup Job
      • Scheduling an Image Backup Job
    • Agentless Backup for VMware and Hyper-V
      • Agentless Backup for VMware
        • Agentless Backup for VMware Complements Block Data Protection
        • Agentless VMware Backup Architecture and Data Flow
        • Environmental Requirements for Agentless VMware Backup
        • Best Practices for Agentless VMware Backup
        • Creating an Agentless VMware Backup Job
          • Job Source Options for Agentless VMware Backup
          • Other Job Options for Agentless VMware Backup
        • Editing an Agentless VMware Backup Job
        • Scheduling a VMware Backup Job
        • Application-Consistent Protection
        • Architecture and Data Flow
      • Agentless Backup for Microsoft Hyper-V
        • Creating a Hyper-V Backup Job
        • Editing a Hyper-V Backup Job
        • Scheduling a Hyper-V Backup Job
    • 🆕S3 Object Storage Backup
      • Creating an S3 Object Storage Backup
      • Scheduling an S3 Object Storage Backup Job
    • Differential and Incremental Backups
    • Archive
      • Creating an Archive Job for Block Backup
      • Creating an Agentless VMware Archive Job
  • Restore
    • Introduction and Restore Modes
    • Restore Modes in the Web Interface
      • Full VM Restore for VMware
      • Full VM Restore for Hyper-V
      • Instant VM Restore
      • Multi-VM Restore
        • Job Options for Multi-VM Restore
        • Advanced Filters
      • 🆕S3 Object Storage Restore
      • Agentless File Restore
      • File Restore from Block Backup
        • Advanced Job Options
      • Instant Access
      • Virtualization
      • Application Restore
        • Microsoft SQL Server Restore
        • Microsoft Exchange Server Restore
        • Microsoft SharePoint Server Restore
        • Oracle Database Restore
        • OpenText GroupWise Restore
      • File Restore from File Backup
        • Job Options for File Restore from File Backup
    • Restore Modes in the Desktop Interface
      • File Restore
        • Creating a File Restore Job
      • Image Restore
        • Creating an Image Restore Job
      • NDMP Restore
        • Creating an NDMP Restore Job
      • Block Restore
        • Creating a Block Restore Job
          • Block Restore Job Options
        • Specifying Mount Points
        • Restoring Block Data with Instant Access
        • Restoring BMR Data with Virtualization
        • NetApp SnapVault Management Restore
      • Agentless VMware Restore
        • Creating an Agentless VMware Restore Job
          • Agentless VMware Restore Job Operations
        • Rapid Return to Production (RRP)
      • Tape Restore
        • Creating a Tape Restore Job
      • Application Restore
      • Scheduling a Restore Job in the Desktop Interface
        • Previewing Scheduled Jobs in the Desktop Interface
      • Restore Job Source Options
    • Catalog Restore
      • Creating a Catalog Restore Job
    • Bare Metal Recovery (BMR) Restore
    • Recovering Archived Backups
      • Recovering a VMware Archive
  • Web Interface
    • Log-in Page
    • Dashboard
    • Job Monitor
    • Job Manager
    • Schedule Overview
    • Reports
      • Reports Templates
    • Nodes
    • Devices & Pools
    • Events
    • Configuring Enterprise Information
    • Configuring Custom SSL Certificates
  • Desktop Interface
    • Connect to DPX Window
    • Main Window
    • Common Menu Bar Options
    • Function Tabs Desktop Interface
      • Backup Tab
      • Restore Tab
      • Monitor Jobs Tab
      • Control Devices Tab
      • Reports Tab
      • Catalog Tab
      • Copy Tab
      • Manage Tapes Tab
      • Configure Tab
      • [Legacy] Analytics Tab
    • Common Function Window Tasks
    • Configuring Parameters
    • Configuring the Enterprises
      • Editing an Enterprise Configuration
      • Configuring Devices
  • BARE METAL RECOVERY
    • Bare Metal Recovery Overview
    • Bare Metal Recovery for Windows
    • Bare Metal Recovery for Linux
    • Recovery from a Replicated or Alternate Data Resource
  • MAINTENANCE
    • Condense
      • Starting a Condense Job
      • Scheduling a Condense Job (desktop interface only)
    • Job-Related Information
      • Job Return Codes
      • Job Status and Available Actions
    • Collecting Logs
    • Getting Node Information
    • File Exclusion Rules
    • Managing Licenses
    • Pre-Scripts and Post-Scripts
    • Updating DPX
      • Command Line Update
      • Online Autoupdate Method
      • Offline Autoupdate Method
  • Miscellaneous
    • Configuring Keyrings
      • Adding a Keyring
      • Adding a Key
    • SNMP Interface
    • Troubleshooting
      • Troubleshooting Unsuccessful Multi-VM Restore Cleanup
      • Troubleshooting Installation of the Catalogic DPX Client on UNIX and UNIX-like Systems
      • Managing the CMAgent Service
      • VMs Unable to Power On after Full or Instant VM Restore
    • Technical Support
    • Terminology
    • Acronyms
    • Default Ports
Powered by GitBook
On this page
  1. Restore
  2. Restore Modes in the Desktop Interface
  3. Agentless VMware Restore

Creating an Agentless VMware Restore Job

PreviousAgentless VMware RestoreNextAgentless VMware Restore Job Operations

Last updated 2 months ago

Creating an Agentless VMware Restore job involves a few more steps than other restore jobs due to the need for additional information, such as Target Datastore or Virtual Machine Options. The Restore Wizard guides you through this process.

Restrictions. When performing a full or instant VM restore, the VM hardware version in the target vCenter is set to the vCenter’s default value. This may prevent the VM from starting. For more information, see in the troubleshooting section.

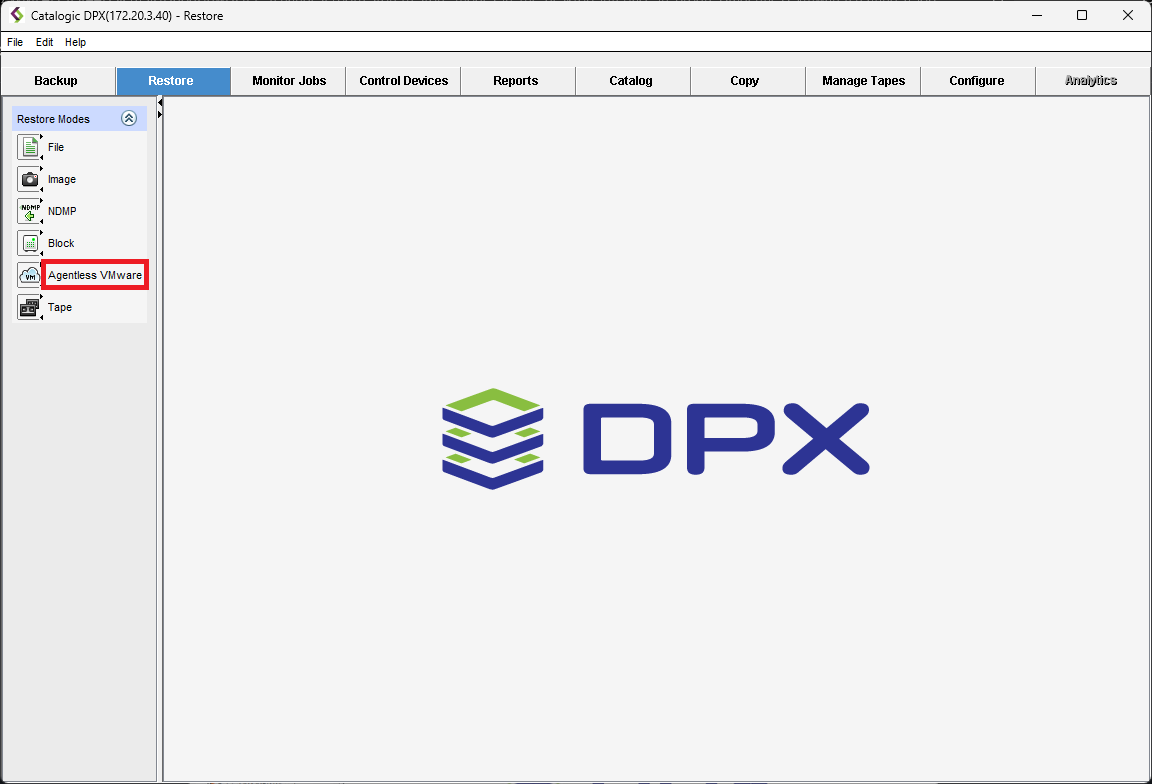
  1. Navigate to the Restore tab in the main desktop interface window. From the Restore Modes section in the task panel, select Agentless VMware.
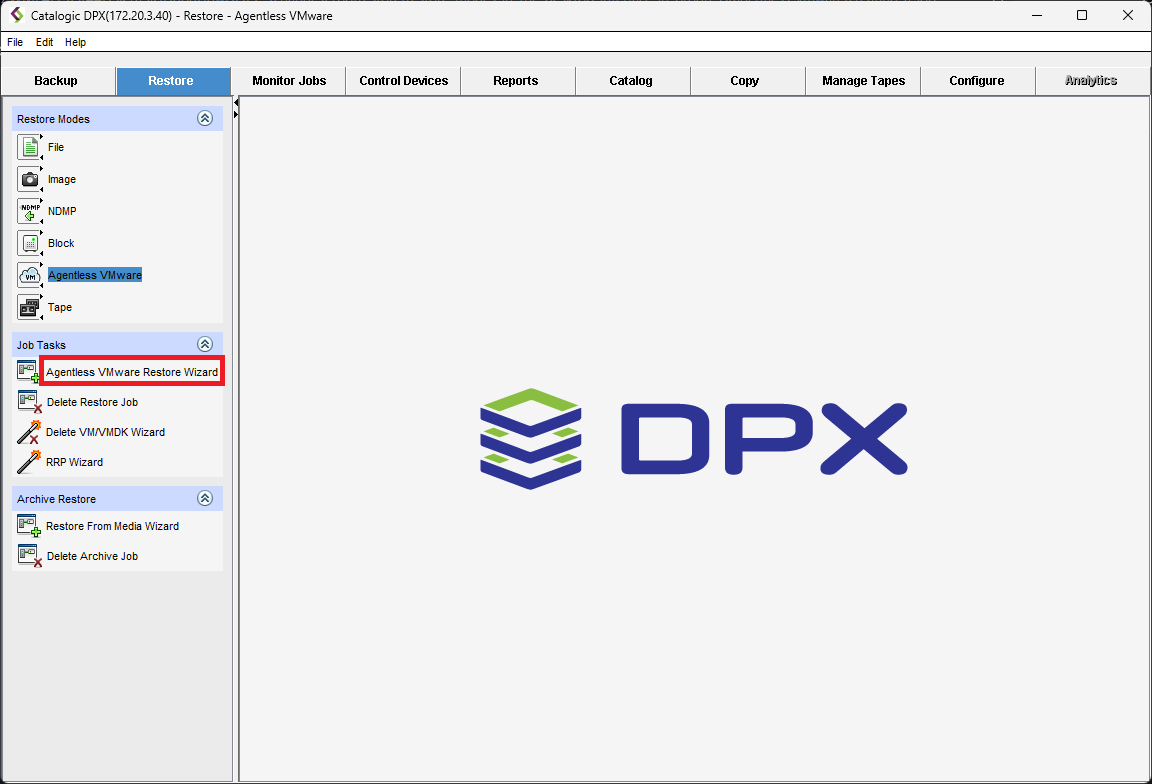
  1. To create a new Agentless VMware Restore Job, select Agentless VMware Restore Wizard.
  1. Click New Job to create a new job or select an existing job from the dropdown list to modify it.

  2. Select an operation, you want your Restore job to perform. You can choose from the following options:

    • Instant VM Restore

    • Full VM Restore

    • Instant VMDK Restore

    • Full VMDK Restore

  1. Browse to the snapshot you wish to restore. The steps that follow may vary slightly based on the restore option you selected in the previous step.
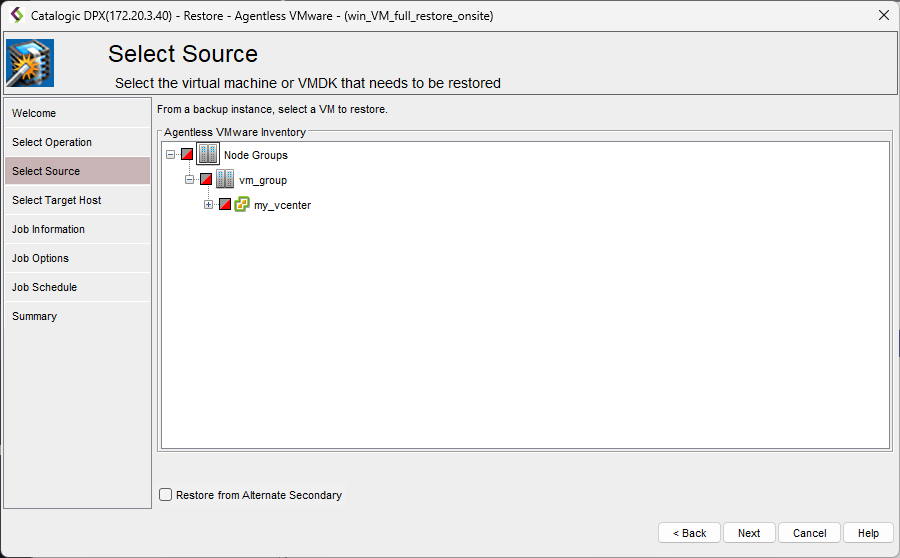
In the left pane, select the VM to restore. The right pane lists snapshots for the selected VM. If you selected one of the VMDK operations on the Select Operation page, browse to a VM that contains the VMDK to restore and select it.

In the right pane, expand a backup instance to reveal the object to restore. The selectable items, snapshots, or VMDKs, depend on your choice on the Select Operation page:

  • If a VMDK operation was not selected on the Select Operation page, only VM-level restore will be possible. You can view VMDKs under a VM, but they are not selectable.

  • If you selected a VMDK operation on the Select Operation page, you can select a VMDK to restore, but Agentless VMware Backup VM snapshots are not selectable.

Tip. The snapshot labeled LATEST is always the most recent. If you select LATEST and save the restore job, the restore job will automatically update to use the most current snapshot in the future.

Attention! If the snapshot to restore resides on an alternate secondary storage, such as a storage system at a remote site, use the Alternate Secondary section on the Select Source page to identify the storage. This is crucial in scenarios requiring disaster recovery failover from offsite NetApp SnapMirrored snapshots or vStor replication snapshots. The alternate secondary must be synced with the mirror source.

  1. On this page, select the restore destination. The procedure differs depending on your selection on the Select Operation page:
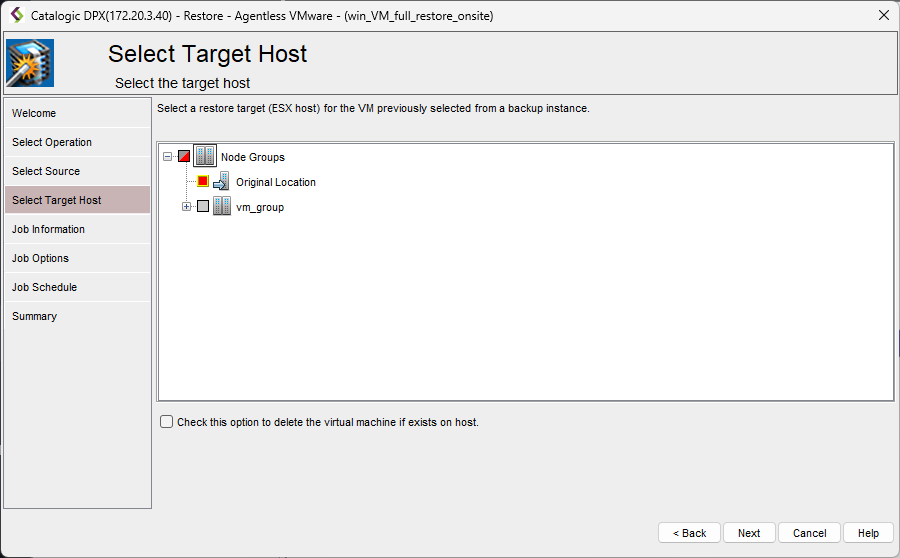
  • To select a target host, if you selected an operation other than VMDK Instant Access, choose a host to restore to. You can select either the original location or an alternate location. Note that when an alternate restore location is selected for a VMDK file, only VMs are selectable.

  • A list of data stores appears under the selected destination host. Select a datastore for the restore target.

Tip. If the option Check this option to delete the virtual machine if it exists on the target host is checked, the VM is deleted if it is not part of a resource pool. However, if the VM is part of a resource pool and this option is checked, the restore job will fail.

  1. [Instant and Full VM Restore only] Choose the setting for your VM. The tabs contain fields populated by default with values from the source VM. For more detailed information on each available field, see the tables below:

Name

Virtual Machine Name

By default the source VM name displays.

Virtual Machine Memory (MB)

By default the source VM memory displays.

Start VM after it is created

This checkbox controls whether the restored VM powers on automatically. It's advisable to enable this feature. If left unchecked, a Full restore will resort to cloning rather than storage relocation, leading to the VM's unavailability until the cloning process is complete.

Resource

Resource Pool

Select from the dropdown list a resource pool for the new VM.

Network

Choose a network for the new VM from the dropdown list. The networks that appear are those supported by the vCenter for the host.

iSCSI Adapter

Choose a software or hardware iSCSI adapter from the dropdown list. The adapters displayed are those available on the host.

CPU Count

This value can be modified. However, it's not advisable to decrease it below the displayed source value.

  1. Give the restore job a name and location and indicate if the job is deleted when it completes.

  2. Set up pre-job and post-job scripts, disk provisioning, and notifications. For more detailed information on each available field and tab, see the tables below:
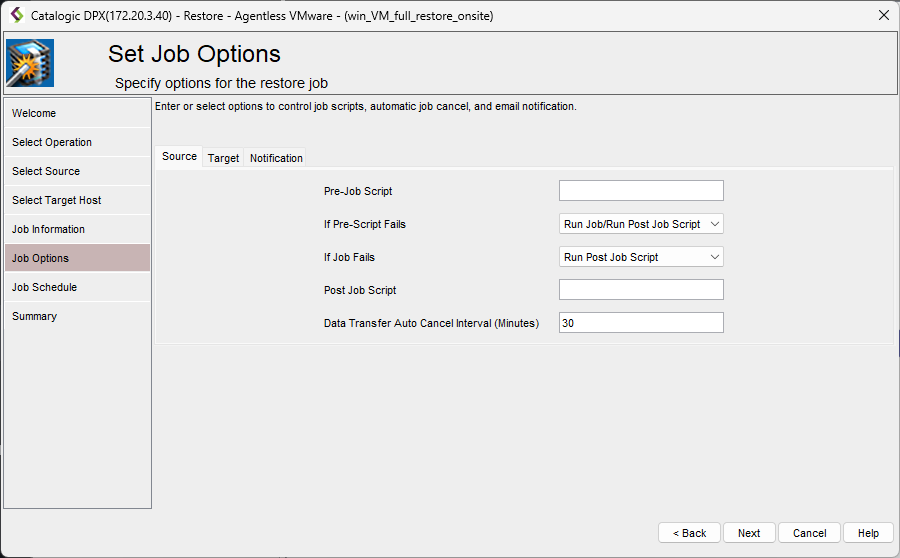
The Source tab displays options related to setting up pre-job and post-job scripts and when they are run.

The Target tab displays only for Full VM Restore or Full VMDK Restore.

Disk Provisioning

Select either Thick or Thin disk provisioning for the new virtual machine. The disk provisioning option is independent of disk provisioning on the original backup source. The default is Thick.

Consolidate VMDK and VM files in one folder

Select Yes if you prefer the VMDK to be stored alongside VM files such as VMX and VMXF files. Choosing No will store the VMDK file in a separate folder, which may be more difficult to locate. Be aware that opting for Yes can typically increase job run time. The default setting is No.

Notification

The To, Cc, and Bcc fields designate email recipients

The To field should contain only one recipient. For multiple email addresses in the Cc and Bcc fields, separate them with semicolons.

Subject

The subject line of your message can include variables such as %JOBNAME, %JOBID, %JOBTYPE, and %RC (return code) to dynamically insert job-related information. Ensure these variables start with a percent sign (%) to function correctly. If enclosed in double quotes, they will be interpreted as literal text.

Avoid using the following invalid characters in any field: < > ; and single quote.

To successfully send reports via email, verify that the SMTP Host Name and SMTP Port settings are accurately configured.

  1. Scheduling a job is optional. If you do not want to schedule the job, click Next. To schedule the job, click Schedule.

  1. The Summary page displays field entries from the previous pages. If the displayed values are satisfactory, click Finish. If you did not schedule the job, you will be asked if you want to start the job.

See also. To learn more about these operations, see .

See also. To learn more about scheduling a Restore job, see .

Agentless VMware Restore Job Operations
Scheduling a Restore Job in the Desktop Interface
VMs Unable to Power On after Full or Instant VM Restore