Job Destination Options for File Backup
Catalogic DPX offers a variety of source options for File backup. All of them are available from both interfaces, but the access thereto may slightly differ. See details for each interface below.
To access the job destination options, do the following:
Go to Job Manager in the sidebar.
Open an already existing backup job. Or create a new File backup job, by clicking the New Backup Job button in the upper right corner and then selecting Backup Type File.
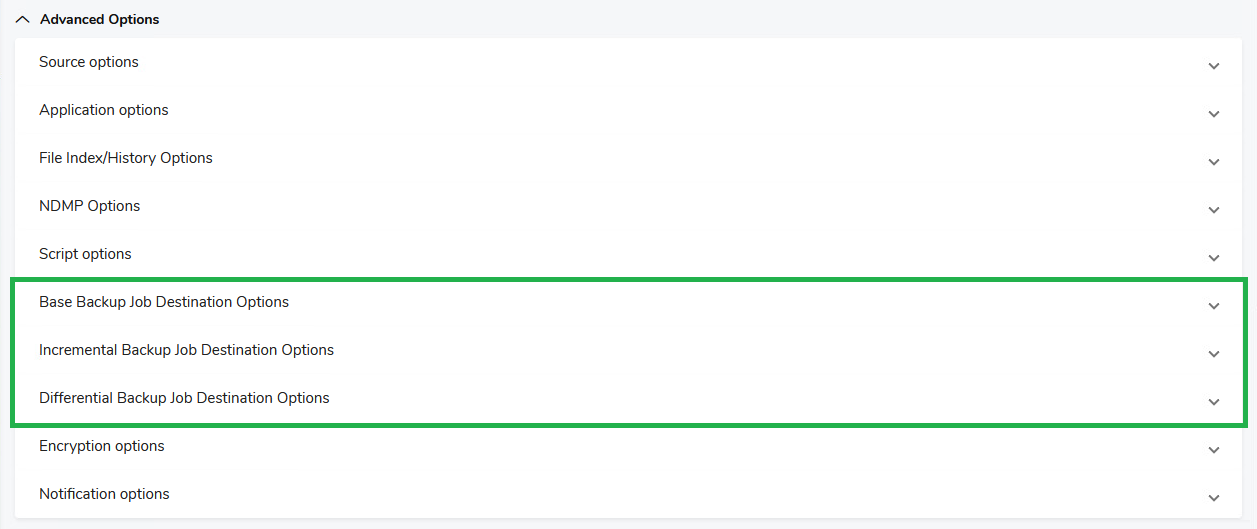
Go to the Advanced Options section at the bottom (scroll down if necessary) and expand it. Click any of the following section headers to expand it. Each field and the available choices are explained below.
Note. The Advanced Options section in the web interface also includes job source options which are discussed in a separate section for the sake of clarity. See Job Source Options for File Backup.
Note. All three sections, i.e. Base, Incremental and Differential Backup Job Destination Options, feature exactly the same options, only referring to different backup types. For more information, see Differential and Incremental Backups.
Backup Job Destination Options
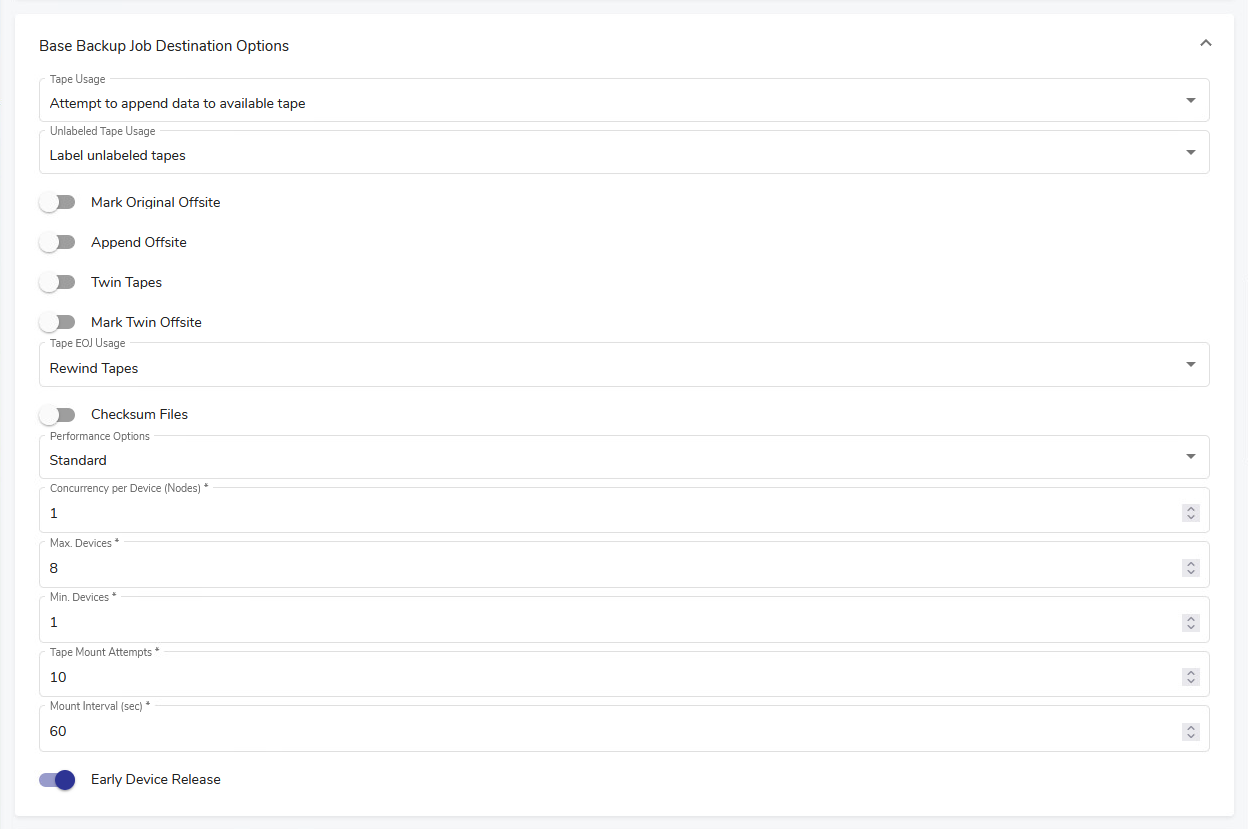
Tape Usage
Determines whether or not to accept a tape with data on it.
Use a new tape
Requires media with status New or Empty from the selected media pool. Media with status New will only be used if the option Unlabeled Tape Usage (defined below) is set to Allow unlabeled tapes and label them.
Attempt to append data to available tape
Accepts a backup tape from the selected media pool with data on it (status Appendable) and writes to the unused portion of the tape. The appended data can have a retention period that differs from the data preceding it on the tape.
Unlabeled Tape Usage
Determines expected behavior when an unlabeled tape is found in the tape drive.
Label unlabeled tapes
Label the unlabeled tape. This saves the step of labeling a tape beforehand.
Reject unlabeled tapes
Do not use the unlabeled tape.
Mark Original Offsite
Determines whether a backup tape is stored offsite. DPX adds the Offsite status to the tape.
Toggle on
Indicates in the Catalog that the tape is stored offsite.
Toggle off
Indicates in the Catalog that the tape is stored onsite.
Append Offsite
Determines if a backup tape with status Offsite can be appended to.
Toggle on
Tapes in the library with status Offsite can be appended to. The Append Offsite field in the Edit Media Pool dialog must also be set to Yes.
Toggle off
Tapes in the library with status Offsite cannot be appended to.
The Offsite status of a tape can be viewed through the Operate Tape Library function, the Configure Media function, or in the media volume report. Note that when you use the Operate Tape Library function to import a tape with status Offsite, the Offsite status is cleared and the tape becomes available for use.
Twin Tapes
Enables the twinning option. The twinning option creates two sets of backups simultaneously, eliminating the need for separate tape duplication for off-site vaulting.
Toggle on
Backs up data simultaneously to two tapes.
Toggle off
Disables twinning.
Mark Twin Offsite
Indicates in the Catalog the location of twinned tapes, if twinning is on.
Toggle on
Indicates that the twinned tape (second tape) is stored offsite.
Toggle off
Indicates in the Catalog that the tape is stored onsite.
Tape EOJ Usage
Determines what to do with the tape when the backup job is complete.
Rewind Tapes
For a standalone tape device, this option rewinds the tape and leaves it in the drive. For a tape library tape drive, this option rewinds, unloads, and returns the tape to its slot.
Unload Tapes
For a standalone tape device, this option rewinds the tape and ejects it from the drive. For a tape library tape drive, this option rewinds, unloads, and returns the tape to its slot.
For DiskDirectory, this option causes empty volsers to be used before new volsers.
Leave Tapes
In the case of standalone tape drives, the tape remains wound to the point where the job ended and stays in the drive. However, for tape library drives, the tape is always attempted to be returned to its slot after the backup operation is completed. The next job attempts to use the tape in the drive instead of mounting a new tape. In the case of standalone drive, if the currently mounted tape is unacceptable (for example, if the next backup requires a tape from a different media pool), the operator is prompted to mount another tape. In the case of a tape library, if the tape in the drive is rejected for any reason, it unloads the tape, returns it to its slot, and proceed to select another tape.
Export Tapes
Automates the export of tapes to an I/O port, eliminating manual processes and preparing tapes for their next destination. In environments with physical tape libraries, the availability of an empty I/O port is essential. The system will alert and will return an error code if no port is available, prompting user action. A rescan of ports is recommended to ensure availability.
Attention! In some cases, a backup job may fail if the Export option is used for the first job following a system restart, especially if the initial job is a File backup with the Export setting.
Checksum Files
Generates a checksum value for each file that is backed up. The checksum value is written to the SIDF header.
Toggle on
Generates a checksum value for backed-up files.
Toggle off
Turns off checksum generation. If you turn checksum generation off, level 3 verification cannot be performed. For more information on level 3 verification, see the source option Verify Backup.
Performance Options
Indicates the desired performance option. This option helps control the number of tasks running concurrently within a backup job. The appropriateness of each selection depends upon the backup you are running.
Standard
Backs up UNIX nodes and Windows disks concurrently. Use this option when memory on the master or device server(s) is limited or when you will not derive benefit from any of the other choices.
Split Job by Partitions
Backs up UNIX partitions (mount points) and Windows disks concurrently. Use this option when backing up multiple partitions and there are no device or memory limitations.
Split Job by Files
Use this option when backing up single partitions (disks or volumes) that contain many files. This selection will create a task for every available tape drive in this job. Note. This option is not supported for Linux OES.
Split Large Files/Partitions
Splits files that exceed the Split Size threshold. Each part of the split file is backed up concurrently. Use this with large raw partition backups or when you are backing up very large files and the number of files or partitions is less than the number of devices.
Split Size [MB]
Sets a threshold for file splitting. File splitting is the ability to split a file into smaller pieces and back up those pieces simultaneously. File splitting is designed for large files or raw partitions. If Split Large Files/Partitions is selected in Performance Options and the file exceeds the size entered here, the file splits automatically. If the file does not exceed the size entered here, the file does not split. Keep the threshold large enough (2 GB) so that file splitting is reserved for truly large files.
Note. This option applies only to UNIX systems. It is not available for Windows.
Concurrency Per Device
Sets the maximum number of tasks that can have files backed up to a single device. The default is 1.
Note. Increasing concurrency to values >1 during backups slows restore performance and requires more memory on the master server during restore.
Max. Devices
Limits the number of storage devices valid for use with this job. Use this option if you want to stop DPX from using all the drives in the selected device cluster so that some drives will be available for other purposes.
Min. Devices
Holds tasks within a job until the number of drives specified are available for each task to use.
Tape Mount Attempts
The maximum number to check a tape in a standalone tape device.
Mount Interval [Seconds]
The number of seconds to wait between checking the availability of a tape in a standalone tape device.
Early Device Release
Controls tape drive usage.
Toggle on
The tape drive is released after the current task with a tape drive finishes so that the next job can use the same tape drive before completing the entire job.
Toggle off
The tape drive is not made available for the next job until the entire job is completed.
To access the job destination options, do the following:
Go to the Backup tab.
In the Backup Modes section, select File.
Open an already existing backup job. Or go directly to step 4 to set source options for the new job you will be defining directly afterward.
Go to the Other Tasks section in the task panel (scroll down if necessary) and select Set Destination Options. The Set Job Destination Options dialog will appear.
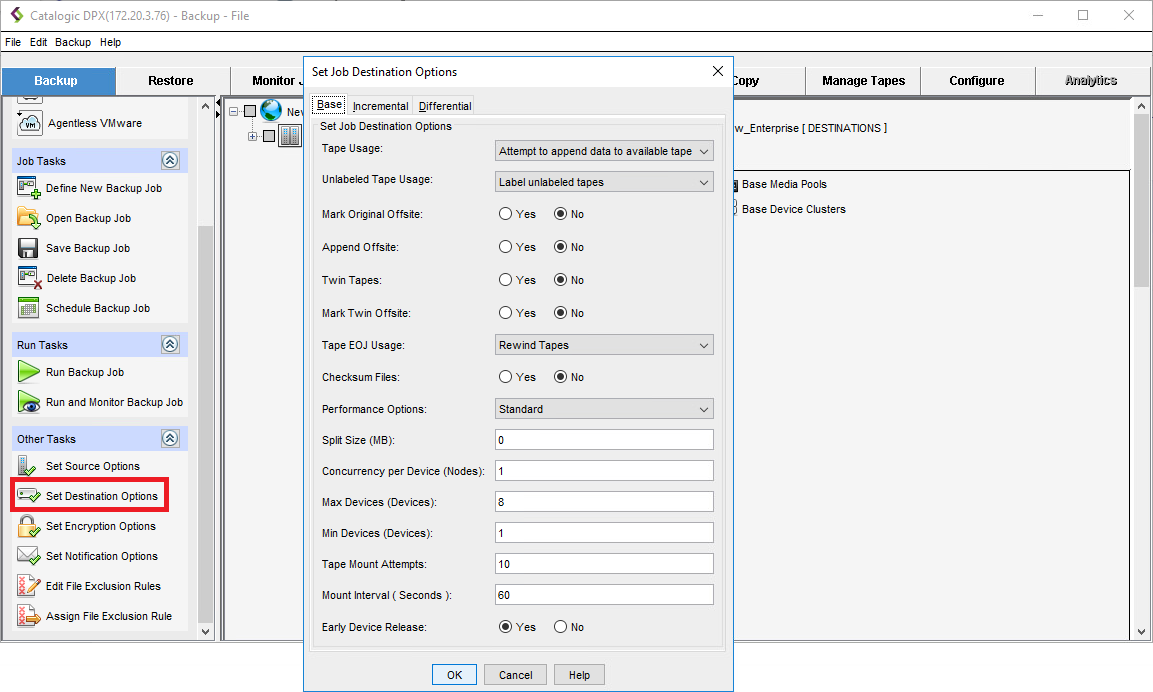
The Set Job Destination Options dialog allows you to set options related to backup destinations. This section provides an explanation of each field in the dialog and the available choices.
Note. All three tabs, i.e. Base, Incremental and Differential, feature exactly the same options, only referring to different backup types.
Job Destination Options
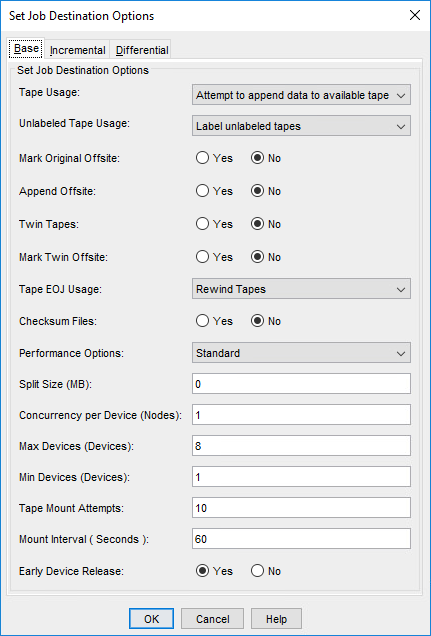
Tape Usage
Determines whether or not to accept a tape with data on it.
Use a new tape
Requires media with status New or Empty from the selected media pool. Media with status New will only be used if the option Unlabeled Tape Usage (defined below) is set to Allow unlabeled tapes and label them.
Attempt to append data to available tape
Accepts a backup tape from the selected media pool with data on it (status Appendable) and writes to the unused portion of the tape. The appended data can have a retention period that differs from the data preceding it on the tape.
Unlabeled Tape Usage
Determines expected behavior when an unlabeled tape is found in the tape drive.
Label unlabeled tapes
Label the unlabeled tape. This saves the step of labeling a tape beforehand.
Reject unlabeled tapes
Do not use the unlabeled tape.
Mark Original Offsite
Determines whether a backup tape is stored offsite. DPX adds the Offsite status to the tape.
Yes
Indicates in the Catalog that the tape is stored offsite.
No
Indicates in the Catalog that the tape is stored onsite.
Append Offsite
Determines if a backup tape with status Offsite can be appended to.
Yes
Tapes in the library with status Offsite can be appended to. The Append Offsite field in the Edit Media Pool dialog must also be set to Yes.
No
Tapes in the library with status Offsite cannot be appended to.
The Offsite status of a tape can be viewed through the Operate Tape Library function, the Configure Media function, or in the media volume report. Note that when you use the Operate Tape Library function to import a tape with status Offsite, the Offsite status is cleared and the tape becomes available for use.
Twin Tapes
Enables the twinning option. The twinning option creates two sets of backups simultaneously, eliminating the need for separate tape duplication for off-site vaulting.
Yes
Backs up data simultaneously to two tapes.
No
Disables twinning.
Mark Twin Offsite
Indicates in the Catalog the location of twinned tapes, if twinning is on.
Yes
Indicates that the twinned tape (second tape) is stored offsite.
No
Indicates in the Catalog that the tape is stored onsite.
Tape EOJ Usage
Determines what to do with the tape when the backup job is complete.
Rewind Tapes
For a standalone tape device, this option rewinds the tape and leaves it in the drive. For a tape library tape drive, this option rewinds, unloads, and returns the tape to its slot.
Unload Tapes
For a standalone tape device, this option rewinds the tape and ejects it from the drive. For a tape library tape drive, this option rewinds, unloads, and returns the tape to its slot.
For DiskDirectory, this option causes empty volsers to be used before new volsers.
Leave Tapes
In the case of standalone tape drives, the tape remains wound to the point where the job ended and stays in the drive. However, for tape library drives, the tape is always attempted to be returned to its slot after the backup operation is completed. The next job attempts to use the tape in the drive instead of mounting a new tape. In the case of standalone drive, if the currently mounted tape is unacceptable (for example, if the next backup requires a tape from a different media pool), the operator is prompted to mount another tape. In the case of a tape library, if the tape in the drive is rejected for any reason, it unloads the tape, returns it to its slot, and proceed to select another tape.
Export Tapes
Automates the export of tapes to an I/O port, eliminating manual processes and preparing tapes for their next destination. In environments with physical tape libraries, the availability of an empty I/O port is essential. The system will alert and will return an error code if no port is available, prompting user action. A rescan of ports is recommended to ensure availability.
Attention! In some cases, a backup job may fail if the Export option is used for the first job following a system restart, especially if the initial job is a File backup with the Export setting.
Checksum Files
Generates a checksum value for each file that is backed up. The checksum value is written to the SIDF header.
Yes
Generates a checksum value for backed-up files.
No
Turns off checksum generation. If you turn checksum generation off, level 3 verification cannot be performed. For more information on level 3 verification, see the source option Verify Backup.
Performance Options
Indicates the desired performance option. This option helps control the number of tasks running concurrently within a backup job. The appropriateness of each selection depends upon the backup you are running.
Standard
Backs up UNIX nodes and Windows disks concurrently. Use this option when memory on the master or device server(s) is limited or when you will not derive benefit from any of the other choices.
Split Job by Partitions
Backs up UNIX partitions (mount points) and Windows disks concurrently. Use this option when backing up multiple partitions and there are no device or memory limitations.
Split Job by Files
Use this option when backing up single partitions (disks or volumes) that contain many files. This selection will create a task for every available tape drive in this job. Note. This option is not supported for Linux OES.
Split Large Files/Partitions
Splits files that exceed the Split Size threshold. Each part of the split file is backed up concurrently. Use this with large raw partition backups or when you are backing up very large files and the number of files or partitions is less than the number of devices.
Split Size (MB)
Sets a threshold for file splitting. File splitting is the ability to split a file into smaller pieces and back up those pieces simultaneously. File splitting is designed for large files or raw partitions. If Split Large Files/Partitions is selected in Performance Options and the file exceeds the size entered here, the file splits automatically. If the file does not exceed the size entered here, the file does not split. Keep the threshold large enough (2 GB) so that file splitting is reserved for truly large files.
Note. This option applies only to UNIX systems. It is not available for Windows.
Concurrency Per Device (Nodes)
Sets the maximum number of tasks that can have files backed up to a single device. The default is 1.
Note. Increasing concurrency to values >1 during backups slows restore performance and requires more memory on the master server during restore.
Max Devices (Devices)
Limits the number of storage devices valid for use with this job. Use this option if you want to stop DPX from using all the drives in the selected device cluster so that some drives will be available for other purposes.
Min Devices (Devices)
Holds tasks within a job until the number of drives specified are available for each task to use.
Tape Mount Attempts
The maximum number to check a tape in a standalone tape device.
Mount Interval (Seconds)
The number of seconds to wait between checking the availability of a tape in a standalone tape device.
Early Device Release
Controls tape drive usage.
Yes
The tape drive is released after the current task with a tape drive finishes so that the next job can use the same tape drive before completing the entire job.
No
The tape drive is not made available for the next job until the entire job is completed.
Last updated