Bare Metal Recovery Overview
Introduction
Bare Metal Recovery (BMR) is a disk-based disaster recovery feature that enables administrators to restore an entire system environment for an individual computer. A full recovery using Bare Metal Recovery includes the operating system, point-in-time backed-up data, and Exchange, SQL Server, and Oracle applications if applicable.
Restrictions. If the computer being recovered is a Master Server, Bare Metal Recovery restores the DPX application and Catalog; however, this restored Catalog may not be consistent. To protect the master server Catalog, use the Catalog functions to perform backups and restores. For more information, see Catalog Backup and Catalog Restore.
Uses for Bare Metal Recovery include disaster recovery and replicating a node’s environment, applications, and data.
Bare Metal Recovery utilizes open-source software governed by the GNU General Public License. A license copy is available in GNUGPL.TXT in the main directory of DPX. In compliance with the GNU General Public License, a copy of the relevant source code is available.
Bare Metal Recovery requires that a backup of a BMR volume has been made. Some Knowledge Base articles may use the term ExpressDR for describing both the BMR volume and the Bare Metal Recovery feature.
Process Overview
To take advantage of Bare Metal Recovery, regularly generate Block backups of Windows and Linux nodes, including the special BMR volume. Then, if the need to perform a Bare Metal Recovery recovery arises, boot up a “bare machine” with the appropriate Bare Metal Recovery media, provide minimal information about the backup job and the storage system, and select the backup instance to recover. Bare Metal Recovery restores both the data and the environment to the bare machine.
Bare Machine Considerations
A “bare machine” is required for the recovery process of Bare Metal Recovery. The following are requirements and considerations.
The bare machine must have the necessary hardware to connect to the network.
The bare machine must have at least 2 GB of memory when performing a Bare Metal Recovery for a Linux machine. Otherwise, the bare machine must have at least 1 GB of memory.
Bare Metal Recovery is designed to recover to dissimilar hardware. The storage adapter on the booting server will have the necessary drivers so that the operating system can boot, but other drivers may need to be installed, for example, a VGA adapter and network adapters.
Note. Because of the large variety and combinations of hardware on servers due to different vendors, controllers, processors, etc., it is important to carefully perform advanced testing to assess Bare Metal Recovery to dissimilar machines in a given environment. Additional steps may be required for such recovery.
Bare Metal Recovery supports recovery to physical and virtual machines. Perform careful advanced testing to ensure required recovery in a given VM environment.
Note. Bare Metal Recovery to a VMware virtual machine may require a specific SCSI controller driver to be loaded for the Windows version used. LSI logic parallel is required for Windows 2003, Logic SAS is required for Windows 2008 or later. See the VMware Knowledge Base article Injecting SCSI controller device drivers into Windows for more information.
When recovering a boot partition configured for UEFI, the bare machine must also be configured to boot with UEFI before restoring. Consult your hardware vendor documentation for more information on selecting the boot interface.
See also. If additional steps for dissimilar machines are required, follow the procedures in Additional Steps for Recovery to Dissimilar Hardware.
Backup and Recovery Considerations
The following are considerations for Bare Metal Recovery backups and restores.
Bare Metal Recovery requires Block backups to a storage system. This backup must include the special BMR volume. For Linux Bare Metal Recovery, any volumes with critical files, other than
/bootand/rootvolumes, must also be specifically selected for backup. Alternatively, you can select the entire node for backup.Bare Metal Recovery restore from a NetApp ONTAP storage system requires that an iSCSI service is licensed and enabled. Restoring from DPX open storage does not require a separate iSCSI license.
Protection and recovery of an Active Directory Domain Controller requires additional steps. For a description of these steps, read the Knowledge Base article 46474.
A backed-up iSCSI drive can be recovered to a local physical drive.
Bare Metal Recovery for Linux requires LVM2.
ISA Network Interface Cards are not supported for Bare Metal Recovery.
Bare Metal Recovery is backward compatible. That is, newer versions of Bare Metal Recovery can generally be used to recover older backups, but the reverse is not true.
If the hardware configuration of the bare machine restore destination differs from the hardware configuration of the source system, you may need to provide drivers for the SCSI or RAID controller of the destination system. For a description of these steps, read the Knowledge Base article 45702.
See also. Node Level vs. Volume Level Backups.
Steps to Perform Before Restoring
Before using Bare Metal Recovery:
Use DPX to perform frequent Block backups of Windows and Linux nodes, including the BMR volume. The BMR volume appears along with other volumes in the backup source tree found in the Block backup window of DPX.
Note. After the initial base backup, subsequent Block backups transfer changed blocks only, so backups finish quickly.
Keep track of the backup job name, node name and information about the storage system.
See also. Running Backups and Tracking Important Information.
Running Backups
Using either the web interface or desktop interface, schedule frequent Block backups of the node, including the BMR volume.
For a cluster, back up all nodes, physical and virtual, in one backup job. The BMR volume displays on the virtual node because it includes a container for the quorum shared drive.
Important. For multiple node backups, all nodes must be backed up to the same backup destination. That is, any Bare Metal Recovery backup job must have a single backup destination.
Tip. As part of a job definition for a Bare Metal Recovery backup, enable e-mail reporting. The emailed job report helps identify the location of the job name and host name required for a Bare Metal Recovery.
Node Level vs. Volume Level Backups
For Bare Metal Recovery purposes, back up an entire node or just individual volumes.
If the Windows System or Boot drives have no drive letter, assign a drive letter to them before running a Bare Metal Recovery backup, then back up the entire node.
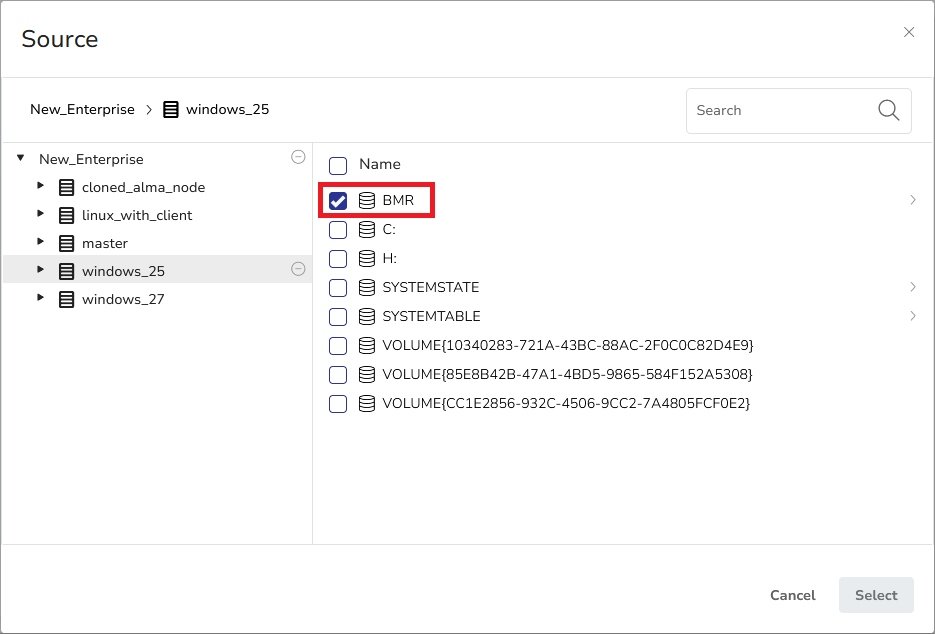
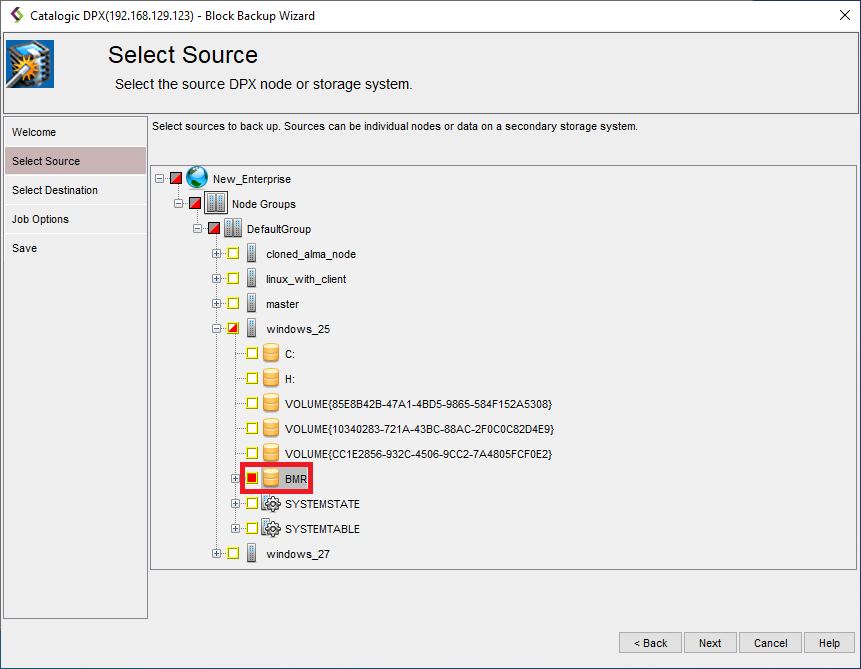
When backing up individual volumes, include the BMR volume in the backup selection. The BMR volume appears with other volumes in the backup source tree on a Block backup window.
When creating a Block backup job, select BMR as the backup source.

See also. For more details about creating Block backup jobs, see Creating a Block Backup Job.
When creating a Block backup job using Block Backup Wizard, select BMR as the backup source.

See also. For more details about creating Block backup jobs, see Creating a Block Backup Job.
Selecting the BMR volume for backup instructs DPX to back up the System and Boot volumes as well as other critical resources. This ensures that the system boots once restored.
On a DPX Master Server, selecting the volume containing the Catalog instructs DPX to back up the Catalog; however, this backup is not suitable for Catalog restore. To protect the master server Catalog, use the Catalog functions to perform backups and restores instead.
See also. Catalog Backup and Catalog Restore.
Advantages of node-level backup:
When a hard drive on the node being backed up undergoes installation, removal, or repartitioning, there is no need to change the backup definition.
When a new application is added, it is automatically backed up and there is no need to change the backup definition. For example, if Exchange 2007 is installed, the Exchange volume is automatically backed up.
DPX is backed up, even on client nodes. There is no need to reinstall DPX after recovering with Bare Metal Recovery. For the master server, the Catalog is also backed up even for volume-level Bare Metal Recovery backups; however, this backup is not suitable for Catalog restore. To protect the master server Catalog, use the Catalog functions to perform backups and restores.
Advantages of volume-level backup:
Volume-level backup enables you to select the booting portions and the locations of critical applications, saving time when performing a backup.
Block Backup Features and Requirements
Since Bare Metal Recovery backup is a Block backup, all the features of Block backups also apply to Bare Metal Recovery backups. These include snapshot images, backup of allocated blocks only, backup of changed blocks only after the initial base backup, checkpoint restart, Application Recovery, backup of unknown file system partitions, and others. System State and System Table volumes are fully supported for Block backups on supported Windows x64 and x86 environments.
Further, all licenses and other requirements needed for DPX Block Data Protection backups and restores are also needed for Bare Metal Recovery backups and restores.
Tracking Important Information
It is essential to keep track of the location of your Bare Metal Recovery backups, so you can easily find them for recovery.
Preliminary Steps
Schedule and Test Bare Metal Recovery backups. See Running Backups above.
As part of a job definition for a Bare Metal Recovery backup, enable e-mail reporting. The e-mailed job report helps identify the location of the job name and host name required for a Bare Metal Recovery.
Backup Source Information and Examples
Node name: Division2
Job name: MyBackup
Backup Destination Information and Examples
Storage system (or SVM IP address for Clustered Data ONTAP): 192.0.2.24
Storage system volume name: vol2
Administrator User Name: root
Administrator Password: rootpass
Tip. A NetApp ONTAP storage system volume name can be obtained by running the vol status command on the storage system.
Important. Store this important information somewhere other than on the node itself, because access to that node will not be available when recovering with Bare Metal Recovery. If appropriate, store this information offsite.
Update node information if any of the following occurs:
The IP address of the storage system changes
The user ID or password for logging in to the storage system changes
The name of the node being backed up in the Bare Metal Recovery backup job changes in DPX
A new Bare Metal Recovery backup job is defined with a new name or new destination.
See also. Block Backup and Block Restore.
Last updated