Creating an Archive Job for Block Backup
A separate archive backup job must be created for the archive job to be run. For Block backup, Archive jobs are created by scheduling their instances from within the Block backup job creation process. The desktop interface also features a separate Archive to Media Wizard, specifically for scheduling Base Archive jobs for Block backup.
The typical scenario for archive jobs is that they are scheduled to run soon after the backup job is completed, ensuring the most recent recovery point is archived.
Note. If the Archive job is attempted to run a second time on the same recovery point, an error will be thrown and the archive job will fail due to no new recovery point detected.
Archive Job for Block Backup
In the web interface, archiving is embedded in the Block backup job creation process.
Go to Job Manager in the sidebar.
Click the New Backup Job button to start creating a new Block backup job, or select an existing Block backup job from the Jobs list.
Go to the Archive section (scroll down if necessary) and click Add Archive.

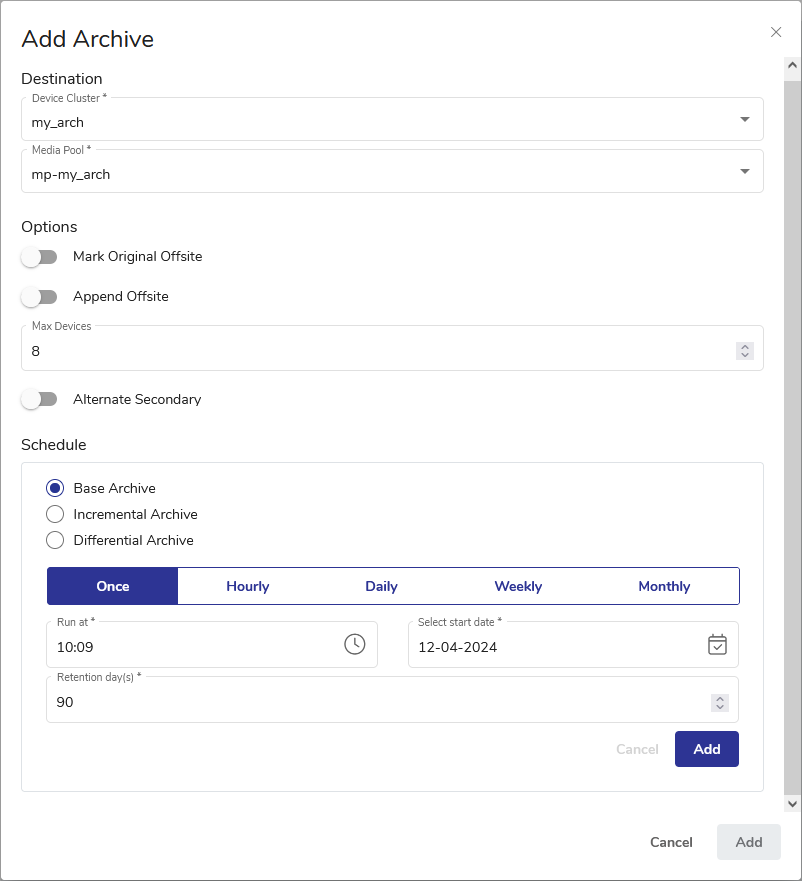
Set Options as desired. See the full options description at the bottom of this page.
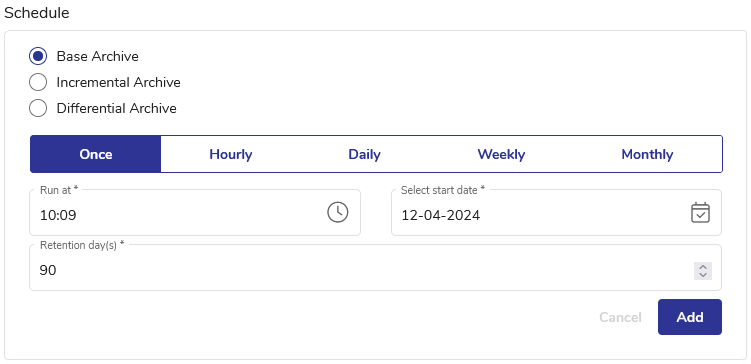
Schedule your archive job. Select Base, Incremental or Differential Archive.
See also. For discussion on differences between incremental and differential backups, see Differential and Incremental Backups.
Specify the schedule frequency, start time and date, and Archive retention period. Click Add in the Schedule area. Multiple schedules may be added.
See also. For details concerning scheduling jobs, see Scheduling a Block Backup Job.
The added Archive schedule will be shown in the Schedule area. To add another schedule, click Add Another Schedule.\

Important. When scheduling an Archive job, ensure the relevant Backup job is completed before the Archive job starts. Otherwise, the Archive job will fail.
When all schedules are set, click Add at the bottom of the Add Archive dialog. The dialog will close, and the newly added Archive schedules will be shown in the Add Schedule pane.

Click Save or Save as…. The Run Job prompt will be shown, where you may determine the retention period (default: 90 days) and choose whether to run the job immediately. Either way, the job will be available in the Job Manager section.
Important. The Archive job will run according to the schedule even when the block backup is not completed. We strongly suggest monitoring the completion of both jobs to ensure proper backup archiving.
Options
Mark original offsite
Determines whether a backup tape is stored offsite. DPX adds the Offsite status to the tape.
Toggle on
Indicates in the Catalog that the tape is stored offsite.
Toggle off
Indicates in the Catalog that the tape is stored onsite.
Append offsite
Determines if a backup tape with the status Offsite can be appended to.
Toggle on
Tapes in the library with status Offsite can be appended to. The Append Offsite field in the Edit Media Pool dialog must also be set to Yes.
Toggle off
Tapes in the library with status Offsite cannot be appended to.
The Offsite status of a tape can be viewed through the Operate Tape Library function, the Configure Media function, or in the media volume report. Note that when you use the Operate Tape Library function to import a tape with the status Offsite, the Offsite status is cleared and the tape becomes available for use.
Max Devices
Limits the number of storage devices valid for use with this job. Use this option if you want to stop DPX from using all the drives in the selected device cluster so that some drives will be available for other purposes.
Alternate Secondary
When this toggle is on, two additional fields appear, where the user needs to select the node and volume within the node where a secondary copy of the backup is stored. Data can be restored from an alternate secondary data source directly from the management console.
In the desktop interface, archiving is embedded in the Block backup job creation process through the Block Backup Wizard. It can also be accessed through the dedicated Archive to Media Wizard (see the tab to the right).
Creating an Archive Job through Block Backup Wizard
Go to the Backup tab.
From the Backup Modes section in the side panel, choose Block.
Find and click Block Backup Wizard in the Job Tasks section of the task panel. The Block Backup Wizard dialog will open.
Select an existing Block backup job or create a new one and go through the process as described in Creating a Block Backup Job until the Save step.
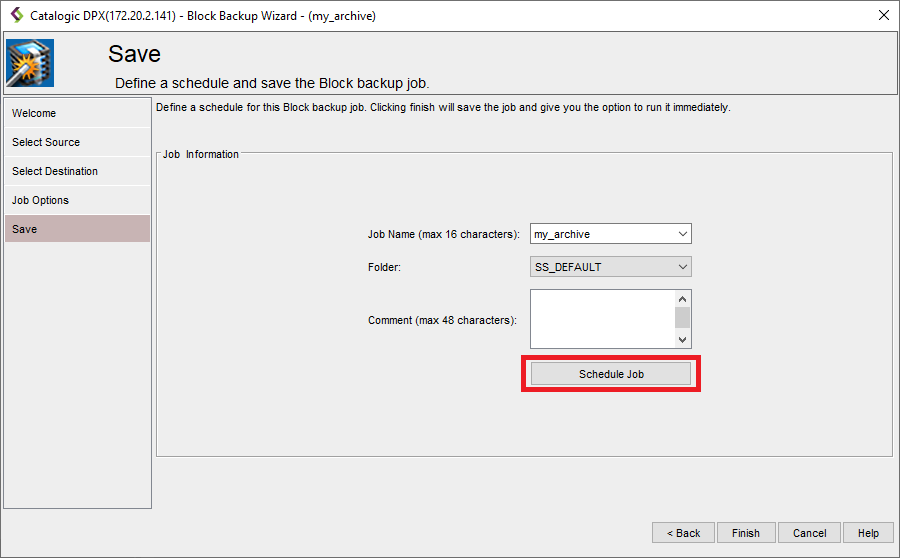
Click the Schedule Job button. This will launch the Job Schedule window. The Schedule Description section lists all schedules defined for the Block backup job. The Edit Schedule section shows the parameters for the description record selected in the Schedule Description section. If no record is selected, the lower section changes its title to New Schedule and the parameters pertain to a new schedule that is not saved yet.
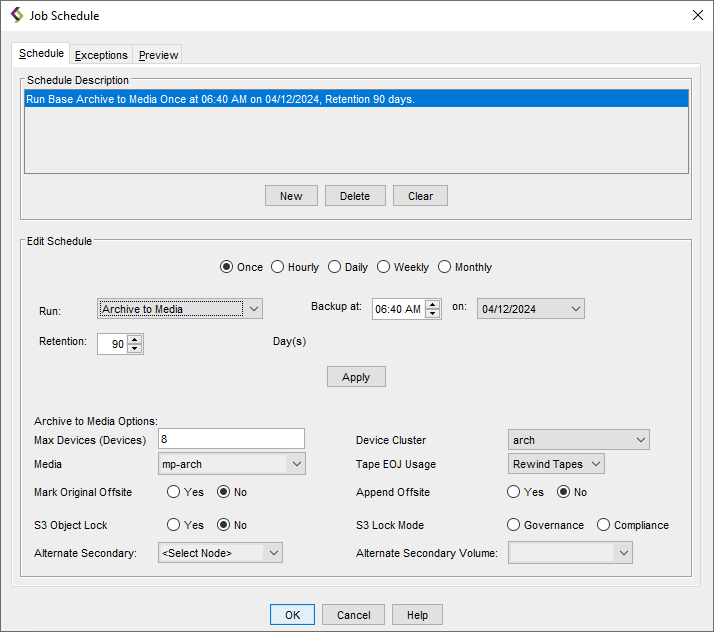
Select typical schedule parameters, like interval, time and date. For details concerning scheduling jobs, see Scheduling a Block Backup Job.
From the Run drop-down list, select the job type you are scheduling. Archive to Media stands for Base Archive.
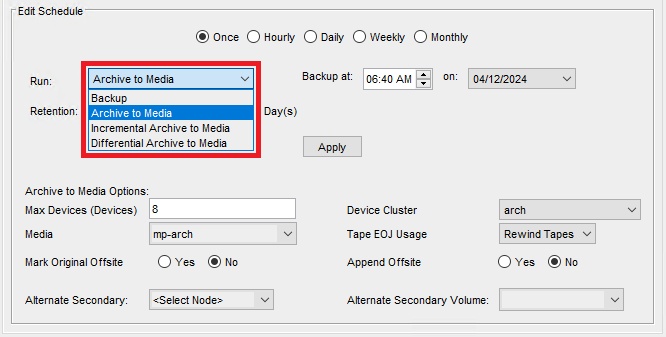
See also. For discussion on differences between incremental and differential backups, see Differential and Incremental Backups.
Important. When scheduling an Archive job, ensure the relevant Backup job is completed before the Archive job starts. Otherwise, the Archive job will fail.
In the Archive to Media Options section, specify the following options:
Max Devices (Devices)
Limits the number of storage devices valid for use with this job. Use this option to stop DPX from using all the drives in the selected device cluster so that some drives will be available for other purposes.
Device Cluster
Select the Device Cluster from the drop-down list.
Media
Select the Media Pool from the drop-down list.
Tape EOJ Usage
Determines what to do with the tape when the backup job is complete. For selection details, see the Tape EOJ Usage option in Job Destination Options for File Backup.
Mark Original Offsite
Determines whether a backup tape is stored offsite. DPX adds the Offsite status to the tape.
Yes
Indicates in the Catalog that the tape is stored offsite.
No
Indicates in the Catalog that the tape is stored onsite.
Append Offsite
Determines if a backup tape with the status Offsite can be appended to.
Yes
Tapes in the library with status Offsite can be appended to. The Append Offsite field in the Edit Media Pool dialog must also be set to Yes.
No
Tapes in the library with status Offsite cannot be appended to.
The Offsite status of a tape can be viewed through the Operate Tape Library function, the Configure Media function, or in the media volume report. Note that when you use the Operate Tape Library function to import a tape with the status Offsite, the Offsite status is cleared and the tape becomes available for use.
Alternate Secondary
Tu use this option, the user needs to select the node and volume within the node where a secondary copy of the backup is stored. Data can be restored from an alternate secondary data source directly from the management console.
When all desired schedules are set, click OK. The Job Schedule window will close.
Click Finish to save the Block backup job under the same name. If you want to save changes under a new job name, change the name and click Finish.\
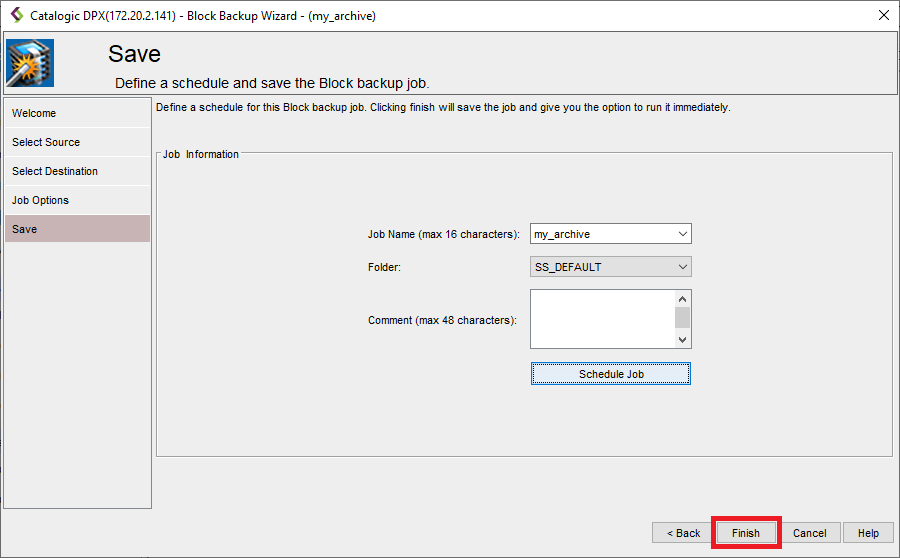
The Final Job Run Settings dialog box will appear.
 You may choose to run the job immediately or save it without running. You may also change the retention period (default: 90 days).
The archiving flow with Archive to Media Wizard allows the user to define a Base Archive job independently from the Block backup job. This involves creating the Archive job definition from scratch, following the procedure below.
Restrictions. The Archive to Media Wizard only allows to schedule or directly run Archive jobs protecting the recovery point selected in the Archive job definition. For scheduling Archive jobs in sync with Block backup jobs, we recommend using Web UI or Block Backup Wizard.
Creating an Archive Job through Archive to Media Wizard
Go to the Backup tab.
From the Backup Modes section in the side panel, choose Block.
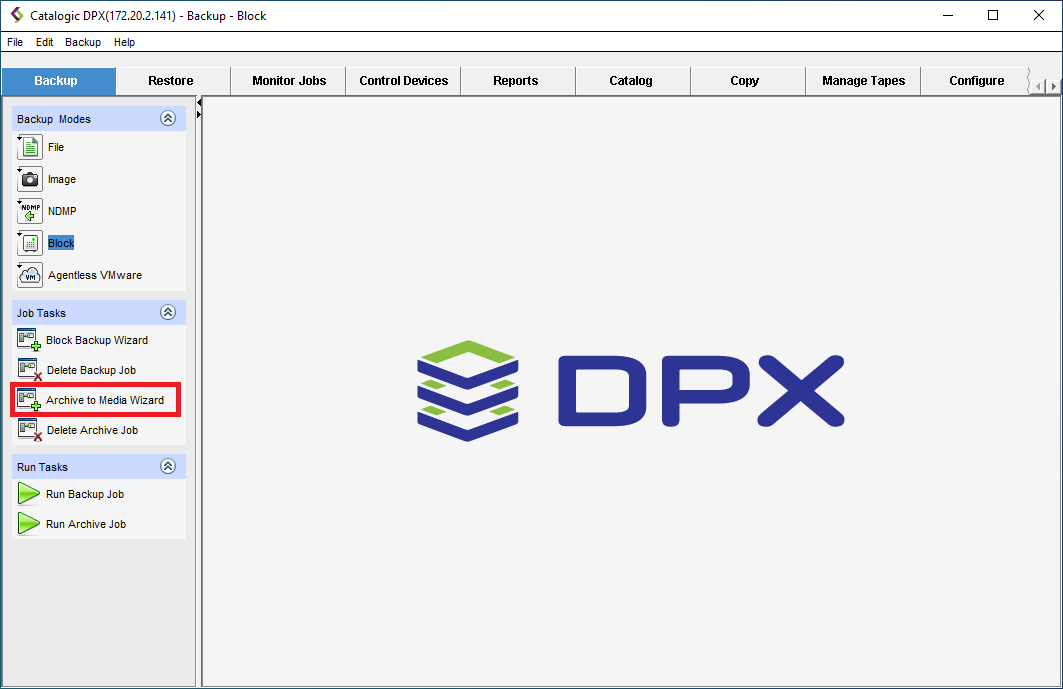
Find and click Archive to Media Wizard in the Job Tasks section of the task panel.
The Archive to Media Wizard window will appear.
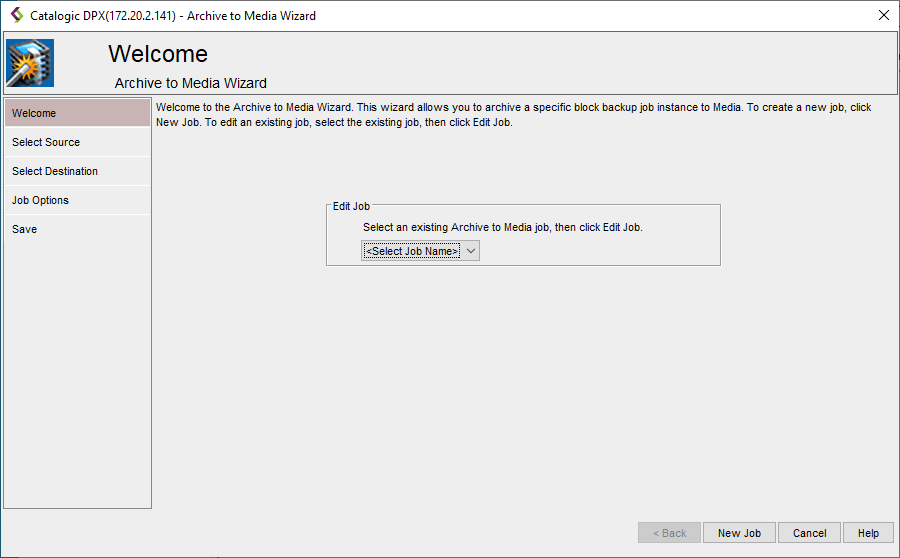
By default, the creator allows you to select from the drop-down list and edit an already existing job. To create a new block backup job, click the New Job button in the lower right corner.
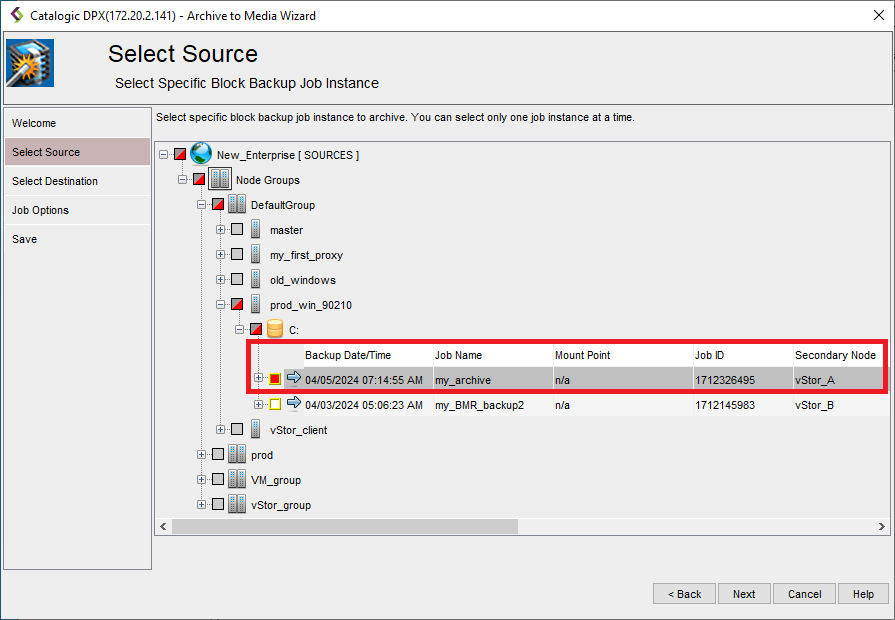
In the Select Source step, choose the Block backup recovery points you want to include in the Archive. Click Next.
Restrictions. Multiple selection is not supported, even though the interface may allow selecting more than one recovery point. Please select one item only.
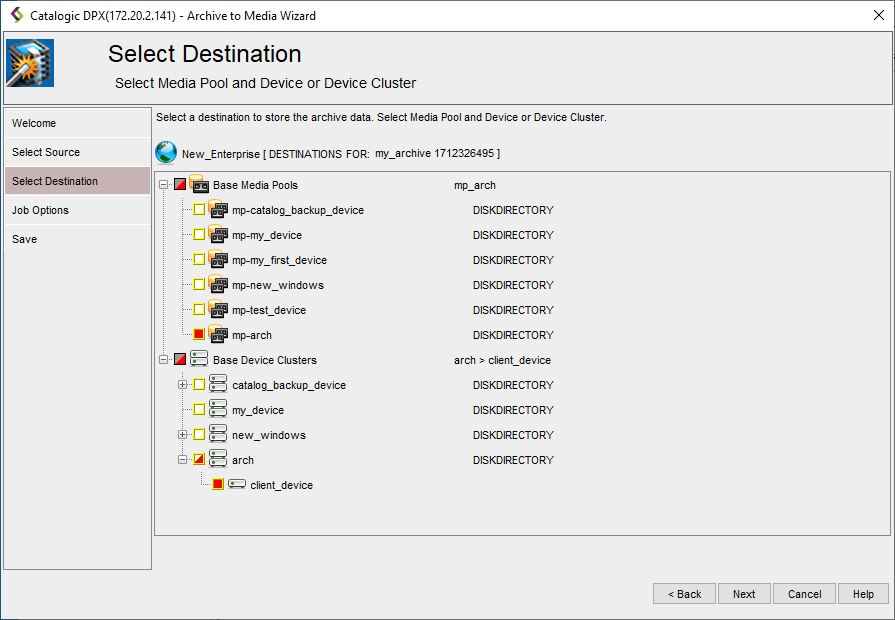
In the Select Destinations step, choose the destination for the archive job. Click Next.
In the Job Options step, define the job options for the archive job.
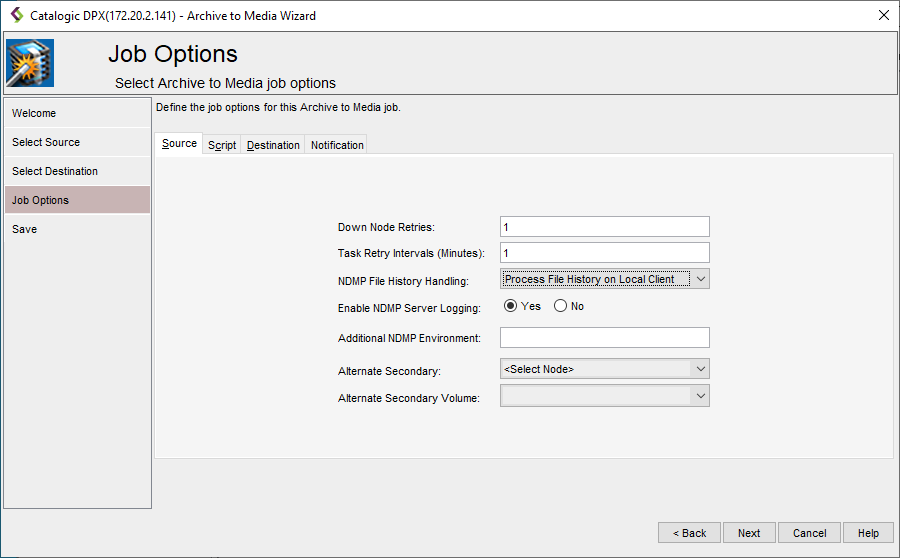
The Source tab
Down Node Retries
Controls how DPX behaves when it cannot establish contact with a node during a backup operation. If you enter zero, DPX skips unreachable nodes. If you enter a number, DPX waits until all the reachable nodes have been backed up and then retries the nodes that it could not back up on its first attempt. The number you enter determines how many times DPX tries to reach unreachable nodes.
Task Retry Intervals (Minutes)
Determines how long to wait before retrying failed tasks. When a task fails (due to permission problems, open files, interim job changes, etc.), it waits the number of minutes specified in this field before attempting that task again. Because the same failure might occur if the task is retried too soon, it is better to allow some time for an error to be corrected before retrying the task. A task is only retried once. Failing tasks appear in error message lists in the Job Log. All tasks are subject to retry.
NDMP File History Handling
Controls file history generation for NDMP and Block backup tasks.
For information on using Instant Access for file-level restore, see Instant Access as a File History Alternative in the DPX 4.9 User’s Guide.
Disable File History
Disables NDMP server file history generation.
Process File History on Local Client
Enables NDMP server file history generation and processes the file history data on the NDMP client node. This is the default.
Process File History on Master Server Appliance
Enables NDMP server file history generation but transmits the file history data to the master server node for processing.
See also. Generic NDMP Restore with File History Processing in the DPX 4.9 Reference Guide
Enable NDMP Server Logging
Controls the routing of NDMP server-generated log messages to the job log file.
Yes
All NDMP server log messages will be routed to the master server’s job log file. Yes is the default.
No
The NDMP server log messages will be logged locally in the NDMP client node log file instead of in the master server’s job log file.
Additional NDMP Environment
This option allows you to introduce any additional NDMP environment variables that are necessary for the backup task. Specify your environment variables as an ASCII string with an environment variable name and value pairs using the following syntax:
Note. Syntax validation is not performed on the specified value at job definition time, but rather at run time. Only valid entries are added to the NDMP operation environment.
Note. Alternative syntax, e.g. env1name value;env2name value;... (semicolon-delimited, no equal sign) or env1name valueenv2name value... (no delimiter, no equal sign) may be displayed in the interface. However, for the sake of clarity, the env1name=value,env2name=value,... version is strongly recommended.
Attention! Do not specify any of the following NDMP environment variables in your variable string because DPX controls these specifically:
BASE_DATE
DEBUG
DIRECT
DUMP_DATE
EXTRACT
FILES
FILESYSTEM
HIST
LEVEL
PREFIX
RECOVER_FILEHIST
SINCE_TIME
TYPE
UPDATE
VERBOSE
Specifying the variables above may cause unexpected results due to the unpredictability of the order in which they are evaluated.
NDMP servers from different vendors may support different NDMP environment variables. Except for a few well-known environment variable names, there is currently no standardized set of such variables. This option allows you to add environmental variables specific to your NDMP server.
Alternate Secondary
An alternate secondary is an alternate location where backup data resides. This location could be a replica of the original data using NetApp SnapMirror, copied through Data ONTAP commands, or restored from a tape backup. Data can be restored from an alternate secondary data source directly from the management console.
Select the node where the alternate backup resides.
Alternate Secondary Volume
Specify the volume containing the backup.
The Script tab
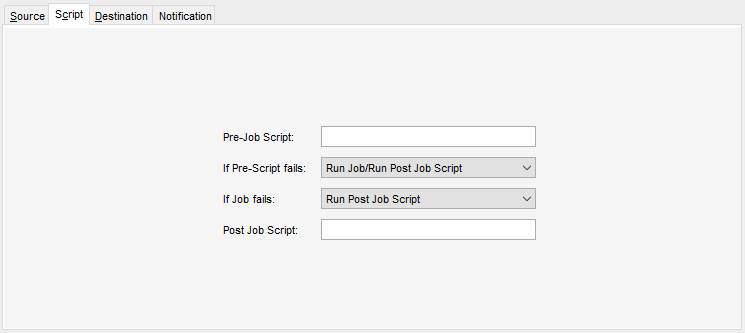
Pre-Job Script
Enter the name of a script to execute prior to the actual job.
Basic usage: <script>@<node_name> <argument_list>
If Pre-Script fails
The action be taken if the Pre-Job Script fails to complete successfully:
Run Job/Run Post-Job Script
Skip Job/Run Post-Job Script
Skip Job/Skip Post-Job Script
If Job fails
The action to be taken if the Job fails to complete successfully:
Run Post-Job Script
Skip Post-Job Script
Post-Job Script
Enter the name of a script to execute after the actual job.
Basic usage: <script>@<node_name> <argument_list>
See also. For detailed information about pre- and post-job scripts, including all valid definitions, see Pre-Scripts and Post-Scripts.
The Destination tab
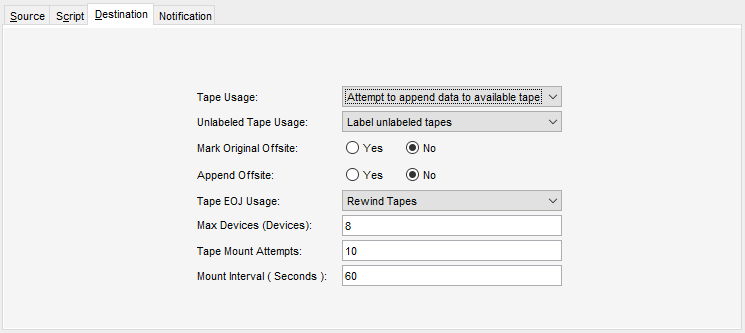
Tape Usage
Determines whether or not to accept a tape with data on it.
Use a new tape
Requires media with status New or Empty from the selected media pool. Media with status New will only be used if the option Unlabeled Tape Usage (defined below) is set to Allow unlabeled tapes and label them.
Attempt to append data to available tape
Accepts a backup tape from the selected media pool with data on it (status Appendable) and writes to the unused portion of the tape. The appended data can have a retention period that differs from the data preceding it on the tape.
Unlabeled Tape Usage
Determines expected behavior when an unlabeled tape is found in the tape drive.
Label unlabeled tapes
Label the unlabeled tape. This saves the step of labeling a tape beforehand.
Reject unlabeled tapes
Do not use the unlabeled tape.
Mark Original Offsite
Determines whether a backup tape is stored offsite. DPX adds the Offsite status to the tape.
Yes
Indicates in the Catalog that the tape is stored offsite.
No
Indicates in the Catalog that the tape is stored onsite.
Append Offsite
Yes
Tapes in the library with status Offsite can be appended to. The Append Offsite field in the Edit Media Pool dialog must also be set to Yes.
No
Tapes in the library with status Offsite cannot be appended to.
The Offsite status of a tape can be viewed through the Operate Tape Library function, the Configure Media function, or in the media volume report. Note that when you use the Operate Tape Library function to import a tape with the status Offsite, the Offsite status is cleared and the tape becomes available for use.
Tape EOJ Usage
Rewind Tapes
For a standalone tape device, this option rewinds the tape and leaves it in the drive. For a tape library tape drive, this option rewinds, unloads, and returns the tape to its slot.
Unload Tapes
For a standalone tape device, this option rewinds the tape and ejects it from the drive. For a tape library tape drive, this option rewinds, unloads, and returns the tape to its slot.
For DiskDirectory, this option causes empty volsers to be used before new volsers.
Leave Tapes
In the case of standalone tape drives, the tape remains wound to the point where the job ended and stays in the drive. However, for tape library drives, the tape is always attempted to be returned to its slot after the backup operation is completed. The next job attempts to use the tape in the drive instead of mounting a new tape. In the case of standalone drive, if the currently mounted tape is unacceptable (for example, if the next backup requires a tape from a different media pool), the operator is prompted to mount another tape. In the case of a tape library, if the tape in the drive is rejected for any reason, it unloads the tape, returns it to its slot, and proceed to select another tape.
Export Tapes
Automates the export of tapes to an I/O port, eliminating manual processes and preparing tapes for their next destination. In environments with physical tape libraries, the availability of an empty I/O port is essential. The system will alert and will return an error code if no port is available, prompting user action. A rescan of ports is recommended to ensure availability.
Attention! In some cases, a backup job may fail if the Export option is used for the first job following a system restart, especially if the initial job is a File backup with the Export setting.
Max Devices
Limits the number of storage devices valid for use with this job. Use this option if you want to stop DPX from using all the drives in the selected device cluster so that some drives will be available for other purposes.
Tape Mount Attempts
The maximum number to check a tape in a standalone tape device.
Mount Interval (Seconds)
The number of seconds to wait between checking the availability of a tape in a standalone tape device.
The Notification tab
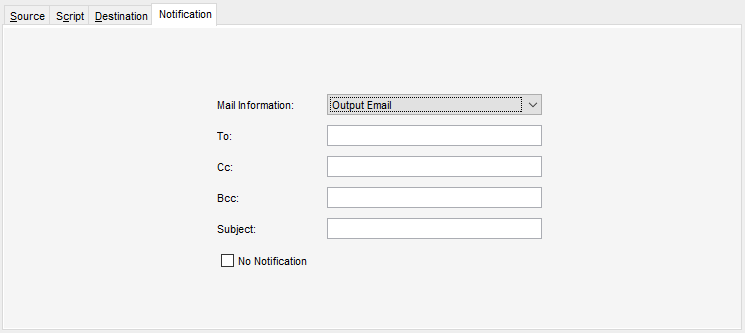
Mail information
Two sets of mail information can be specified:
Output Email
Specifies that the subsequent fields apply to reports that are sent when a job has completed.
Operator Email
Specifies that the subsequent fields apply to mount requests, error messages, and informational messages that are sent during a job.
To
The email address of the primary recipient of your message. Only one “To” address is permitted.
Cc
Carbon Copy. The email address(es) of the secondary recipient(s) of your message. Use a semicolon to delimit multiple email addresses.
Bcc
Blind Carbon Copy. The email address(es) of the secondary recipient(s) not identified to other recipients. Use a semi-colon to delimit multiple email addresses.
Subject
The subject of your message. The subject line usually contains a combination of straight text and variable elements. Variables, which must begin with %, are replaced with actual corresponding values. If you enclose variables in double quotation marks, those variables are treated as literal values. You can embed the following variables:
%JOBNAME%JOBID%JOBTYPE%RC
Use %RC to include the return code in the message for this run of the job, when applicable.
No Notification
Selecting this check box option temporarily disables notifications for the job without deleting the currently defined job notification data.
Note. Note that the following characters are invalid in all fields: < > ; and '.
Note. DPX emailing must be enabled when you first configure your Enterprise. At that time, you supply general system information, including SMTP Host Name and SMTP Port. See Editing an Enterprise Configuration in the DPX 4.9 Reference Guide.
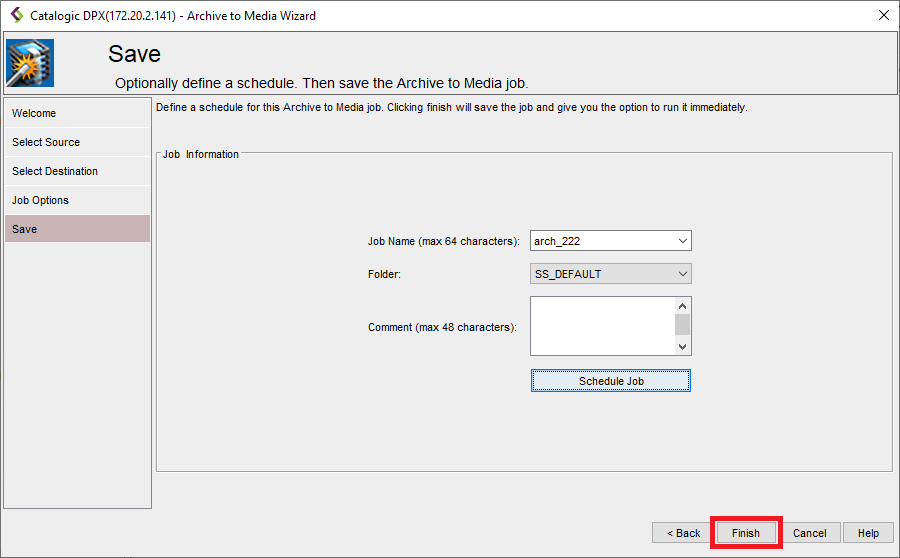
In the Save step, you must enter the Job Name (max. 16 characters) and specify the Job Folder to store the job in (the default folder is SS_DEFAULT). You may also add a comment to the job definition or set up a schedule (See Scheduling a Block Backup).
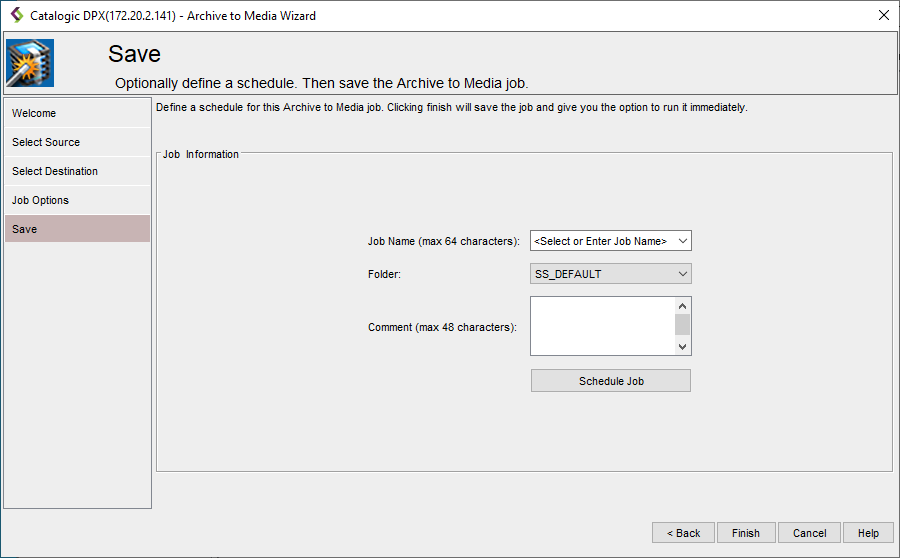
Note. The Archive to Media Wizard allows you to run the Archive job manually by clicking Finish and confirming the job start in the Job Run Settings subsequent dialog. Alternatively, set a schedule for the Archive job and save the job without running it.
To schedule the Archive job, click the Schedule Job button. This will launch the Job Schedule window.
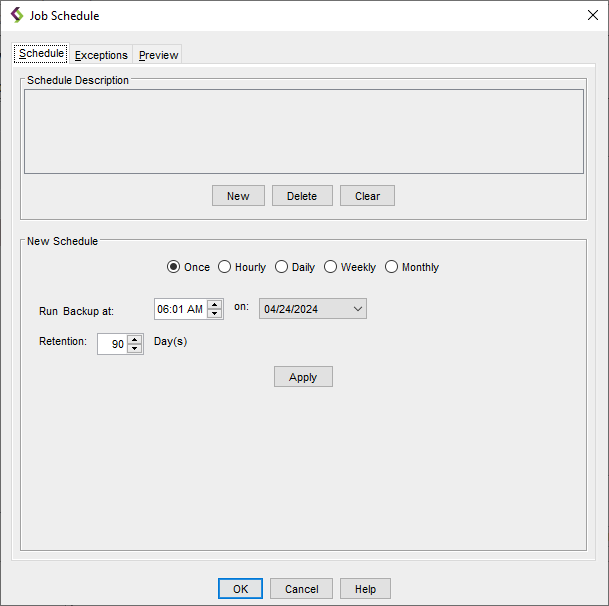
Add schedules as required. For more information, see Scheduling a Block Backup Job. Click OK.
Restrictions. The usage of scheduling in Archive to Media Wizard is rather limited, as Archive jobs scheduled from within the Wizard always archive the recovery point indicated in the Archive job definition, disregarding any later incremental or differential backups of the same source. To keep Archive jobs in sync with Block backups, use Web UI or Block Backup Wizard instead.
Click Finish to save the Archive job under the same name. If you want to save changes under a new job name, change the name and click Finish.
The final Job Run Settings dialog box will appear.
 You may choose to run the job immediately or save it without running. You may also change the retention period (default: 90 days).
Last updated