Virtual Data Optimizer (VDO)
In this section, you can find information on how to enable deduplication using basically any block storage available. We assume that you have prepared your storage provider and have exposed the block device to the system where vPlus Node is installed.
Preparation
Disable Secure Boot option for the VM to allow VDO work properly. Run below command to check status of Secure Boot option:
mokutil --sb-state
-
Log in to vPlus Node and create a mount directory as in the example
/backupdestinationmkdir /backupdestination -
List all existing disks, and find your drive. Let's assume
/dev/sdcis your empty block device that you want to use:fdisk -l | grep dev
#Disk /dev/sda: 32.2 GB, 32212254720 bytes, 62914560 sectors
#/dev/sda1 * 2048 1026047 512000 83 Linux
#/dev/sda2 1026048 62914559 30944256 8e Linux LVM
#Disk /dev/sdc: 500 GB, 17179869184 bytes, 33554432 sectors
#Disk /dev/sdb: 21.5 GB, 21474836480 bytes, 41943040 sectors
#Disk /dev/mapper/centos-root: 28.5 GB, 28462546944 bytes, 55590912 sectors
#Disk /dev/mapper/centos-swap: 3221 MB, 3221225472 bytes, 6291456 sectors -
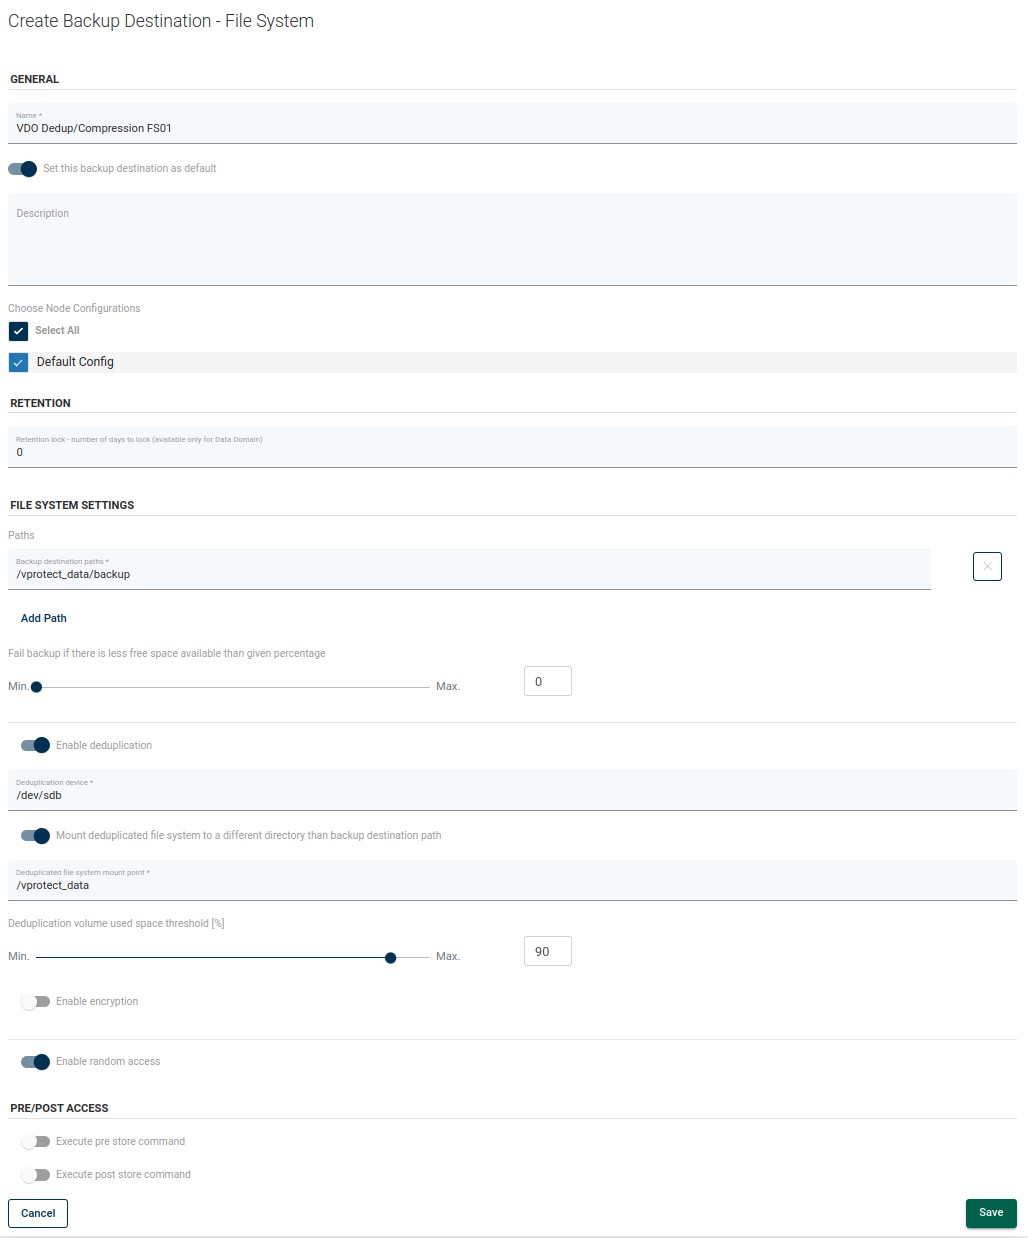
Log in to the vProtect web UI.
-
Go to Backup Destinations.
-
Click on Create Backup Destination, choose a File system.
-
Type the name for the new backup destination, set the retention, and select at least one node configuration.
-
Based on whether the staging space is same as backup destination or not, do one of the following:
- If the staging space is different from your backup destination storage:
- In Storage paths type
/backupdestination- this path will be used to mount the prepared file system (XFS) on top of the VDO volume. - Check Enable deduplication.
- Provide your block device (for example
/dev/sdc) as your Deduplication device.
- In Storage paths type
- If the staging space needs to be the same as your backup destination storage:
- In Storage paths type
/vprotect_data/backups- this path assumes that/vprotect_datais your staging space path andbackupsis a subdirectory of the staging space. - Check Enable deduplication.
- Provide your block device (for example
/dev/sdc) as your Deduplication device. - Enable Mount deduplicated file system to a different directory than backup destination path and provide the mount point - your staging space path, for example
/vprotect_data- this will force vPlus to mount XFS on top of VDO in the staging space directory rather than in the backup subdirectory.
- In Storage paths type
- If the staging space is different from your backup destination storage:
Only one file system backup destination with deduplication using VDO pointing to a specific directory can be used. If you want to add another backup destination using the same VDO device, but just a different subdirectory, create it without deduplication enabled.
Importing existing VDO volumes to LVM
The Python-based VDO management software has been deprecated and removed from RHEL 9/CentOS 9 Stream. It has been replaced by the LVM-VDO integration. If you are using VDO on RHEL 8/CentOS 8 Stream and plan to upgrade to version 9, you need to convert VDO volume.
In this example we have VDO volume called VDOexample created and managed by vPlus.
lsblk
#NAME         MAJ:MIN RM  SIZE RO TYPE MOUNTPOINT
#sda            8:0    0   40G  0 disk
#|-sda1         8:1    0  600M  0 part /boot/efi
#|-sda2         8:2    0    1G  0 part /boot
#`-sda3         8:3    0 38.4G  0 part
#  |-cs-root  253:0    0 34.4G  0 lvm  /
#  `-cs-swap  253:1    0    4G  0 lvm  [SWAP]
#sdb            8:16   0  100G  0 disk
#`-VDOexample 253:2    0  300G  0 vdo  /backups
#sr0           11:0    1 1024M  0 rom
-
On vPlus Node, stop vprotect-node service.
systemctl stop vprotect-node -
Unmount VDO volume from backup destination path.
umount /backups -
Convert VDO volume. Change
/dev/sdbto the device on which you have created VDO.lvm_import_vdo /dev/sdb
#Convert VDO device "/dev/sdb" to VDO LV "vdovg/vdolvol"? [y|N]: Yes
#Stopping VDO VDOexample
#Converting VDO VDOexample
# Opening /dev/sdb exclusively
# Loading the VDO superblock and volume geometry
# Checking the VDO state
# Converting the UDS index
# Converting the VDO
# Conversion completed for '/dev/sdb': VDO is now offset by 2097152 bytes
#Physical volume "/dev/sdb" successfully created.
#Volume group "vdovg" successfully created
#WARNING: Logical volume vdovg/vdolvol_vpool not zeroed.
#Logical volume "vdolvol_vpool" created.
#WARNING: Converting logical volume vdovg/vdolvol_vpool to VDO pool volume WITHOUT formating.
#WARNING: Using invalid VDO pool data MAY DESTROY YOUR DATA!
#Logical volume "vdolvol" created.
#Converted vdovg/vdolvol_vpool to VDO pool volume and created virtual vdovg/vdolvol VDO volume. -
Rename volume group and logical volume names. They must be the same as the original VDO volume name.
vgrename vdovg VDOexample
#Volume group "vdovg" successfully renamed to "VDOexample"
lvrename /dev/VDOexample/vdolvol /dev/VDOexample/VDOexample
#Renamed "vdolvol" to "VDOexample" in volume group "VDOexample" -
Edit /etc/yum.repos.d/vProtect.repo and change
baseurlto point toel9.vim /etc/yum.repos.d/vProtect.repo
[vProtect]
baseurl = https://f002.backblazeb2.com/file/DPX-vPlus/current/el9
gpgcheck = 0
name = vProtect repo -
On vPlus Server machine, create a vprotect database backup and copy it to safe place. Wait for all tasks to finish before stopping the vprotect-server service.
stop systemctl vprotect-server
/opt/vprotect/scripts/backup_db.sh
cp /tmp/vprotect_db.sql.gz /root -
Login to mysql and execute below SQL query.
mysql -uroot -p vprotect

update filesystembackupdestination
inner join backupdestination on filesystembackupdestination.guid = backupdestination.guid
set filesystembackupdestination.dedupvolume = CONCAT('/dev/', REGEXP_REPLACE(backupdestination.name,'\\W','_'), '/', REGEXP_REPLACE(backupdestination.name,'\\W','_'))
where filesystembackupdestination.dedupvolume is not null;

MariaDB [vprotect]> quit -
Start vprotect-server service.
systemctl start vprotect-server -
Proceed with the system upgrade of the vPlus Node machine. After the reboot, you should have new LVM-VDO mounted on your backupdestination directory.
lsblk
#NAME                               MAJ:MIN RM  SIZE RO TYPE MOUNTPOINTS
#sda                                  8:0    0   40G  0 disk
#├─sda1                               8:1    0  600M  0 part /boot/efi
#├─sda2                               8:2    0    1G  0 part /boot
#└─sda3                               8:3    0 38.4G  0 part
#├─cs-root                        253:0    0 34.4G  0 lvm  /
#└─cs-swap                        253:1    0    4G  0 lvm  [SWAP]
#sdb                                  8:16   0  100G  0 disk
#└─VDOexample-vdolvol_vpool_vdata   253:2    0  100G  0 lvm
#└─VDOexample-vdolvol_vpool-vpool 253:3    0  300G  0 lvm
#    └─VDOexample-VDOexample        253:4    0  300G  0 lvm  /backups