vPlus 7.0
  • Welcome to vPlus!
  • Overview
    • Main Features
    • Support Matrix
    • Components and Architecture
    • Typical Scenarios
    • Licensing
    • Product Life Cycle
  • Deployment
    • Component Requirements
    • Supported Platforms Requirements
    • Sizing Guide
      • Small
      • Medium
      • Large
    • Installation
      • Quick Installation Using All-in-one Script
      • Installing vPlus Offline
      • Adding vPlus Nodes
    • Initial Configuration
    • Backup Destinations
      • File System
        • Synthetic File System
          • XFS
          • DD Boost
        • isoLayer (Synthetic)
        • File System
          • Virtual Data Optimizer (VDO)
        • Catalogic Software vStor
      • Deduplication Appliances
        • Huawei OceanProtect
        • HPE StoreOnce
        • Exagrid
        • Neverfail HybriStor
      • Object Storage
        • Alibaba Cloud OSS
        • AWS S3 or S3-compatible
        • Ceph Rados Gateway
        • Cloudian S3
        • Wasabi
        • Google Cloud Storage
        • IBM Cloud Object Storage
        • Microsoft Azure Blob Storage
        • Nutanix Objects
        • OpenStack SWIFT
        • Oracle Cloud Infrastructure Object Storage
        • Scality RING
      • Tape Pools
    • High Availability
      • 2 Node Cluster
      • 3 Node Cluster
    • Common Tasks
      • Staging Space Configuration
      • Enabling HTTPS Connectivity for Nodes
      • LVM Setup on vPlus Node for Disk Attachment Backup Mode
      • Full Versions of libvirt/qemu Packages Installation
      • SSH Public Key Authentication
      • Enabling HTTP(S) Proxy for vPlus
  • Protecting Virtual Environments
    • Virtual Machines
      • Nutanix Acropolis Hypervisor (AHV)
      • Red Hat Openshift Virtualization
      • Red Hat Virtualization
      • oVirt
      • Oracle Linux Virtualization Manager
      • Oracle VM
      • Proxmox VE
      • KVM/Xen
      • OpenStack
      • OpenNebula
      • Virtuozzo
      • Citrix Hypervisor (XenServer)
      • XCP-ng
      • Huawei FusionCompute
      • SC//Platform
    • Cloud
      • Amazon EC2
      • GCP GCE
      • Azure Cloud
    • Containers
      • Red Hat OpenShift
      • Proxmox VE
    • Backup & Restore
  • Protecting Microsoft 365
    • Microsoft 365 Organization Management
      • Configure Microsoft 365 Access
      • Add Microsoft 365 Organization Manually
      • Add Microsoft 365 Organization Using the Setup Assistant
      • Account Auto-synchronization
    • Backup & Restore
    • Suppoted Sharepoint Templates and Limitations
  • Protecting Applications
    • Applications
      • PostgreSQL
      • DB2
      • Relax and Recover - ReaR
      • Git
      • oVirt/RHV/OLVM
      • Kubernetes/OpenShift etcd
    • Backup & Restore
  • Protecting Storage Providers
    • Storage Providers
      • File System
      • Ceph RBD
      • Nutanix Files
      • Nutanix Volume Groups
    • Backup & Restore
  • Administration
    • Dashboard
    • Virtual Environments
      • Instances
        • Backup On-Demand
        • Restore On-Demand
        • Snapshot Management
      • Virtualization Providers
      • Backup SLAs
        • Policies
        • Schedules
      • Snapshot SLAs
        • Policies
        • Schedules
      • Recovery Plans
        • Policies
        • Schedules
      • Mounted Backups (File-level Restore)
    • Storage
      • Instances
        • Backup On-Demand
        • Restore On-Demand
      • Infrastructure
      • Backup SLAs
        • Policies
        • Schedules
      • Snapshot SLAs
        • Policies
        • Schedules
      • Mounted Backups (File-level Restore)
    • Microsoft 365
      • Instances
      • Organizations
      • Backup SLAs
        • Policies
        • Schedules
      • Download
    • Applications
      • Instances
      • Execution Configurations
      • Backup SLAs
    • Reporting
      • Virtual Environments
      • Storage
      • Microsoft 365
      • Applications
      • Notifications
      • Audit Log
    • Nodes
      • Instances
      • Node Configurations
    • Access Management
      • Users
      • Groups
      • Roles
      • OS Credentials
    • Settings
      • Global Settings
      • Internal DB Backup
      • Notification Rules
      • Mailing Lists
      • Endpoints Global Settings
    • Upgrade
    • CLI Reference
    • CLI v2 Reference (technical preview)
  • Integration
  • Troubleshooting
    • How to Enable vPlus DEBUG Mode
    • Collecting Logs
    • External Log Targets
    • Disaster Recovery
  • Known Software Issues and Limitations
  • Glossary
Powered by GitBook
On this page
  • Backup Strategies
  • XVA-based
  • Changed-Block Tracking
  • Change Block Tracking setup
  • Notes on restore
  • NBD Server setup (on XenServer)
  • NBD Client setup (on vPlus Node)
  • Limitations
  1. Protecting Virtual Environments
  2. Virtual Machines

XCP-ng

PreviousCitrix Hypervisor (XenServer)NextHuawei FusionCompute

Last updated 6 months ago

Backup Strategies

XVA-based

In this strategy, the VM is exported as a single XVA bundle containing all the data. Incremental backup is also supported. Data is transferred directly from the XenServer API without the need to set up anything on the hosts.

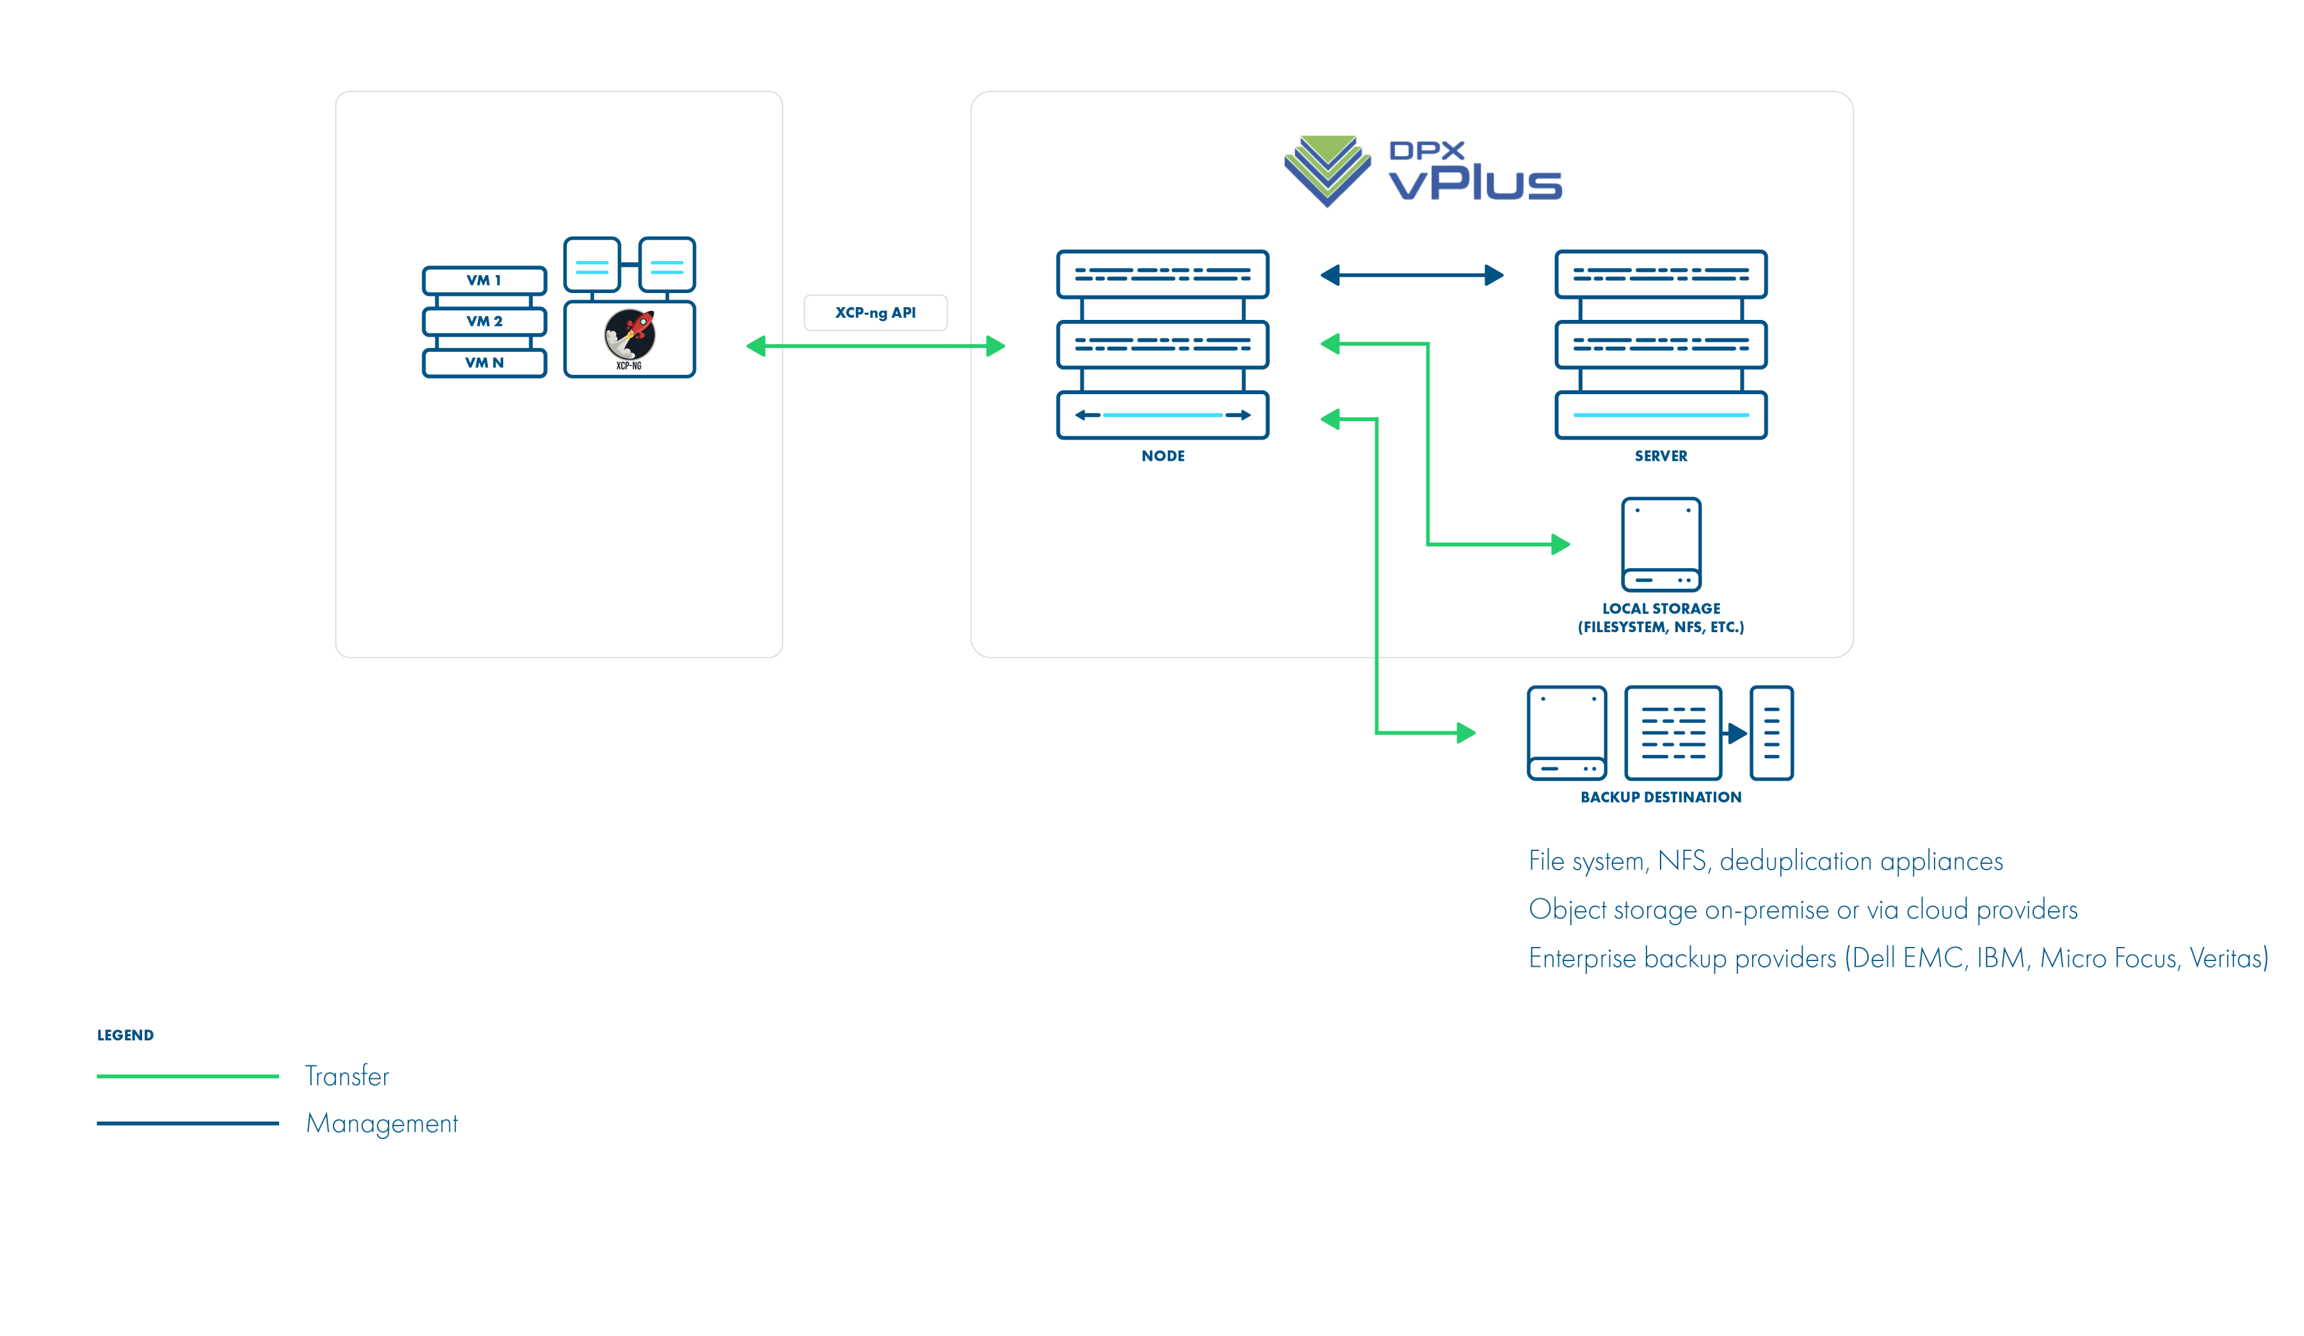
Backup Process (XVA-based)

  • crash-consistent snapshot using hypervisor's API only for full backups

  • optionally quiesced snapshot can be done if enabled and guest tools installed inside - if the quiesced snapshot has been failed we are doing regular one

  • optional application consistency using pre- / post-snapshot command execution

  • data export directly from the hypervisor using hypervisor's API - both full (XVA) and delta (VHD for each disk)

  • full backup (XVA) contains metadata

  • snapshot taken with full backup is kept on the hypervisor for the next incremental backup - if at least one schedule assigned to the VM has backup type set to incremental

  • incremental backups are cumulative (all data since last full backup)

  • restore recreates VM from XVA, and then applies changes from each incremental backup using Hypervisor APIs

Changed-Block Tracking

In this strategy, the VM is exported using XenServer API (full backup) and the Network Block Device service (NBD, incremental backups) on the XenServer hosts. The CBT feature in Citrix XenServer 7.3+ may require an additional license. The resulting backup has separate files for each disk + metadata, so you also have the option to exclude specific drives.

Note. For full backups only you can still use this strategy without CBT enabled on the hypervisor.

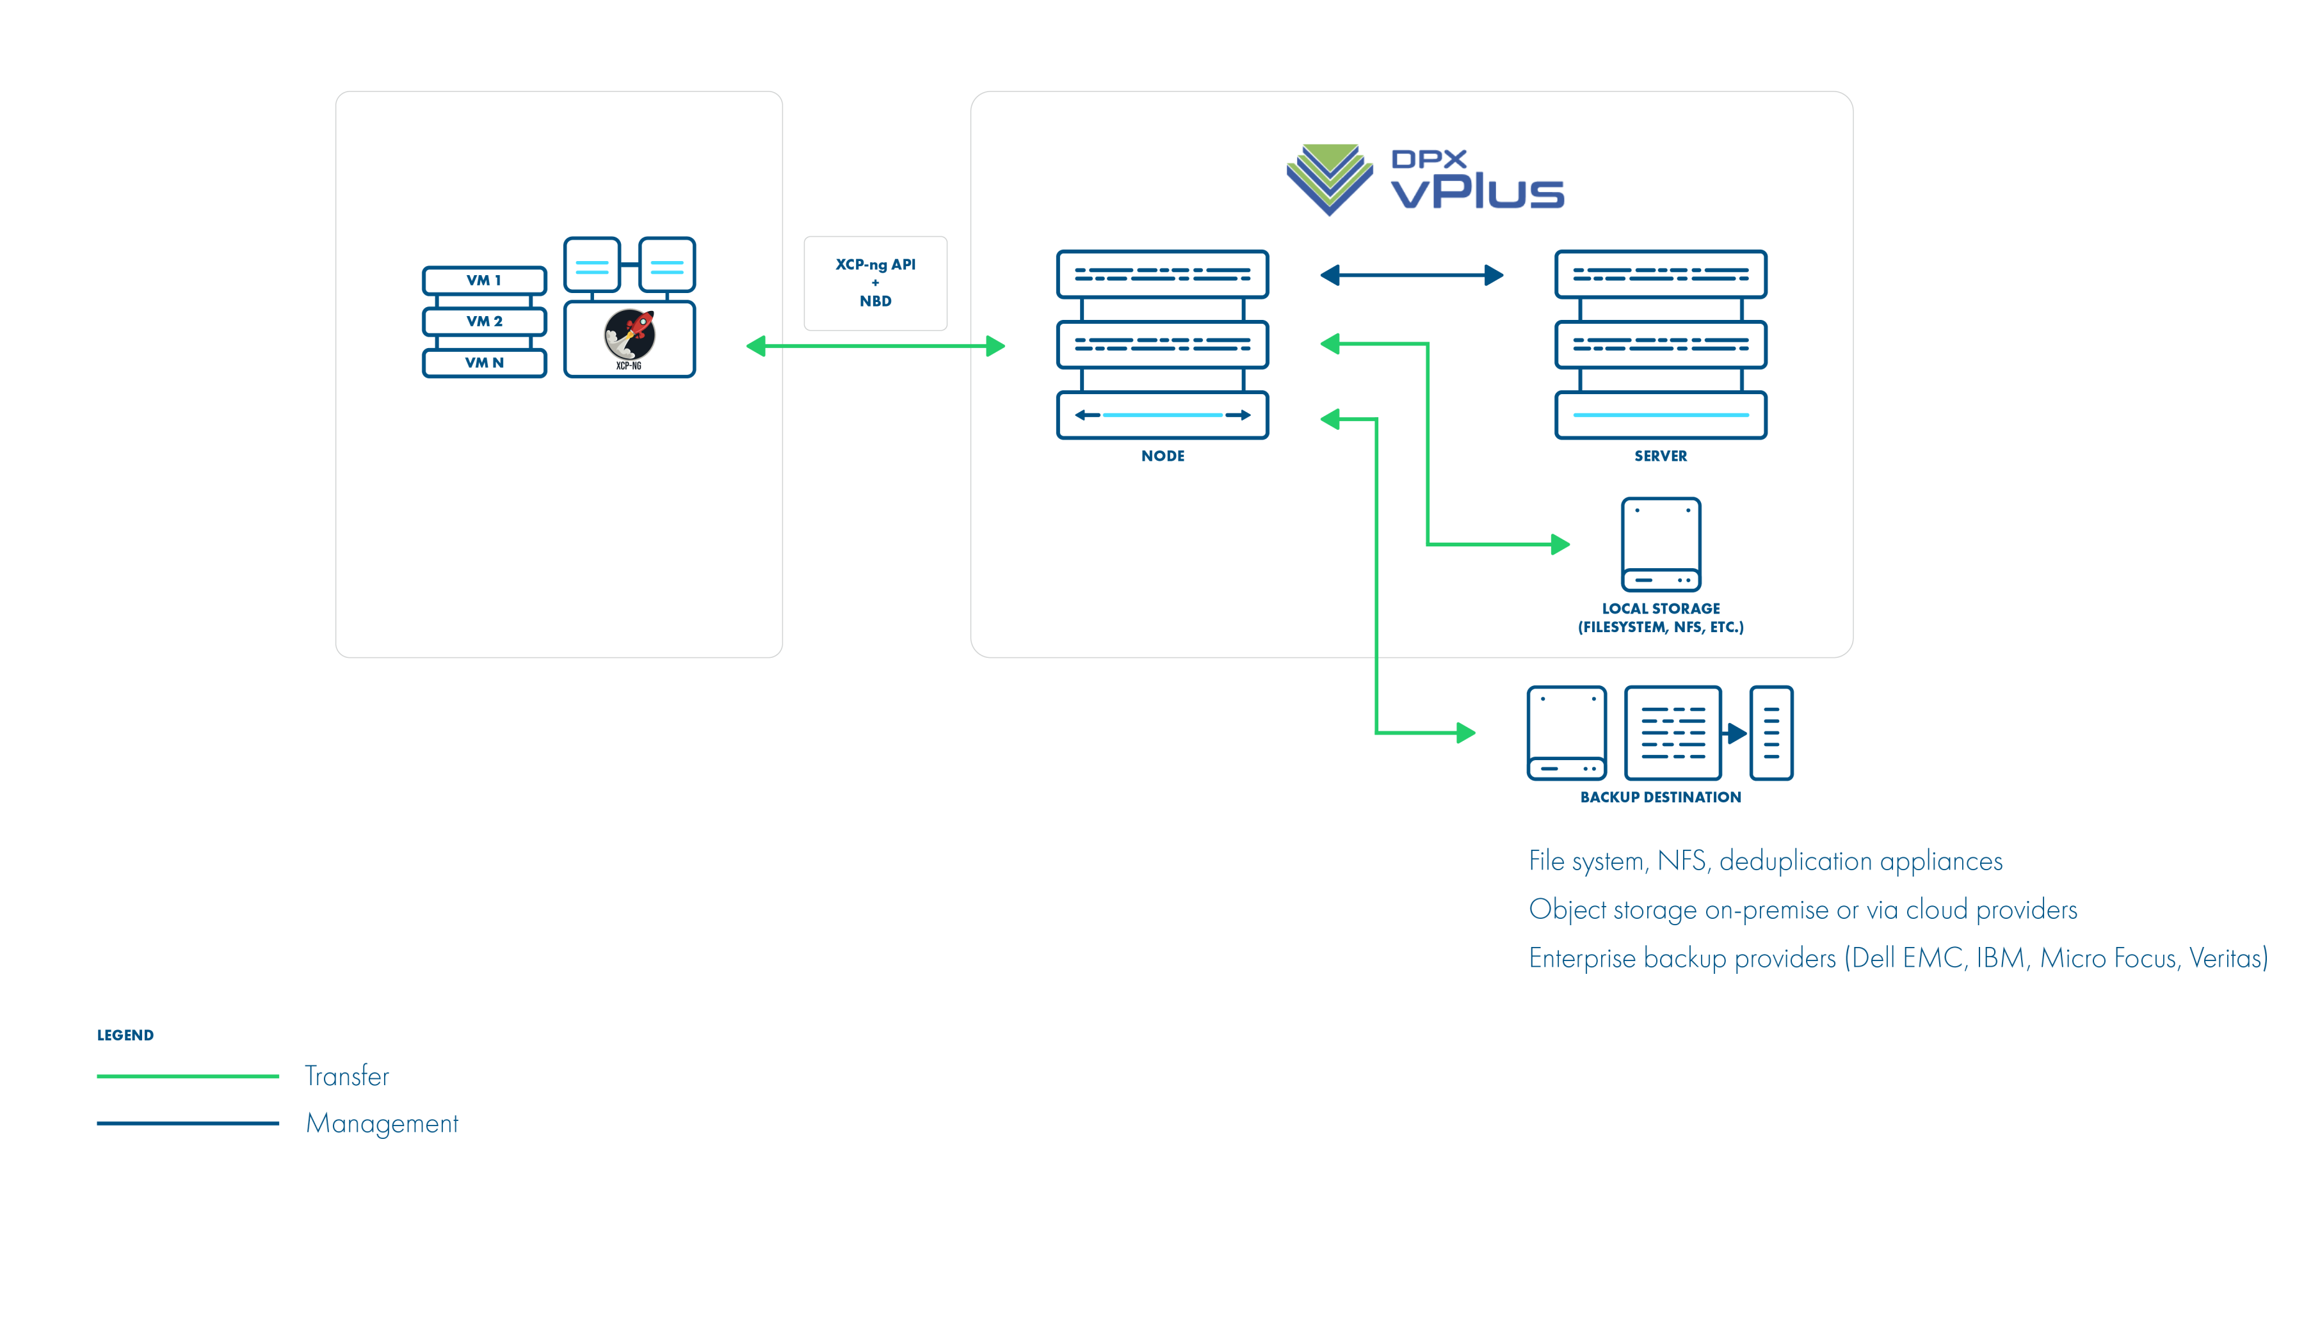
Backup Process (Changed-Block Tracking)

  • crash-consistent snapshot using hypervisor's API

  • optionally quiesced snapshot can be done if enabled and guest tools installed inside - if the quiesced snapshot has been failed we are doing regular one

  • optional application consistency using pre- / post-snapshot command execution

  • CBT enabled during full backup on each disk if it wasn't done earlier

  • metadata exported from API

  • full backup - each disk exported from API (RAW format)

  • incremental backup - each disk queried for changed blocks and which are exported over NBD

  • the last snapshot is kept on the hypervisor for the next incremental backup - if at least one schedule assigned to the VM has a backup type set to incremental

  • restore recreates VM from metadata using API and imports merged chain of data for each disk using API

Change Block Tracking setup

Citrix introduced the CBT mechanism in XenServer 7.3. In order to enable CBT backups, the following requirements must be met:

  1. Citrix Hypervisor 7.3 (XCP-ng 7.4) or above must be used - note that CBT is a licensed feature

  2. The NBD server must be enabled on the hypervisor

  3. The NBD client and NBD module must be installed on vPlus Node (vPlus should take care of this automatically during installation)

Notes on restore

  1. When image-based backups (XVA) are used - vPlus restore VMs as templates and renames them appropriately after the restore

  2. When separate disk backups are used:

    • if there is already a VM in the infrastructure with the UUID of the VM being restored (check present flag in VM list) - vPlus restore it as a new VM (MAC addresses will be generated)

    • otherwise, vPlus attempts to restore the original configuration including MAC addresses

NBD Server setup (on XenServer)

  1. Get the Network UUID that you intend to use for communication with vPlus - run on the XenServer shell:

    [root@xenserver-cbt ~]# xe network-list
    uuid ( RO)            : e16b4e34-47d4-9a6e-371b-65beb7252d69
           name-label ( RW): Pool-wide network associated with eth0
     name-description ( RW):
               bridge ( RO): xenbr0
    ..........
    uuid ( RO)            : 244a2fa7-ae7c-e45c-819a-44cecf51e8fa
           name-label ( RW): Host internal management network
     name-description ( RW): Network on which guests will be assigned a private link-local IP address which can be used to talk XenAPI
               bridge ( RO): xenapi

    For example: e16b4e34-47d4-9a6e-371b-65beb7252d69

  2. Enable the NBD service on your hypervisor:

    xe network-param-add param-name=purpose param-key=nbd
    uuid=<network-uuid>

NBD Client setup (on vPlus Node)

Note. This part is done by vPlus automatically during installation. The article may be helpful in case of problems with the NBD module.

vPlus comes with a pre-built RPM and modules for CentOS 7 distribution.

  1. Go to the NBD directory:

    cd /opt/vprotect/scripts/nbd
  2. Use yum to install the NBD client:

    yum -y install nbd-3.16.1-1.el7.centos.x86_64.rpm
  3. If your Linux does not have the NBD module installed you may try to build one yourself (there is a script for Red Hat based distributions that downloads the kernel, enables the NBD module, and builds it) or use the already provided module.

    You can compile the module by running:

    ./compile_nbd_module.sh
  4. Enable the module by invoking the script (the following command will either use a module in your kernel or copy the provided nbd.ko):

    ./enable_nbd.sh
  5. Verify that you have /dev/nbd* devices available on your vPlus node host:

    [root@localhost nbd]# ls /dev/nbd*
    /dev/nbd0  /dev/nbd1  /dev/nbd10  /dev/nbd11  /dev/nbd12  /dev/nbd13
    /dev/nbd14  /dev/nbd15  /dev/nbd2  /dev/nbd3  /dev/nbd4  /dev/nbd5
    /dev/nbd6  /dev/nbd7  /dev/nbd8  /dev/nbd9
  6. Restart your vPlus Node:

    systemctl restart vprotect-node

Limitations

  • VM migration between clusters is not supported.

  • Cloning VM to another cluster is not supported.