OpenStack
vPlus supports backup for OpenStack:
Disk attachment through Cinder with changed block tracking (preferred):
supports all hypervisors and storages
supports incremental backup
proxy VM is required - used for the disk attachment process.
Disk image transfer - for KVM hypervisors with VMs using QCOW2
Volumes or Ceph-based storage:
supports incremental backup
disk images are transferred directly from API (no Proxy VM required)
Disk attachment through Cinder:
supports all hypervisors and storages
no incremental backup
proxy VM is required - used for the disk attachment process.
Backup Strategies
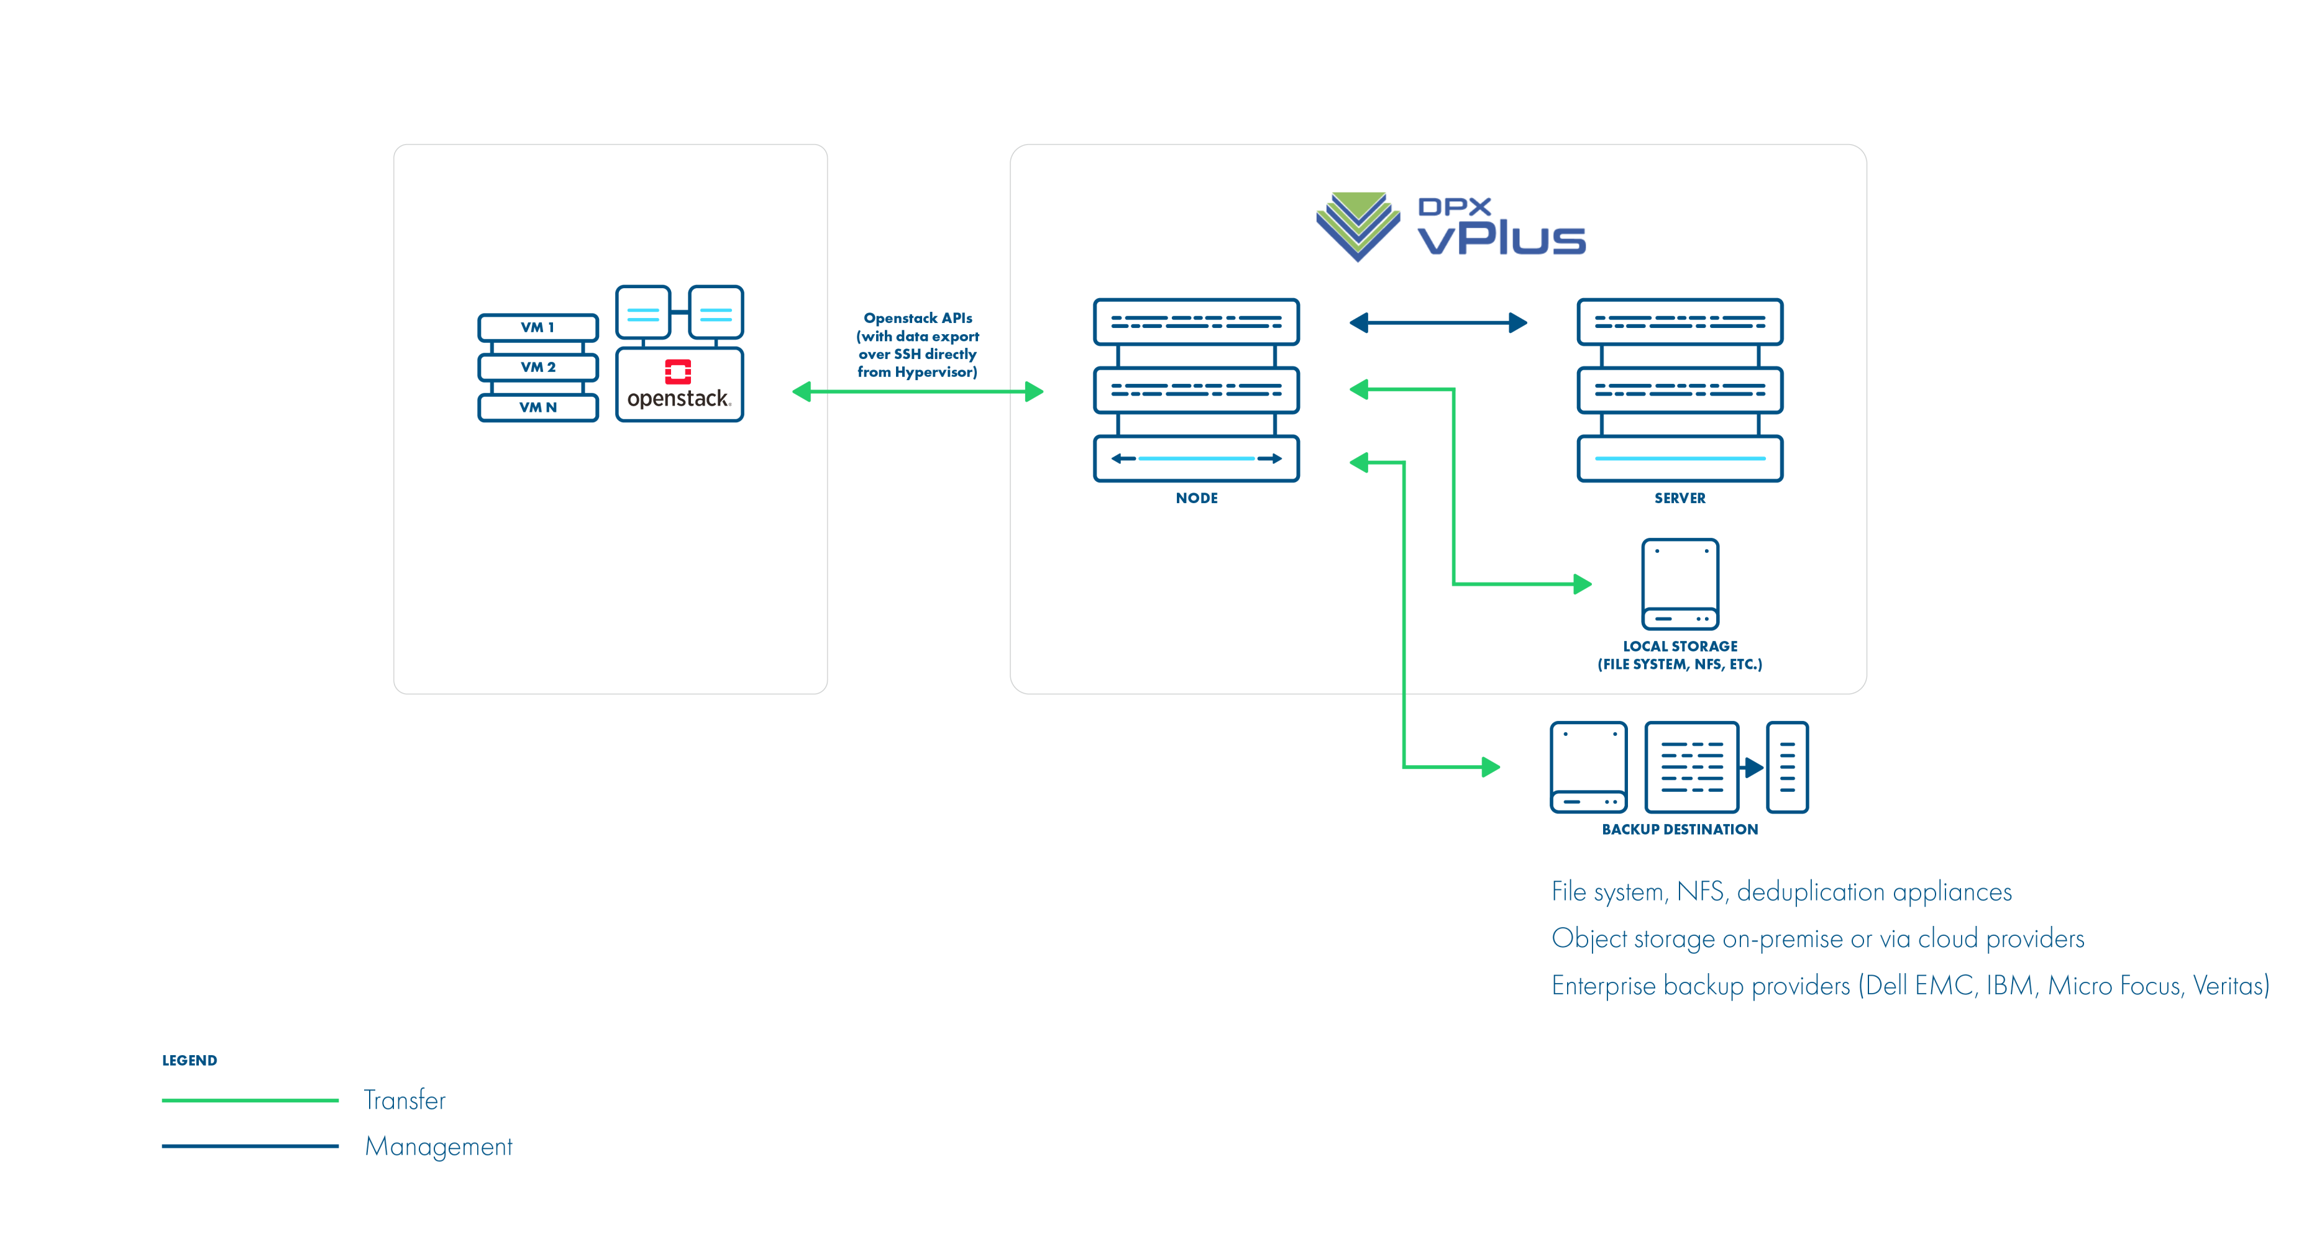
Libvirt strategy
vPlus supports OpenStack environments that use KVM hypervisors and VMs running on QCOW2 or RAW files. vPlus communicates with OpenStack APIs such as Nova and Glance to collect metadata and for the import of the restored process. However, the actual backup is done over SSH directly from the hypervisor. The process is exactly the same as in Deployment in the KVM/Xen environment. vPlus Node can be installed anywhere - it just needs to have access to the OpenStack APIs and hypervisor SSH via a network. Both full and incremental backups are supported.

Backup Process (Libvirt strategy)
direct access to the hypervisor over SSH
crash-consistent snapshot taken directly using virsh (QCOW2/RAW file), rbd snapshot for Ceph (separate call for each storage backend)
optional application consistency using pre/post snapshot command execution • QCOW2/RAW-file data exported over SSH (optionally with netcat)
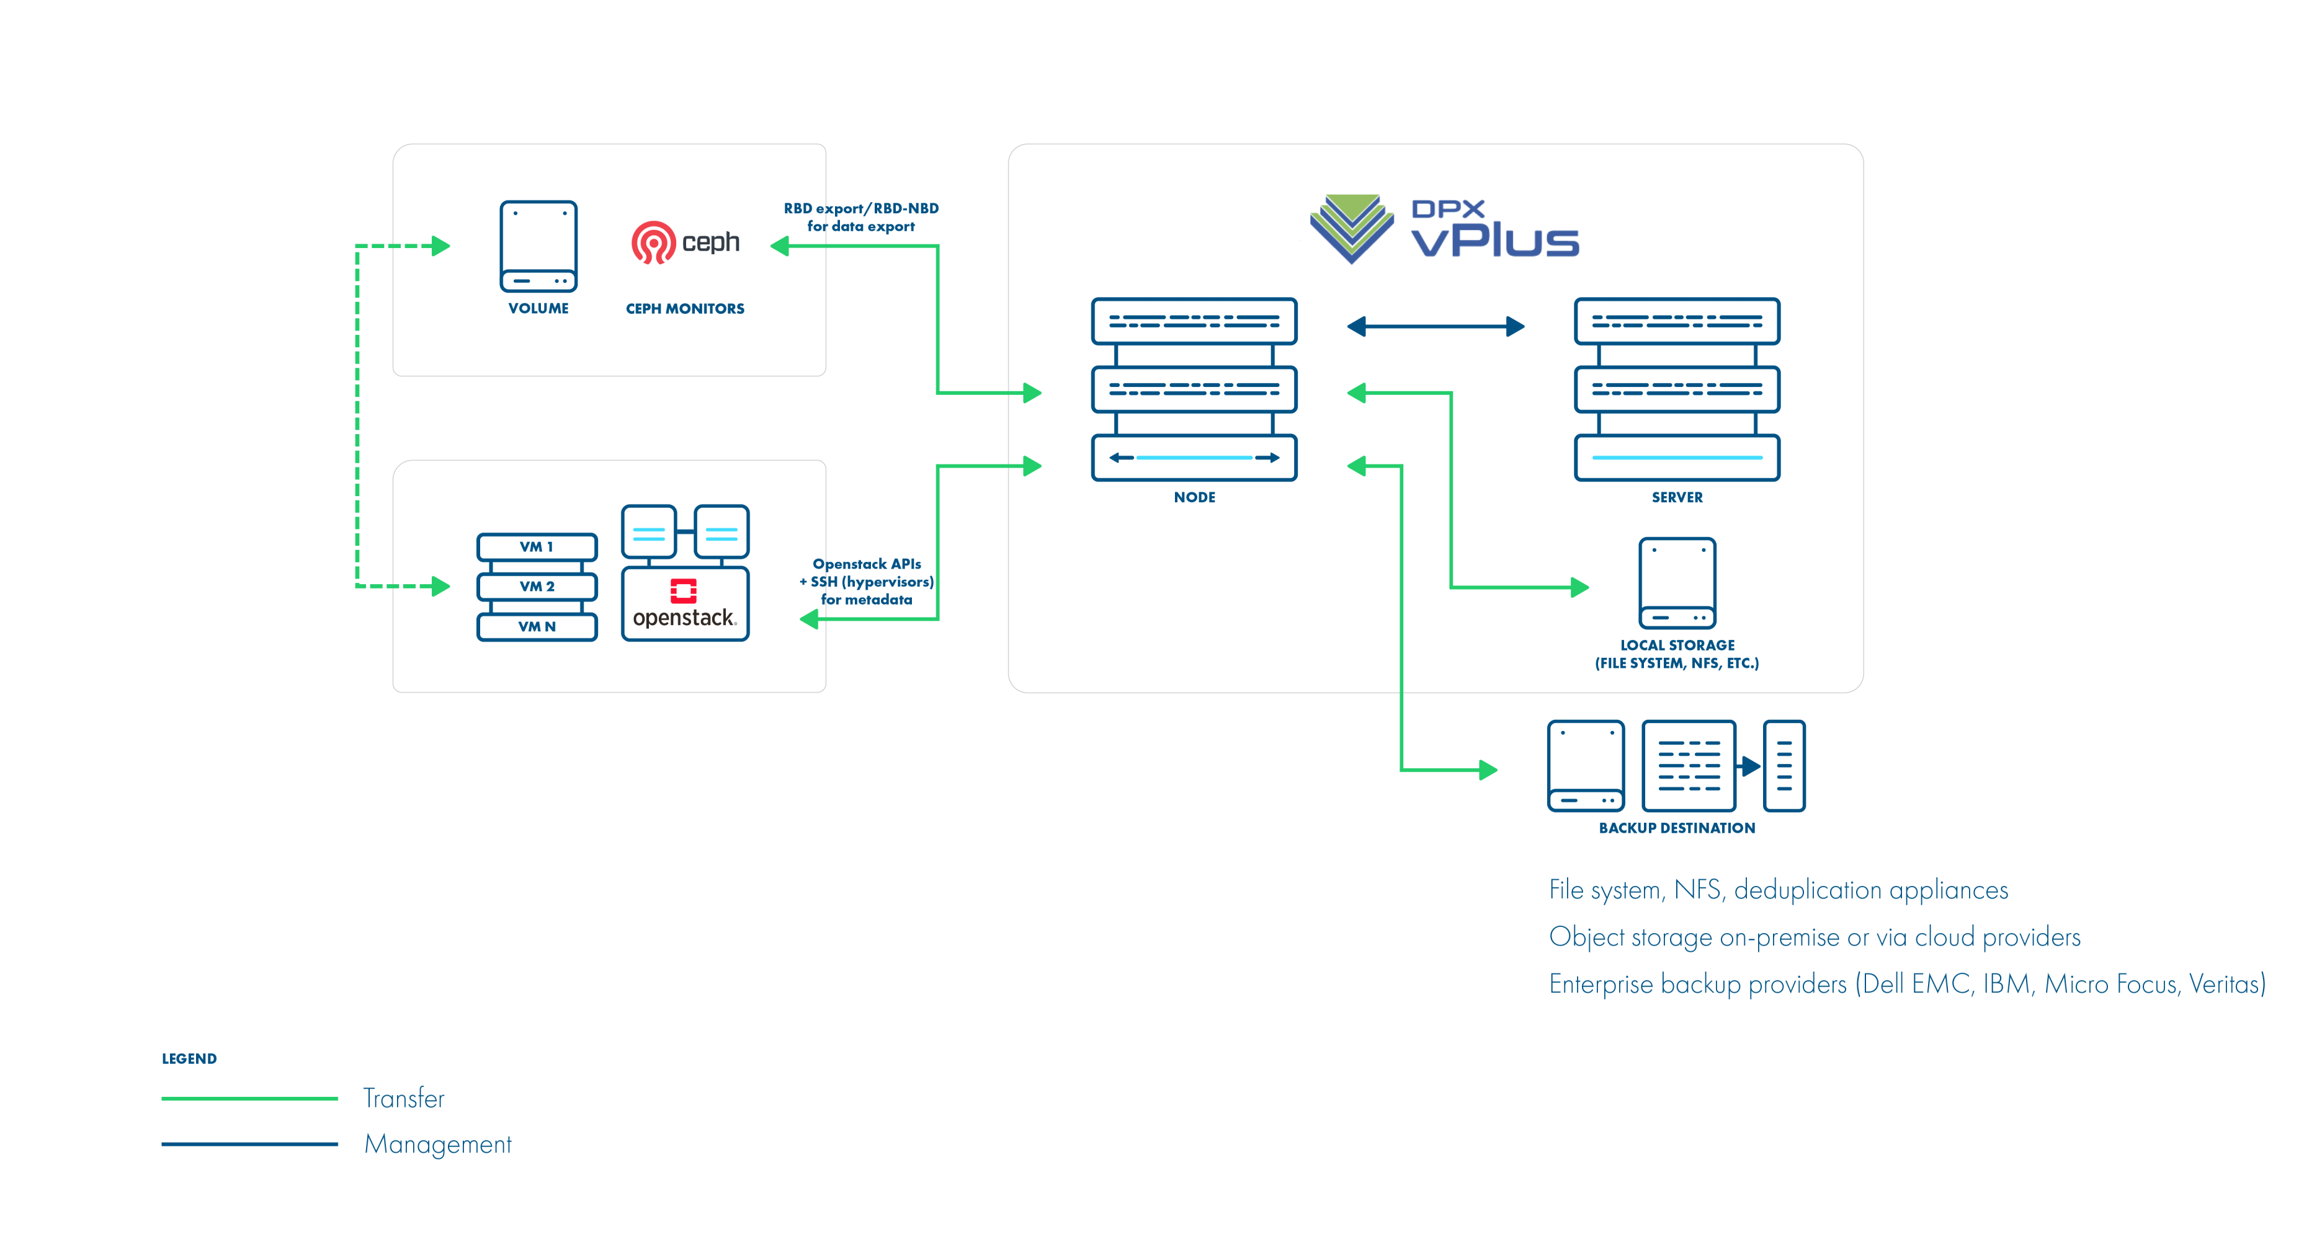
Ceph RBD data exported using rbd export or RBD-NBD when incremental is used
metadata exported from OpenStack APIs (nova, glance, cinder)
the last snapshot kept on the hypervisor for the next incremental backup (if at least one schedule assigned to the VM has backup type set to incremental)
restore recreates files/volumes according to their backend (same transfer mechanism as used in backup) and then defines VM on the hypervisor
Disk attachment (Libvirt strategy)
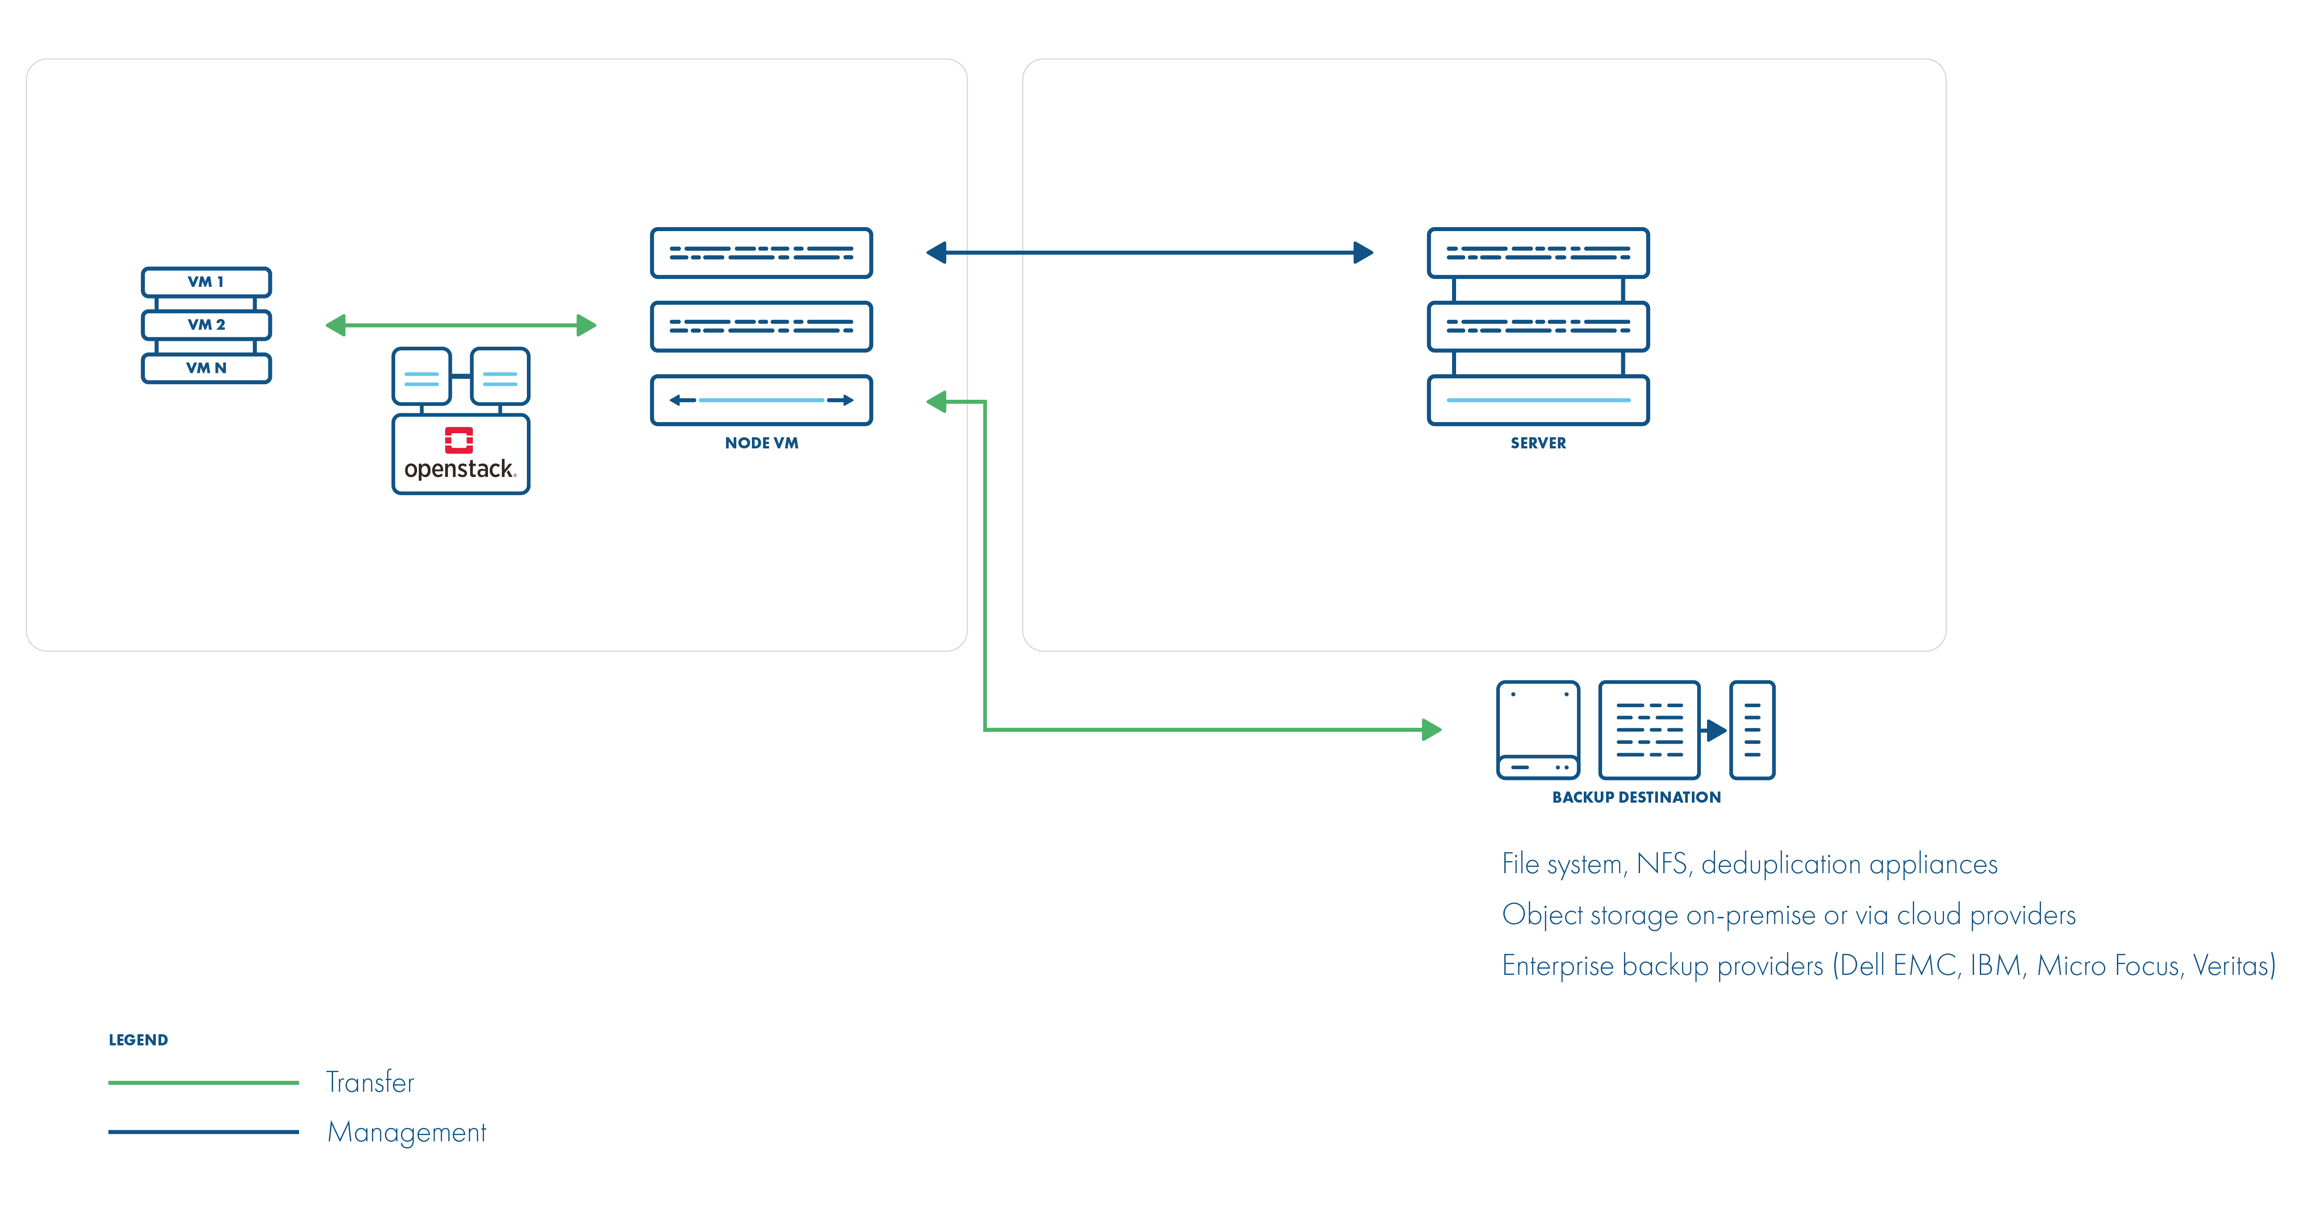
vPlus also supports the disk-attachment method using cinder. This should allow you to use cinder-compatible storage and still allow vPlus to create backups. Incremental backup is supported in disk attachment changed block tracking (which has higher CPU overhead). vPlus needs to communicate OpenStack service's API to attach drives to the proxy VM with vPlus Node installed.

Backup Process (Disk attachment)
crash-consistent snapshot using cinder API
optional application consistency using pre/post snapshot command execution
metadata exported from API
volumes created from snapshotted disks are mounted one by one to the Proxy VM
data read directly on the Proxy VM
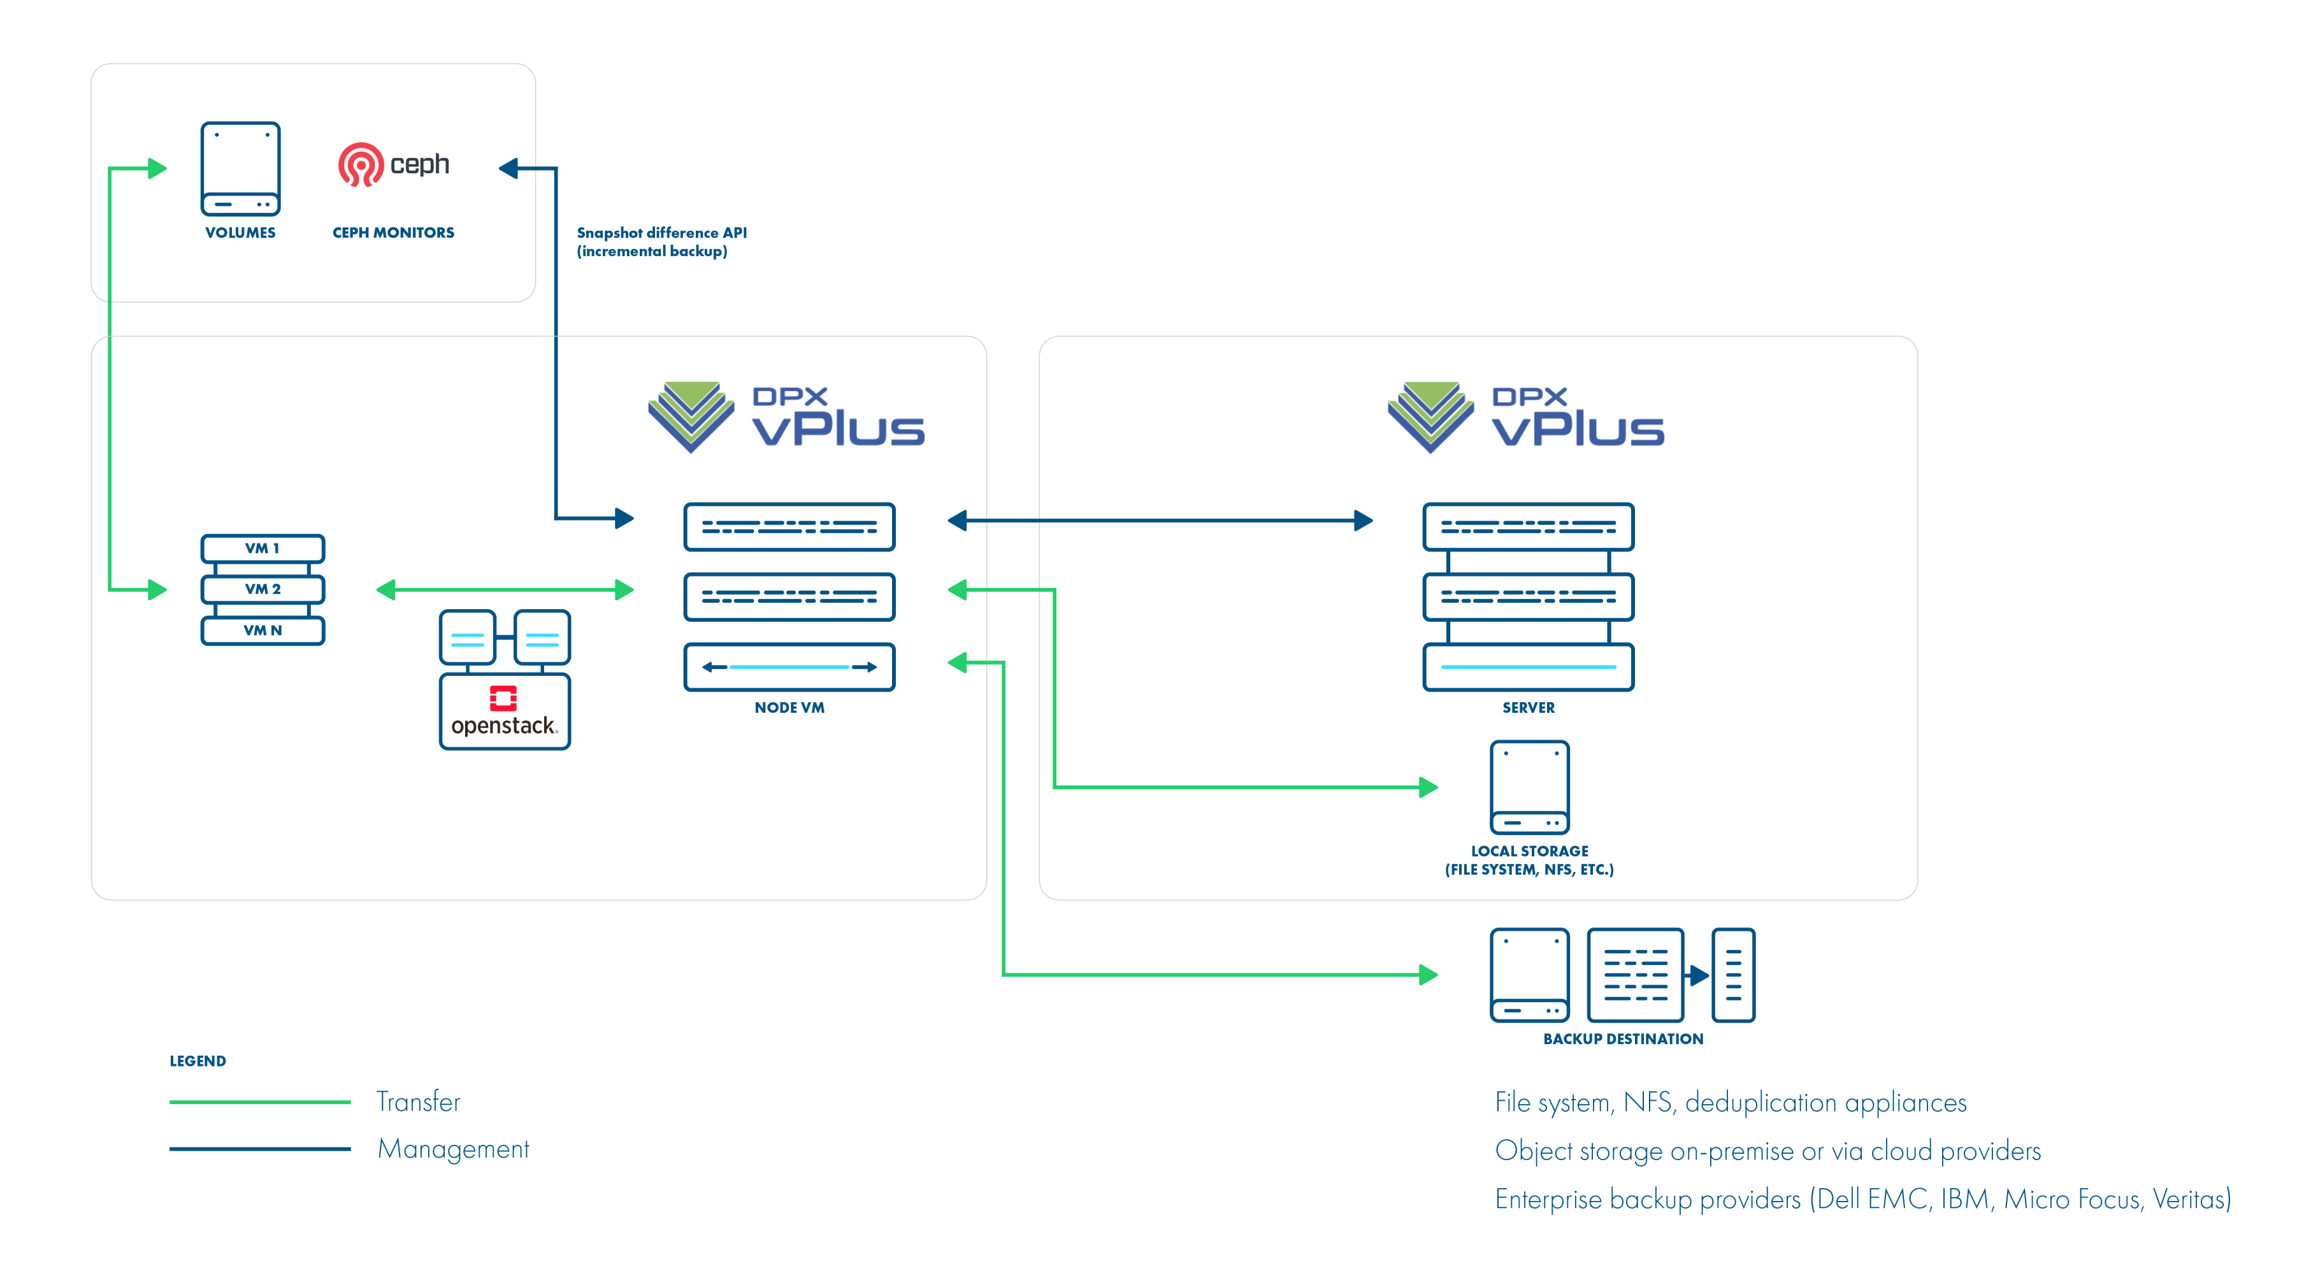
incremental backups supported for Ceph RBD - a list of the changed blocks are fetched from the monitors, and only these blocks are read from the attached disk on the Proxy VM
if an instance is created from the glance image and "download image from glance" option is enabled data is downloaded from glance API, an instance is created from the instance metadata, and the images which are fetched from the glance API
restore creates empty disks on the Proxy VM, imports merged data then recreates the VM using these volumes, it will try to use the image from a glance if present in the target environment or it will upload the image to the glance and register it with the restored VM
Ceph RBD storage backend
vPlus also supports deployments with Ceph RBD as a storage backend. vPlus communicates directly with Ceph monitors using RBD export/RBD-NBD when used with the Libvirt strategy or - when used with the Disk-attachment method - only during incremental backups (snapshot difference).
Libvirt strategy (Ceph RBD storage backend)

Disk attachment strategy (Ceph RBD storage backend)

vPlus supports OpenStack with Ceph RBD volumes. Here is an example of a typical (expected) section that needs to be added in cinder.conf for Ceph in the OpenStack environment:
A good article on how to set up Ceph with OpenStack can be found here.
To set up the Openstack HVM with Ceph RBD volumes in vPlus:
Add Ceph storage as described here
Add the hypervisor manager as described here.
Go to
Virtual Environments->Virtualization Providers->Clustersand select cluster that is used by Openstack.

In
Storage Providerfield select previously added Ceph storage.

Now you can save and sync the inventory - if Ceph communication works properly you should be able to see Hypervisor Storage entries (in Hypervisors -> Storage tab) representing your Ceph storage pools.
QCOW2 files on NFS storage
Example: scenario QCOW2 files residing on NFS
You can configure the NFS volume backend using OpenStack docs.
Make sure the QCOW2 volumes are enabled.
For an NFS backend, it's recommended to set these values in /etc/cinder/cinder.conf:
Nova volumes
vPlus is able to backup nova volumes using libvirt strategy. In the hypervisor manager settings there is an option Download image from glance. When this option is enabled the original image from glance is downloaded. If it is disabled, then the image is not downloaded, however the nova volume created from it is backed up.
Adding hypervisor managers
When creating the hypervisor manager, provide the following data in the fields:
URL - Keystone API URL, e.g. https://10.201.32.40:5000/v3
Authentication domain:
name - name of domain
domainId - optional domain id
user - OpenStack user.
password - password for that user.
default project - name of default project in domain.
Scope VMs to Domain - you can create one or more Authentication Domains based on this setting, as described in the Authentication Domains section below.
Download image from a glance - allows vPlus to use images from a glance as described in the disk attachment strategy
When you index the hypervisor manager, make sure you provide the correct SSH credentials for each hypervisor that appeared on the Hypervisors tab. You can also use SSH public key authentication.
Note. When restoring the instances, make sure that the provided user is a member of the target tenant.
Authentication Domains
vPlus supports OpenStack environments with multiple domains. Each OpenStack Hypervisor Manager needs to have at least one Authentication Domain provided.
vPlus supports two types of domain authorization:
Unscoped - single credentials to multiple domains
Scoped - single credentials to single domain
Single credentials to single domain
Scoping VMs to Domain option needs to be turned on.
In that setup user can create Authentication Domains for every Domain in OpenStack environment. Projects and Virtual Machines are only scanned in provided Authentication Domains.
Single credentials to multiple domains
Scoping VMs to Domain option needs to be turned off.
In that setup user need to create only one Authentication Domain. Projects and Virtual Machines are scanned in every domain that provided user has access to.
Openstack tags
To list tags for specific instance:
Tags for Openstack requires nova API version >= 2.26.
Openstack Access Keys
During Inventory Synchronization, vPlus scans all Keypairs (to which a user has access) and stores them as Access Keys. When restoring an instance, the user can specify the Access Key.
Note. If the access key selected for restore is no longer present in the Openstack environment, it will be restored.
Openstack Flavor
During Inventory Synchronization, vPlus scans all Flavors and saves their configuration. When restoring an instance, the user can specify the flavor.
Note. If the flavor selected for restore is no longer present in the Openstack environment, it will be restored with the same configuration and availability as the original flavor.
Instant restore
Node configuration
First step to initiate the configuration process for OpenStack Instant Restore service, is creating a directory that will be accessible for mounting by the NFS server. Create a specific directory on your Node machine that will be used as the target space for Instant Restore's shared resources.
Next, create an NFS share that will allow access to the /vprotect_data/ directory from other machines in the network. Sharing this directory will enable OpenStack clients to use it for virtual machine restoration.
OpenStack configuration
Note. Paths and commands may vary depending on the version of OpenStack you are using.
After creating the NFS share on the node, you need to configure the NFS backend in the OpenStack environment. This step will allow OpenStack to access resources stored on the node via NFS. Edit the /etc/cinder/cinder.conf file and add this section at the end of the file:
Create the file you provided in the configuration as the value of nfs_shares_config parameter
and path to the NFS share:
After creating the NFS server and configuring cinder, restart the cinder volume service. Please note that the name of this service may be different depending on the OpenStack version.
vPlus web UI configuration
After completing the inventory synchronization of the OpenStack, in Node edition window you can select the storage with the NFS backend configuration. Details about the NFS backend should be supplied by the OpenStack administrator.

You should now be able to select "Instant restore" for backed up virtual machines.
Limitations
vPlus does not backup and restores keypairs that user used in vPlus doesn't have access to. The restored instance will have no keypairs assigned. In such a case, the keypairs have to be backed up and restored manually under the same name before restoring the instance.
For the libvirt strategy only, QCOW2/RAW files or Ceph RBD are supported as the backend.
The disk attachment method with Ceph requires access to the monitors from the Proxy VM.