Azure Cloud
vPlus supports the Azure Cloud platform by using a VM called “Proxy VM”. The node invokes commands on the Azure to snapshot and attach temporary disks of a specific VM to itself (Proxy VM). The proxy VM is able to read the data from the attached disk snapshots and forward them to the backup provider.
This means that you need to create a Compute Instance (Proxy VM) in each zone and region without zone placement from which you want to secure instances. Remember that you need to install 1 Proxy VM in each location so that drives that the Node tries to attach are reachable.
The vPlus Server can be deployed anywhere, but keep in mind that Nodes need to be able to call the server over HTTP(S) on the port you have specified.
All backup destinations can be used, but keep in mind that you may be charged for transferring data between regions, zones, and external backup providers.
vPlus Node has access to instances only in the resource groups where service app has access to.
Setup considerations
It is assumed that you have working experience with Microsoft Azure to be able to deploy vPlus components. You also need an IAM user with the ability to change permissions on the resource group and creating new application registrations in Azure Active Directory.
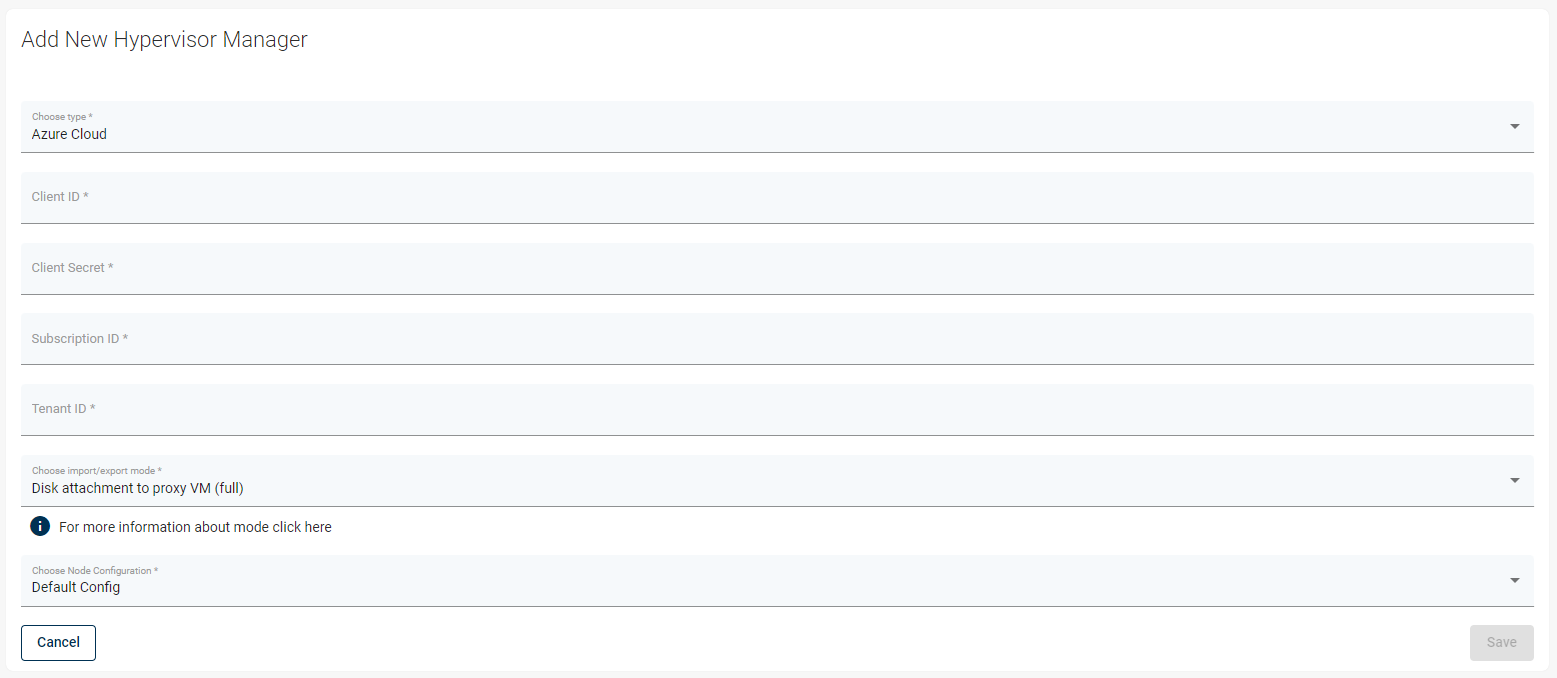
vPlus Node requires the Application (client) ID, Client Secret, Subscription ID and Tenant ID to connect to the Microsoft Azure account.
Permissions
vPlus requires you to create a dedicated application registration in Azure Active Directory.
Register an application with the Microsoft identity platform
For proper operation, the application must have access to the resource group where the VM with vPlus Node is located. To do this, add the app you created with Owner permissions to the Access Control list in the appropriate resource group.
Grant access to resource group
Adding a hypervisor manager
To properly configure your Azure Cloud account, go to vPlus WebUI -> Virtual Environments -> Virtualization Providers and click create button.

Enter parameters such as:
Client ID
Tenant ID
Client Secret
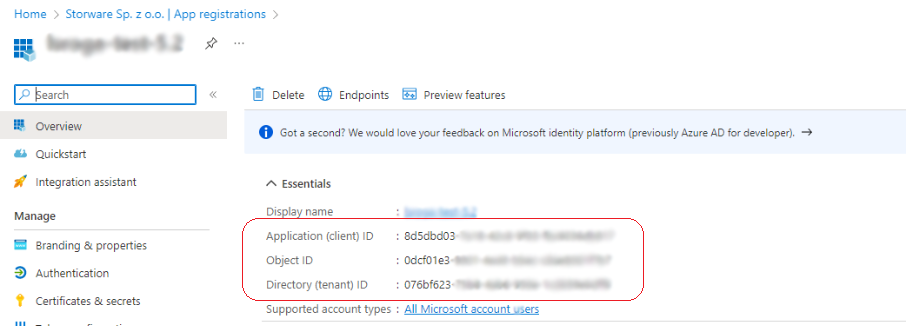
You can find these parameters in Azure Active Directory -> App registrations -> Your App. In the Overview tab you will find Application (client) ID and Directory (tenant) ID. In the Certificates & secrets tab you can generate a Client Secret.

Subscription ID
Subscription ID can be found in the settings of your Azure subscription.

Multi-zone configuration
To secure instances from multiple zones and regions, You need to register additional Nodes. For every zone you want to back up instances from, You need to create a separate Node Configuration. Each Node Configuration needs to be assigned to the correct Hypervisor Cluster (which reflects compute zone from Azure).
First Synchronization Task needs only one Node. After the first scan, You can assign Node Configurations to Hypervisor Clusters, and run the Synchronization Task once again to fetch all instances from other zones.
To assign Node Configurations to Hypervisor Cluster, you need to go to Clusters list in Virtualization Providers tab. Then click on selected Cluster to choose Node Configuration.
Note.
For backup and restore between zones nodes and node configurations should have access to the same backup destination.
In Azure, instances could be placed in Regions without specifying zone, for this use cases You need to assign Node configuration to Hypervisor Cluster with (No Zone), for example Germany West Central (No Zone).
Backup strategies
Azure Cloud supports two backup and restore strategies:
Disk attachment to proxy VM (only full backup)
Disk attachment with changed block tracking (full and incremental backup)
In both cases, volume snapshots are kept in Azure only until the vPlus Export task is completed.
Access Keys
If no access keys are specified during the restore, the target instance will be restored with the same key as in the backup. If this key is no longer available, the only way to access the restored instance is to reset the password in the Azure Cloud Platform.