isoLayer (Synthetic)
Prerequisites
You need a NFS server with storage with XFS filesystem to properly configure isoLayer Backup Destination in DPX vPlus.
Preparation
On NFS server we need to create NFS share, for example:
mkdir /NFSEdit file
/etc/exportsto add access to this share:/NFS SBR_NODE_IP(rw,sync,no_all_squash,no_root_squash)Where SBR_NODE_IP is IP of DPX vPlus Node, which will have access to this share
Generate new SSH keys, without any password:
ssh-keygen
Generating public/private rsa key pair.
Enter file in which to save the key (/root/.ssh/id_rsa):
Enter passphrase (empty for no passphrase):
Enter same passphrase again:
Your identification has been saved in /root/.ssh/id_rsa.
Your public key has been saved in /root/.ssh/id_rsa.pub.
The key fingerprint is:
SHA256:H2NJwORiG3oJDm78sKEx4EuOzIm13vUsJ6NfMOPVgt0 root@vpro43-vmware
The key's randomart image is:
+---[RSA 3072]----+
|       oo        |
|       ...       |
|. . . + . .      |
|oo o + B + .     |
|ooB o O S E      |
|B*o* o = + o     |
|+*o . o . .      |
| . . .++.        |
|  . oo.=o        |
+----[SHA256]-----+
Add new public key to
/root/.ssh/authorized_keysfilecat /root/.ssh/id_rsa.pub > /root/.ssh/authotized_keysCopy generated private key (id_rsa) to DPX vPlus Node host
scp /root/.ssh/id_rsa root@SBR_NODE_IP:/opt/vprotect/.ssh/SSH to DPX vPlus Node and change owner of this file:
chown vprotect:vprotect /opt/vprotect/.ssh/id_rsaConnect from DPX vPlus Node to NFSs:
ssh -i /opt/vprotect/.ssh/id_rsa root@NFSsaccept new fingerprint and exit from remote session
Copy last line from
/root/.ssh/known_hostsfile into/opt/vprotect/.ssh/known_hostsfileConfigure isoLayer connection. Edit
/opt/vprotect/scripts/isoLayer/configfile:vi /opt/vprotect/scripts/isoLayer/config) NFS_HOST=NFS4.2_HOST_IP SSH_USER=root SSH_KEY=~/.ssh/id_rsa NFS_HOST_PATTERN=NODE_IP NFS_ROOT=PATH_FOR_MOUNT_POINTS NFS_OPTS=rw,sync,insecure,no_root_squash,no_subtree_checkwhere:
NFS_HOST- IP address of NFS serverNFS_HOST_PATTERN- IP address (CIDR) of NFS server, for example: 10.10.0.0/24NFS_ROOT- NFS server share path, where we want to store our backups, for example /NFS/backup
Creating isoLayer backup destination
Login into DPX vPlus UI.
From menu on the left, select Backup Destinations -> File System.
On the right, click Create Backup Destination button and choose isoLayer (Synthetic).
In new window:
type name for the backup destination
select Node Configurations
provide backup destination path – this is place, where from DPX vPlus Node perspective, isoLayer will be temporary mount share from NFS server
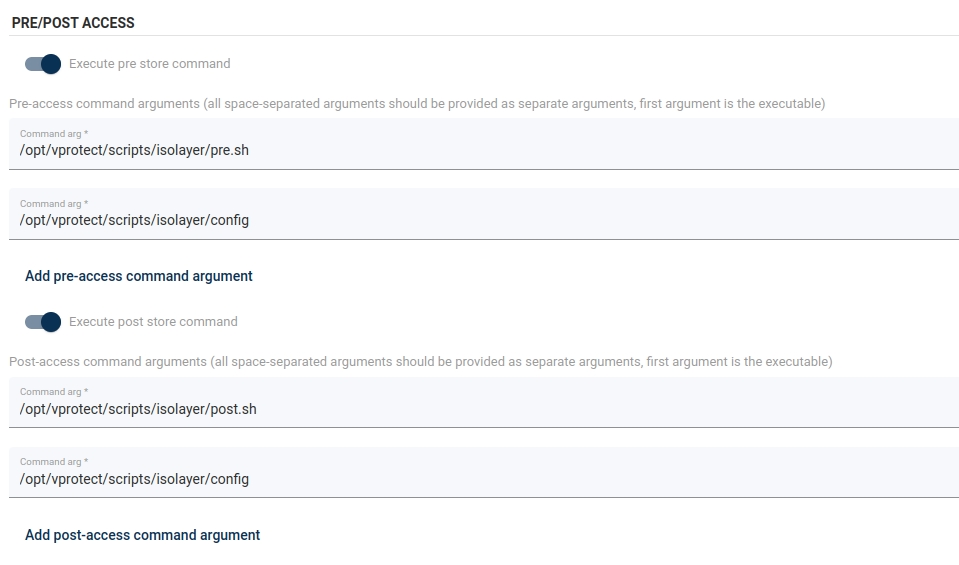
Check if pre and post scripts are active, and correct paths are provided like in example:

Click Save button
Now you can use this isoLayer connection to store your backup.
Last updated