Installing GuardMode Agent on Windows
Downloading and launching GuardMode Agent installer
Go to the Catalogic MySupport website. Select the latest version of GuardMode Agent and click the installer download link.
![[image expected here]](/assets/images/mysupport-installer_download-a885e93f9da33fbe4d0d3c5190c9b3b8.png)
Once the download is completed, launch the installer. The Catalogic GuardMode Agent Setup Wizard will initiate. Go through the Wizard clicking Next and making selections as required.
Selecting installation directory
You can select a custom installation path by clicking on the folder icon next to the default installation path or continue with the default path.
\
![[image expected here]](/assets/images/installation_wizard-installation_directory-f3b76cc55c0c5e8ce713e5e0a60e5e4a.png)
Next, you will be prompted to create a password to access GuardMode Agent via its REST API.
To learn more about GuardMode Agent’s REST API, see REST API documentation.
![[image expected here]](/assets/images/installation_wizard-additional_configuration_1-72031bd4a68ee987a3adba5a5ab8ef88.png)
You can also configure GuardMode Agent REST API authentication using CLI in the project’s root directory:
.\Catalogic.GuardMode.Agent config update basic-authentication --username {username} --password {password}
Setting up notifications
The Setup DPX notifications checkbox (checked by default) guides you through the following configurations:
- Setting up DPX Notification Provider to send events and logs to the DPX panel
- Adding Catalogic GuardMode Agent to DPX Master Server (registering it as a Node, which allows you to configure the Agent through DPX web interface)
The Setup Syslog notifications option (unchecked by default) guides you through the following configurations:
- Setting up GuardMode Agent to send notifications to the Syslog server
- Setting up communication using TLS
DPX configuration panel (optional)
This step will be skipped if you unchecked the Setup DPX notification box.
To configure your GuardMode Agent with DPX, you need to provide the following information:
- Hostname is the DPX Master Server hostname or IP address
- Username is the DPX web interface username (by default, this is sysadmin)
- Password is DPX web interface password
- Disable TLS certificate validation: Tick the checkbox to disable the DPX Master Server’s TLS certificate validation. This may be required if a certificate error is thrown while configuring DPX notifications
![[image expected here]](/assets/images/installation_wizard-dpx_configuration-108928570ca569d7e04317d5e35afa82.png)
When configuring notification providers or DPX authentication, you can specify a full hostname with the protocol (e.g. http://dpxserver.com) instead of just the hostname. If no protocol is provided, the default HTTP will be used.
You can enable or disable DPX SSL certificate validation using GuardMode CLI. For details, see: .\Catalogic.GuardMode.Agent.exe config update notification-provider dpx --help
You can also configure GuardMode Agent with DPX using CLI in the project’s root directory:
.\Catalogic.GuardMode.Agent config add notification-provider dpx --hostname {dpx_hostname} --username {dpx_username} --password {dpx_password}
Make sure GuardMode Agent and the DPX Master Server are in the same network.
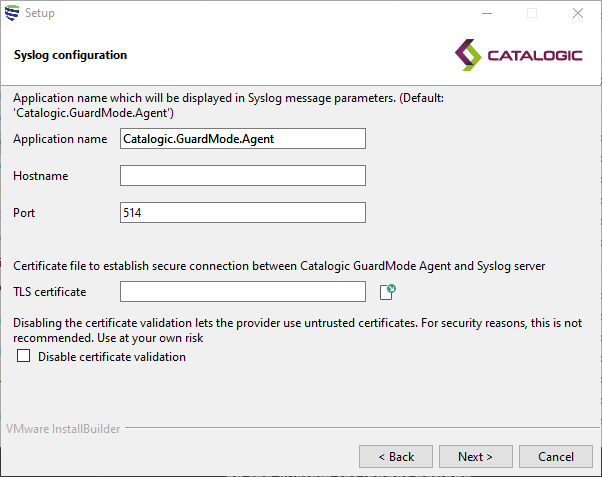
Syslog configuration panel (optional)
To configure GuardMode Agent with Syslog, tick the Setup Syslog notifications checkbox during the Additional configuration step.
Starting with GuardMode 2024.3, Syslog notifications follow the CEF (Common Event Format) standard.
To configure your GuardMode Agent with Syslog, you need to provide the following information:
- Application Name is the name that will be displayed in Syslog message parameters
- Hostname is the hostname or IP address of the Syslog server
- You only need to modify the Port (514 by default) value if you want to use the TLS protocol to send your GuardMode Agent notifications.
To use TLS with GuardMode Agent, you will need a TLS certificate. You also need use to change the value of Port to 6514. In the TLS certificate field, you need to provide a path to the certificate. If your certificate is untrusted, you can check the Disable certificate validation checkbox.
You can also configure GuardMode Agent with Syslog using CLI in the project's root directory:
.\Catalogic.GuardMode.Agent config add notification-provider syslog --hostname "{hostname}" --port "{port}" --validate-tls-certificate "{validate_certificate}" --tls-enabled "{use_tls}" --tls-certificate-path "{certificate_path}" --application-name "{app_name}"
Make sure GuardMode Agent and the DPX Master Server are in the same network.
Finishing installation
Now the installation wizard will start the deployment of GuardMode Agent to your machine.
Once the installation is complete, you can make sure the GuardMode Agent is running by opening the Services tab of Windows Task Manager and finding a service named CatalogicGuardModeAgent with the status Running.
![[image expected here]](data:image/png;base64,iVBORw0KGgoAAAANSUhEUgAAA1AAAAAVCAYAAABIZg9zAAAAAXNSR0IArs4c6QAAAARnQU1BAACxjwv8YQUAAAAJcEhZcwAAFiUAABYlAUlSJPAAAAkJSURBVHhe7Z1bVxVHFsf5RD75lI/Bu69+Ad+yMjdnMmtWxokEY8xKlslgInIx3DIoEVGBcDggSGDUhEtQMETlaEQhRnD0P13VF6q7q6+nsZvOv9b6Lbrr1rWreu/au87x2LCxsQEmprKk2tZr62p/p7LIwVT89OvO698tTExM8RP3pWImrks+SQZQ0w9ASCkYuvNam7/fKIschBBCygH3pWLCdcmHyABqYu2lc32yZxL/Hrolr6s/vcT1n//nlBFSBBhAEUIIIdnDfamYcF3yITSAmroPtI4uoLO6gmuLz9AxsYzOG6von13H8fYRnBtZ0LYjJC8YQBFCCCHZw32pmHBd8iHyE6jB79cxufIE87XfsPR4B/NPtzHzYANfjtxG+9iytg0hecEAihBCCMke7kvFhOuSD9oAqrKyjbbKIq4sPsbcxjZ+/OUFui+N4JO+Cj7qreDS3CqmH22irbqM00O38K/2UV8fhOQBAyhCCCEke7gvFROuSz5oA6jxeztouXoTM7UtLG6+wPH2Afzp2Cl0VVfQcnkeTZ3DGJ6/j+8eb+KzoTn848yArw83izhysAENDRYHm9CjrZeUC2hseAtHqrqymFSbcCBuH7LuXsihQ5VNXBvPO3TBU8ek5+hbxnjSzEOy+Ws+FDyGohDXkMg5865f62FjHg+jWc0LyZfzId+FOt9BDfHkoF4lh3pFCCFpCN+XLHuq0Niqq5cRSfaYksMAKh8Cv8J37e4zzD77DQNzd/Bu02lMrO3+YMSV+WfonlrG4J0nODf5I6buhyye5Ry5FMnIOxKqWHEdkGSOSl1olLX5kMbZzgxVNvP6wEGdrLbRSjMPCeZPyH/wMBq1Y8iS+tY0niGx5sxx1K1AxFjPRlegFJRvOr0Hji4691kTKQf1KiWqbOY19YoQQqKJDqAUGxN0IEkyhwFUPmgDqLZvF4zgqIbrtS182tGPb2499tX56vpdDD/YRPet+3jv/DCOdwz76tgOaPJTiLib/ZtyCtLKUQ+qbOZ14yHD2fM67cJISQc/zTzEnz9xGi+ebf/V1cmG+tY0jiERMjQeFY6r95MO8WydwffmG/d7+ilJlBzUq/SospnX1CtCCIkmUQBFm/PGYACVD9oAqnvqDgbv/oLpjRc40zuI/pk1f53pFYzVnqP79gP8s3MMJ7qrvjrm6XL4CcTu16DESb/4GotQOm+erp5o71FQ61Teruc9nbfLDhjO8247r5JbnzqofUTKEW44wsYunDfnlCZyjOKvOg4xVjtfeX6qefC20z3HquMNHhL3aY33qDihstsJ51Hk23UNUnytKdKQiPGIfnVyyOfr1tmT7zjX1jj3IJgKlUPOqW6cu1CvqFdmu2z0ihBCEgVQYp90bJqnzHUfZLdilkX2YRBmS0sAA6h8CPwK39Wlp5gyAqiRlRpOt/di8udXTtngD0/QPv49rq7v4OzkPfTf8AdYEp1TEIhGGbQveFA9ca04NVJh9GXitHf3qzlqH6aT51I8uy9FDrO9UEZdH7p7Xb45JrcxiB6jcBpdMspx+futbx4MDOPnjM0lv+L0yfs0fZptHEdOGFqvE+j0n4xwQxLhsMpnqw5uQL4c7+4YxZr43pk6iQygqFcKar45JuqVmZ+VXhFCSHQAZQYpEtdBjdf+qPdRdiuOTYvuQ29LywEDqHzQBlAT917i1MUbGFp8iKmtV/h2uYbOb0bReXkMvbNr+OjCFM4aFc//dx1N3eN4++M+2W7g5iN3X9LJUBxPHfJFtxTOpQyeFzyqnuZZjlPkclQEXsUL7kOizQ/ow1dmEEfGJGO06u06fZ7yNPMg29ljtLCMkTA4qvMrDZBtqFL1qcrmaeMrS0aYIXHJ4Ru3QDxb97568sV62vLr7jMgMoDSjlOBemXWSTJGqx71ihBC/EQHUKqNUu1lEtuUpiykXpgtdfL2Nwyg8kEbQFVWt3Hy62m0ji/h8uo6KpuvcPXRDvrXttG1/Bxfzm3ixOhzfHhhFu992oH+mSWc7K3g3ZZBdE2sKH2ZJ8+mM6LBpWTqCaznBY9Tz6ewGTp6WoUL6MNblkTGOGO0+2hV6wc9zyS+oxcku8dZk1h1U/dpy+O995YlI8yQaOXwjT1ovEp+3gEU9SqZjHHGSL0ihJBQYgdQxr37gCiJbUpTFlIvzJY6efsbBlD5EPgVPsHETy/lp01fjM7jxMWbaJl8ik+Ga/hLyxD+fr6KPxw7jerCKj7uHsX5ym00fTXm78c6JXY5e8YLLX8tTJTZL7Z0CgKUIVY9ca08x+VkuMvkSa+2D9MxVU+Fbcw2qtPib+c8W8pslcWVMfYYDaw51Rsndz/J5kEjuzp+B1XeFH3KfEUe1723LBmxDYmYF59c4tlBjmnMtc+ISDmsd8D1XEMm6pXa3r6PM0YDa06pV4QQ4idJAOW+D7HliexWUFlUvSBbWg4YQOVDaAA1dvcF3j7Vh+aeCfznu4f4Y8sg/vx5HzrGlvHOh+fQd/0HvH/W/D+g2kdu4kTvOI61aX6NTzobyimr4ziYSmXmuX/KV5zuynx5sh9Uz6M0rud4FMRyjgTh/9jdVDa7rqPwnj7MfhQHRi1z/XpXzLF7+ggfo+gzyOk0SDUP3nYGxtyLdQh0fO1PXRL2qZ/z3Xv32tt14vFmAigDVa4U44wilhzeuaVeGfne57r7oF7Zde06hBASj2QBlGXP7H0p0JaH2a24ZWH1DMJsaQlgAJUPoQGUYGT5V+f/gPpbyyU0d1Xk9cXZh+i6sYyzV2ZwcW4NX8+u4v2Oa662hUU6HzpHmdRNznNbFkOyL+WgXu0dnFtCSM6UYn8toS1lAJUPkQFUED1T9/BB5zA6JhfQPr6AD7qG8dfPB9A2uqStXyTkSazv0weSBXnPLQOo/KBe7R2cW0JI3pRhfy2jLWUAlQ+pAyjBF0O35d93rF/hO2PdFw/l6z4SnuRmR7HmlgHUm4R6tXdwbgkhxWJ/7q/lt6UMoPKhrgCKkKLBAIoQQgjJHu5LxYTrkg8MoEipYABFCCGEZA/3pWLCdckHGUAxMZUl1bZeW1f7O5VFDiYmJiamciTuS8VMXJc8EvB/o10cGkjGB/gAAAAASUVORK5CYII=)
If you want to alter audit rules after installation, see Altering Audit Rules.
If you selected the Setup DPX notifications checkbox and specified valid credentials in the DPX configuration step, a Data Security node will be added to your DPX Master Server.
![[image expected here]](/assets/images/dpx-gm_node_added-8ba3e10a8196e0395695d8fc850c3949.png)